root

joined 1 year ago
MODERATOR OF
 

Running Commands in Parallel in Linux

In Linux, you can execute multiple commands simultaneously by running them in parallel. This can help improve the overall execution time and efficiency of your tasks. In this tutorial, we will explore different methods to run commands in parallel in a Linux environment.

Method 1: Using & (ampersand) symbol

The simplest way to run commands in parallel is by appending the & symbol at the end of each command. Here's how you can do it:

command_1 & command_2 & command_3 &

This syntax allows each command to run in the background, enabling parallel execution. The shell will immediately return the command prompt, and the commands will execute concurrently.

For example, to compress three different files in parallel using the gzip command:

gzip file1.txt & gzip file2.txt & gzip file3.txt &

Method 2: Using xargs with -P option

The xargs command is useful for building and executing commands from standard input. By utilizing its -P option, you can specify the maximum number of commands to run in parallel. Here's an example:

echo -e "command_1\ncommand_2\ncommand_3" | xargs -P 3 -I {} sh -c "{}" &

In this example, we use the echo command to generate a list of commands separated by newline characters. This list is then piped (|) to xargs, which executes each command in parallel. The -P 3 option indicates that a maximum of three commands should run concurrently. Adjust the number according to your requirements.

For instance, to run three different wget commands in parallel to download files:

echo -e "wget http://example.com/file1.txt\nwget http://example.com/file2.txt\nwget http://example.com/file3.txt" | xargs -P 3 -I {} sh -c "{}" &

Method 3: Using GNU Parallel

GNU Parallel is a powerful tool specifically designed to run jobs in parallel. It provides extensive features and flexibility. To use GNU Parallel, follow these steps:

  1. Install GNU Parallel if it's not already installed. You can typically find it in your Linux distribution's package manager.

  2. Create a file (e.g., commands.txt) and add one command per line:

    command_1
    command_2
    command_3
    
  3. Run the following command to execute the commands in parallel:

    parallel -j 3 < commands.txt
    

    The -j 3 option specifies the maximum number of parallel jobs to run. Adjust it according to your needs.

For example, if you have a file called urls.txt containing URLs and you want to download them in parallel using wget:

parallel -j 3 wget {} < urls.txt

GNU Parallel also offers numerous advanced options for complex parallel job management. Refer to its documentation for further information.

Conclusion

Running commands in parallel can significantly speed up your tasks by utilizing the available resources efficiently. In this tutorial, you've learned three methods for running commands in parallel in Linux:

  1. Using the & symbol to run commands in the background.
  2. Utilizing xargs with the -P option to define the maximum parallelism.
  3. Using GNU Parallel for advanced parallel job management.

Choose the method that best suits your requirements and optimize your workflow by executing commands concurrently.


Chapter 15, Verse 19

यो मामेवमसम्मूढो जानाति पुरुषोत्तमम् |

स सर्वविद्भजति मां सर्वभावेन भारत ॥19

Transliteration

*yo mām evam asammūḍho jānāti puruṣhottamam

sa sarva-vid bhajati māṁ sarva-bhāvena bhārata*

Word Meanings

yaḥ—who; mām—me; evam—thus; asammūḍhaḥ—without a doubt; jānāti—know; puruṣha-uttamam—the Supreme Divine Personality; saḥ—they; sarva-vit—those with complete knowledge; bhajati—worship; mām—me; sarva-bhāvena—with one’s whole being; bhārata—Arjun, the son of Bharat

Translation

O scion of the Bharata dynasty, he who, being free from delusion, knows Me the supreme Person thus, he is all-knowing and adores Me with his whole being.

6
submitted 1 year ago* (last edited 1 year ago) by [email protected] to c/[email protected]
 

Authors: Jonathan Evans and Neha Sahgal

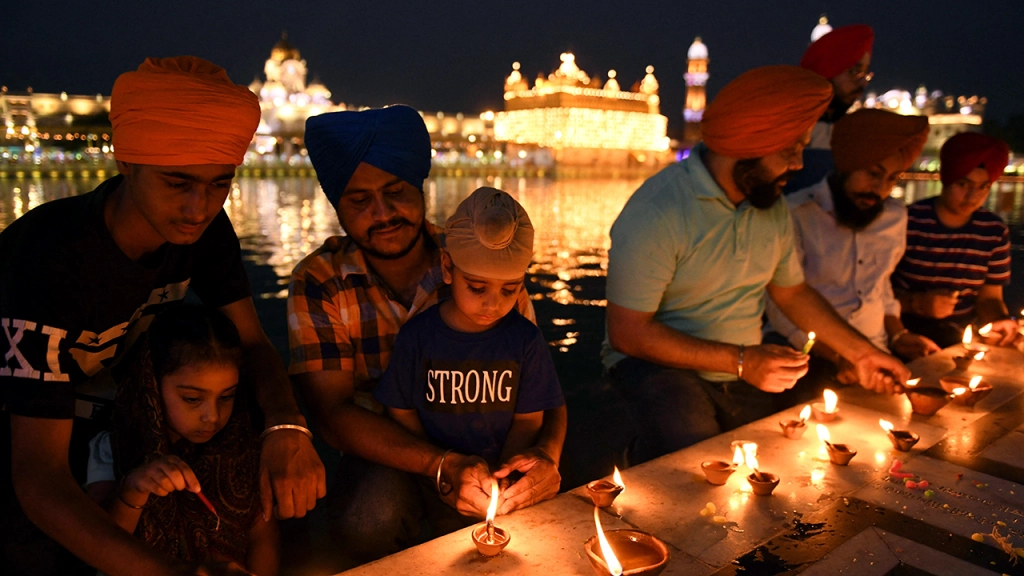
Sikh devotees light candles at the Golden Temple in Amritsar, India, on June 25, 2021. (Narinder Nanu/AFP via Getty Images)

India’s massive population is diverse as well as devout. Not only do most of the world’s Hindus, Jains and Sikhs live in India, but it also is home to one of the world’s largest Muslim populations and to millions of Christians and Buddhists.

A new Pew Research Center report, based on a face-to-face survey of 29,999 Indian adults fielded between late 2019 and early 2020 – before the COVID-19 pandemic – takes a closer look at religious identity, nationalism and tolerance in Indian society. The survey was conducted by local interviewers in 17 languages and covered nearly all of India’s states and union territories. Here are key findings from the report.

How we did this

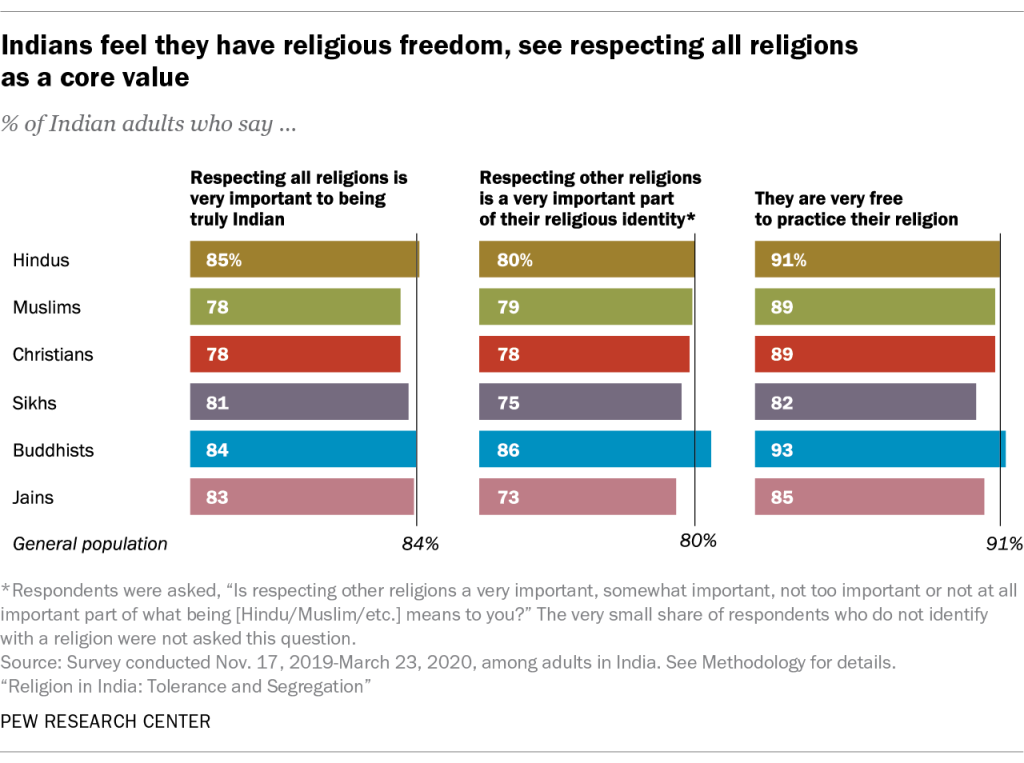
1. Indians value religious tolerance, though they also live religiously segregated lives.

Across the country, most people (84%) say that to be “truly Indian,” it is very important to respect all religions. Indians also are united in the view that respecting other religions is a very important part of what it means to be a member of their own religious community (80%). People in all six major religious groups overwhelmingly say they are very free to practice their faiths, and most say that people of other faiths also are very free to practice their own religion.

But Indians’ commitment to tolerance is accompanied by a strong preference for keeping religious communities segregated. For example, Indians generally say they do not have much in common with members of other religious groups, and large majorities in the six major groups say their close friends come mainly or entirely from their own religious community. That’s true not only for 86% of India’s large Hindu population, but also for smaller groups such as Sikhs (80%) and Jains (72%).

Moreover, roughly two-thirds of Hindus say it is very important to stop Hindu women (67%) or Hindu men (65%) from marrying into other religious communities. Even larger shares of Muslims oppose interreligious marriage: 80% say it is very important to stop Muslim women from marrying outside their religion, and 76% say it is very important to stop Muslim men from doing so.

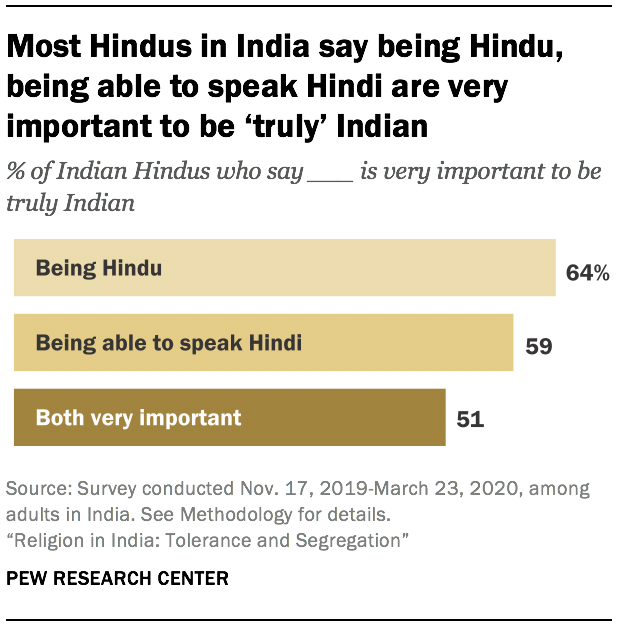
2. For many Hindus, national identity, religion and language are closely connected.

Nearly two-thirds of Hindus (64%) say it is very important to be Hindu to be truly Indian. Among Hindus who say it is very important to be Hindu to be truly Indian, 80% also say it is very important to speak Hindi to be truly Indian. Most Hindus in India say being Hindu, being able to speak Hindi are very important to be ‘truly’ Indian

Hindus who strongly link Hindu and Indian identities express a keen desire for religious segregation. For instance, 76% of Hindus who say being Hindu is very important to being truly Indian feel it is very important to stop Hindu women from marrying into another religion. By comparison, 52% of Hindus who place less importance on Hinduism’s role in Indian identity hold this view about religious intermarriage.

Moreover, Hindus in the Northern (69%) and Central (83%) parts of the country are much more likely than those in the South (42%) to strongly link Hindu identity with national identity. Together, the Northern and Central regions cover the country’s “Hindi belt,” where Hindi, one of dozens of languages spoken in India, is most prevalent. The vast majority of Hindus in these regions strongly link Indian identity with being able to speak Hindi.

3. Among Hindus, views of national identity go hand-in-hand with politics.

Support for the ruling Bharatiya Janata Party (BJP) is greater among Hindus who closely associate their religious identity and the Hindi language with being truly Indian. In the 2019 national elections, 60% of Hindu voters who think it is very important to be Hindu and to speak Hindi to be truly Indian cast their vote for the BJP, compared with 33% among Hindu voters who feel less strongly about both these aspects of national identity. These views also map onto regional support for the BJP, which tends to be much higher in the Northern and Central parts of the country than in the South.

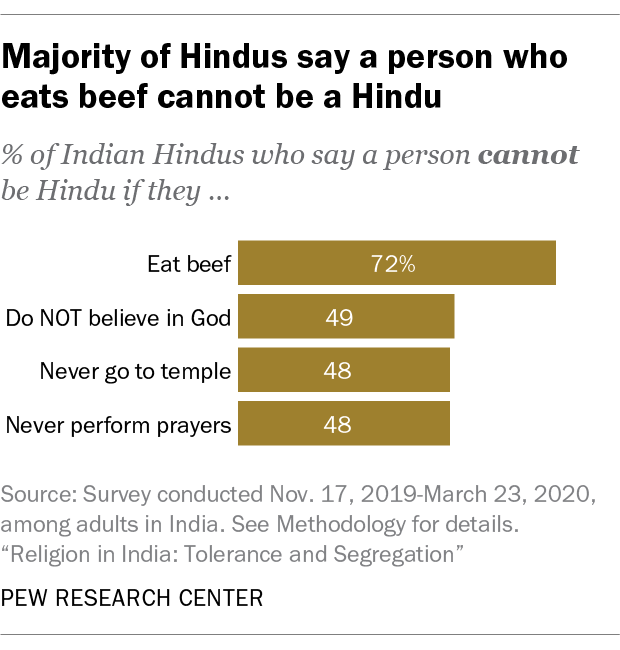
4. Dietary laws are central to Indians’ religious identity.

Hindus traditionally view cows as sacred, and laws on cow slaughter have recently been a flashpoint in India. Nearly three-quarters of Hindus (72%) in India say a person cannot be Hindu if they eat beef. That is larger than the shares of Hindus who say a person cannot be Hindu if they do not believe in God (49%) or never go to a temple (48%).

Similarly, three-quarters of Indian Muslims (77%) say that a person cannot be Muslim if they eat pork, which is greater than the share who say a person cannot be Muslim if they do not believe in God (60%) or never attend mosque (61%).

5. Muslims favor having access to their own religious courts.

Since 1937, India’s Muslims have had the option of resolving family and inheritance-related cases in officially recognized Islamic courts, known as dar-ul-qaza. These courts are overseen by religious magistrates known as qazi and operate under Shariah principles, although their decisions are not legally binding.

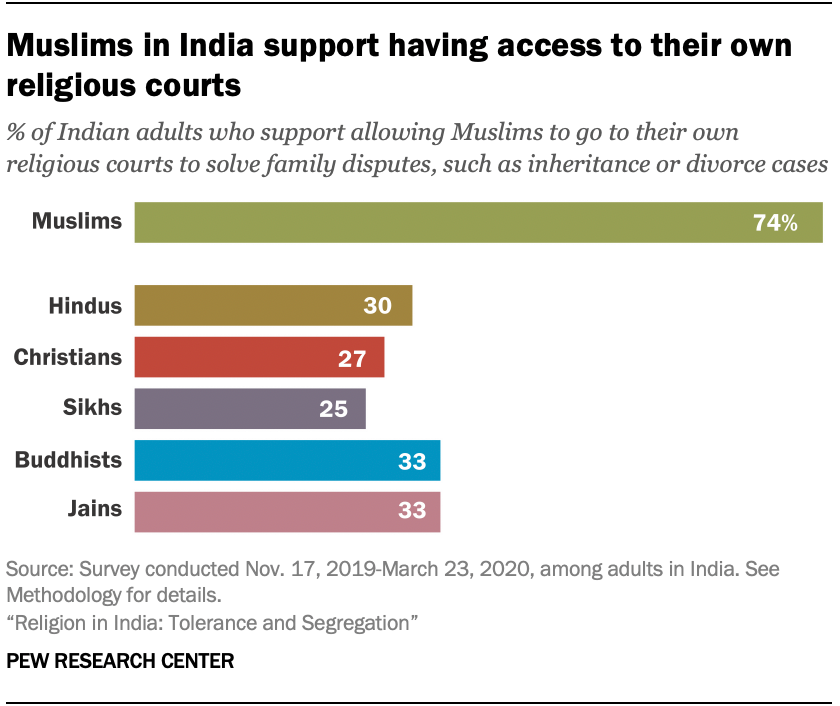
Whether or not Muslims should be allowed to go to their own religious courts remains a hotly debated topic. The survey finds that three-quarters of Muslims (74%) support having access to the existing system of Islamic courts, but followers of other religions are far less likely to support Muslim access to this separate court system.

6. Muslims are more likely than Hindus to say the 1947 partition establishing the separate states of India and Pakistan harmed Hindu-Muslim relations.

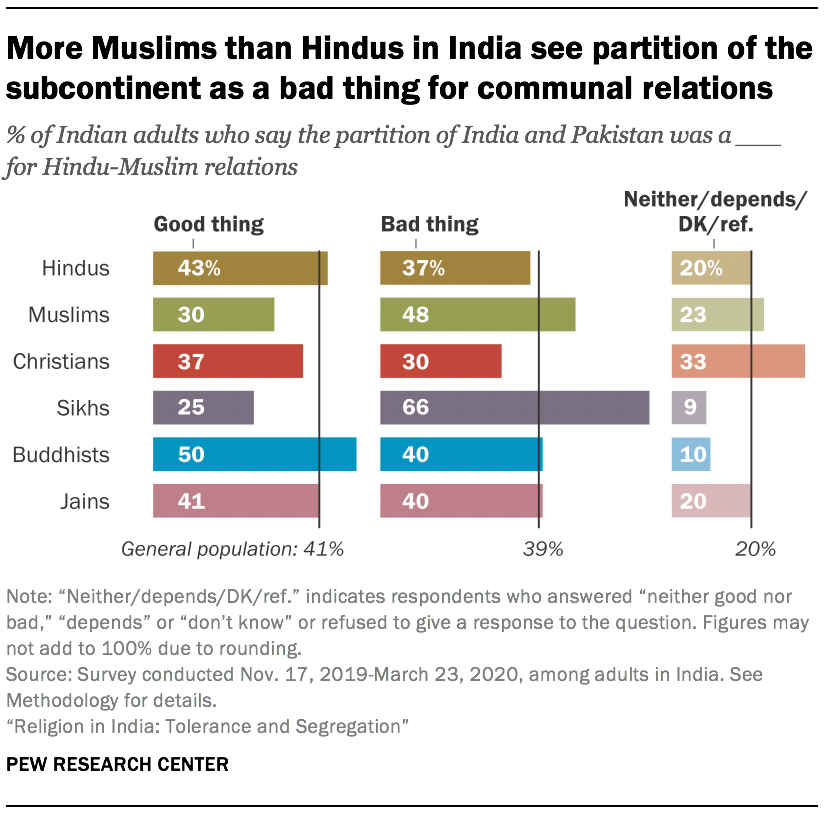
More than seven decades after the Indian subcontinent was divided into Hindu-majority India and Muslim-majority Pakistan at the end of British colonial rule, the predominant view among Indian Muslims is that the partition of the subcontinent was a bad thing for Hindu-Muslim relations (48%). Only three-in-ten Muslims say it was a good thing.

Hindus, however, lean in the opposite direction: 43% of Hindus say Partition was beneficial for Hindu-Muslim relations, while 37% say it was harmful. Sikhs, whose historical homeland of Punjab was split by Partition, are even more likely than Muslims to say the event was bad for Hindu-Muslim relations: Two-thirds of Sikhs (66%) take this position.

7. India’s caste system, an ancient social hierarchy with origins in Hindu writings, continues to fracture society.

Regardless of whether they are Hindu, Muslim, Christian, Sikh, Buddhist or Jain, Indians nearly universally identify with a caste. Members of lower caste groups historically have faced discrimination and unequal economic opportunities, but the survey finds that most people – including most members of lower castes – say there is not a lot of caste discrimination in India. The Indian Constitution prohibits caste-based discrimination, including untouchability, and in recent decades the government has enacted economic advancement policies like reserved seats in universities and government jobs for members of some lower-caste communities.

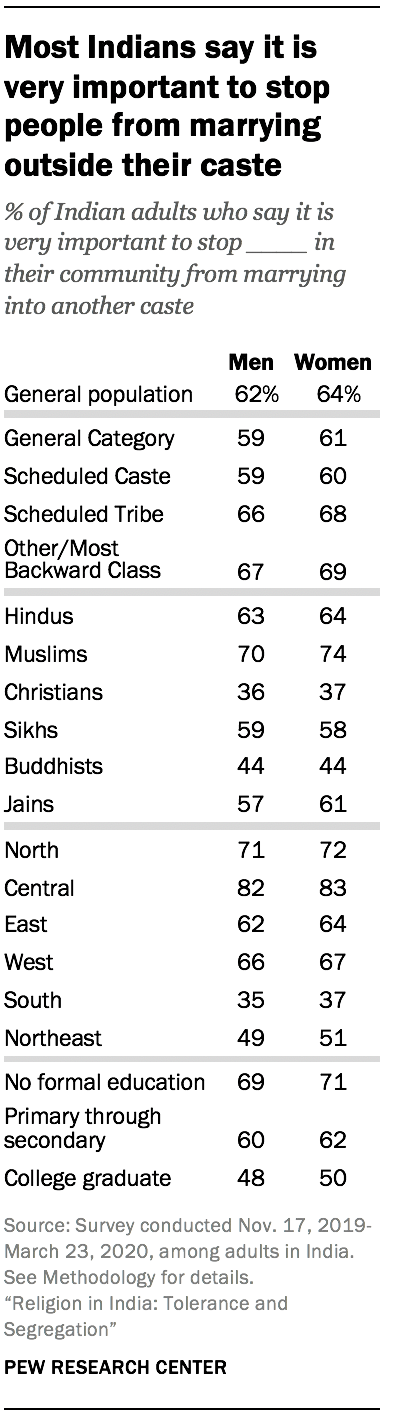
Still, a large majority of Indians overall (70%) say that most or all of their close friends share their caste. Much as they object to interreligious marriages, a large share of Indians (64%) say it is very important to stop women in their community from marrying into other castes, and about the same share (62%) say it is very important to stop men in their community from marrying into other castes. These figures vary only modestly across different castes.

8. Religious conversion is rare in India; to the extent that it is occurring, Hindus gain as many people as they lose.

Conversion of people belonging to lower castes away from Hinduism to other religions, especially Christianity, has been contentious in India, and some states have laws against proselytism. This survey, though, finds that religious switching has a minimal impact on the size of religious groups. Across India, 98% of survey respondents give the same answer when asked to identify their current religion and, separately, their childhood religion.

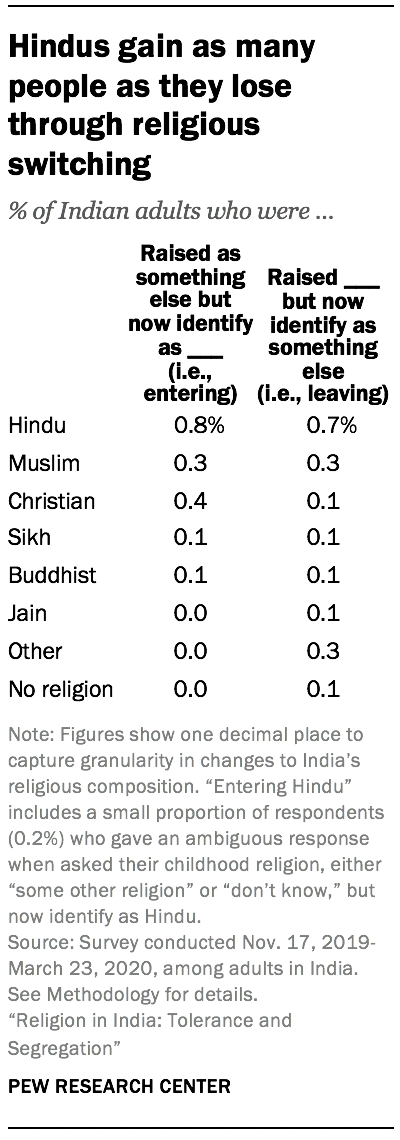
An overall pattern of stability in the share of religious groups is accompanied by little net change from movement into, or out of, most religious groups. Among Hindus, for instance, any conversion out of the group is matched by conversion into the group: 0.7% of respondents say they were raised Hindu but now identify as something else, and roughly the same share (0.8%) say they were not raised Hindu but now identify as Hindu. For Christians, however, there are some net gains from conversion: 0.4% of survey respondents are former Hindus who now identify as Christian, while 0.1% were raised Christian but have since left Christianity.


cross-posted from: https://lemmy.run/post/13744

Introduction to Upanishads

The Upanishads are a collection of ancient philosophical and spiritual texts that form the core teachings of Hinduism. These texts are considered the culmination of Vedic knowledge and are revered for their profound insights into the nature of existence, consciousness, and the ultimate reality. The word "Upanishad" is derived from the Sanskrit root words "upa" (near), "ni" (down), and "shad" (to sit), implying the act of sitting close to a spiritual teacher to receive esoteric knowledge.

Significance of the Upanishads

The Upanishads occupy a central position in Hindu philosophy and have influenced various schools of thought, including Vedanta, Yoga, and Buddhism. These texts delve into profound metaphysical and spiritual concepts, exploring the nature of the self (Atman), the ultimate reality (Brahman), and the interconnectedness of all things. They offer profound meditations on the nature of existence, the purpose of life, and the path to spiritual liberation (Moksha).

Profound Insights and Teachings

The Upanishads provide deep insights into the nature of reality, consciousness, and the human experience. They emphasize the unity of all existence and the interconnectedness of all beings. The texts offer profound teachings on meditation, self-realization, and the nature of the divine. They guide individuals on the quest for self-discovery and spiritual awakening, inviting them to transcend the limitations of the material world and realize their true nature.

Eternal Wisdom and Timeless Relevance

Despite their ancient origins, the wisdom found in the Upanishads remains timeless and relevant. The concepts and teachings presented in these texts continue to inspire seekers and spiritual aspirants across the globe. The Upanishads provide a comprehensive understanding of the human condition and offer guidance on leading a purposeful and fulfilling life. They encourage individuals to explore the depths of their own consciousness and seek answers to life's fundamental questions.

Conclusion

The Upanishads stand as a testament to the profound wisdom and spiritual insights of the ancient sages. Their teachings continue to resonate with individuals seeking to understand the nature of existence, consciousness, and the ultimate reality. By delving into the Upanishads, one embarks on a transformative journey of self-discovery and spiritual growth, uncovering the eternal truths that lie within.


cross-posted from: https://lemmy.run/post/10868

Beginner's Guide to grep

grep is a powerful command-line tool used for searching and filtering text in files. It allows you to find specific patterns or strings within files, making it an invaluable tool for developers, sysadmins, and anyone working with text data. In this guide, we will cover the basics of using grep and provide you with some useful examples to get started.

Installation

grep is a standard utility on most Unix-like systems, including Linux and macOS. If you're using a Windows operating system, you can install it by using the Windows Subsystem for Linux (WSL) or through tools like Git Bash, Cygwin, or MinGW.

Basic Usage

The basic syntax of grep is as follows:

grep [options] pattern [file(s)]
  • options: Optional flags that modify the behavior of grep.
  • pattern: The pattern or regular expression to search for.
  • file(s): Optional file(s) to search within. If not provided, grep will read from standard input.

Examples

Searching in a Single File

To search for a specific pattern in a single file, use the following command:

grep "pattern" file.txt

Replace "pattern" with the text you want to search for and file.txt with the name of the file you want to search in.

Searching in Multiple Files

If you want to search for a pattern across multiple files, use the following command:

grep "pattern" file1.txt file2.txt file3.txt

You can specify as many files as you want, separating them with spaces.

Ignoring Case

By default, grep is case-sensitive. To perform a case-insensitive search, use the -i option:

grep -i "pattern" file.txt

Displaying Line Numbers

To display line numbers along with the matching lines, use the -n option:

grep -n "pattern" file.txt

This can be helpful when you want to know the line numbers where matches occur.

Searching Recursively

To search for a pattern in all files within a directory and its subdirectories, use the -r option (recursive search):

grep -r "pattern" directory/

Replace directory/ with the path to the directory you want to search in.

Using Regular Expressions

grep supports regular expressions for more advanced pattern matching. Here's an example using a regular expression to search for email addresses:

grep -E "\b[A-Za-z0-9._%+-]+@[A-Za-z0-9.-]+\.[A-Za-z]{2,}\b" file.txt

In this case, the -E option enables extended regular expressions.

Conclusion

grep is a versatile tool that can greatly enhance your text searching and filtering capabilities. With the knowledge you've gained in this beginner's guide, you can start using grep to quickly find and extract the information you need from text files. Experiment with different options and explore more advanced regular expressions to further expand your skills with grep. Happy grepping!


cross-posted from: https://lemmy.run/post/10475

Testing Service Accounts in Kubernetes

Service accounts in Kubernetes are used to provide a secure way for applications and services to authenticate and interact with the Kubernetes API. Testing service accounts ensures their functionality and security. In this guide, we will explore different methods to test service accounts in Kubernetes.

1. Verifying Service Account Existence

To start testing service accounts, you first need to ensure they exist in your Kubernetes cluster. You can use the following command to list all the available service accounts:

kubectl get serviceaccounts

Verify that the service account you want to test is present in the output. If it's missing, you may need to create it using a YAML manifest or the kubectl create serviceaccount command.

2. Checking Service Account Permissions

After confirming the existence of the service account, the next step is to verify its permissions. Service accounts in Kubernetes are associated with roles or cluster roles, which define what resources and actions they can access.

To check the permissions of a service account, you can use the kubectl auth can-i command. For example, to check if a service account can create pods, run:

kubectl auth can-i create pods --as=system:serviceaccount:<namespace>:<service-account>

Replace <namespace> with the desired namespace and <service-account> with the name of the service account.

3. Testing Service Account Authentication

Service accounts authenticate with the Kubernetes API using bearer tokens. To test service account authentication, you can manually retrieve the token associated with the service account and use it to authenticate requests.

To get the token for a service account, run:

kubectl get secret <service-account-token-secret> -o jsonpath="{.data.token}" | base64 --decode

Replace <service-account-token-secret> with the actual name of the secret associated with the service account. This command decodes and outputs the service account token.

You can then use the obtained token to authenticate requests to the Kubernetes API, for example, by including it in the Authorization header using tools like curl or writing a simple program.

4. Testing Service Account RBAC Policies

Role-Based Access Control (RBAC) policies govern the access permissions for service accounts. It's crucial to test these policies to ensure service accounts have the appropriate level of access.

One way to test RBAC policies is by creating a Pod that uses the service account you want to test and attempting to perform actions that the service account should or shouldn't be allowed to do. Observe the behavior and verify if the access is granted or denied as expected.

5. Automated Testing

To streamline the testing process, you can create automated tests using testing frameworks and tools specific to Kubernetes. For example, the Kubernetes Test Framework (KTF) provides a set of libraries and utilities for writing tests for Kubernetes components, including service accounts.

Using such frameworks allows you to write comprehensive test cases to validate service account behavior, permissions, and RBAC policies automatically.

Conclusion

Testing service accounts in Kubernetes ensures their proper functioning and adherence to security policies. By verifying service account existence, checking permissions, testing authentication, and validating RBAC policies, you can confidently use and rely on service accounts in your Kubernetes deployments.

Remember, service accounts are a critical security component, so it's important to regularly test and review their configuration to prevent unauthorized access and potential security breaches.


cross-posted from: https://lemmy.run/post/10206

Creating a Helm Chart for Kubernetes

In this tutorial, we will learn how to create a Helm chart for deploying applications on Kubernetes. Helm is a package manager for Kubernetes that simplifies the deployment and management of applications. By using Helm charts, you can define and version your application deployments as reusable templates.

Prerequisites

Before we begin, make sure you have the following prerequisites installed:

  • Helm: Follow the official Helm documentation for installation instructions.

Step 1: Initialize a Helm Chart

To start creating a Helm chart, open a terminal and navigate to the directory where you want to create your chart. Then, run the following command:

helm create my-chart

This will create a new directory named my-chart with the basic structure of a Helm chart.

Step 2: Customize the Chart

Inside the my-chart directory, you will find several files and directories. The most important ones are:

  • Chart.yaml: This file contains metadata about the chart, such as its name, version, and dependencies.
  • values.yaml: This file defines the default values for the configuration options used in the chart.
  • templates/: This directory contains the template files for deploying Kubernetes resources.

You can customize the chart by modifying these files and adding new ones as needed. For example, you can update the Chart.yaml file with your desired metadata and edit the values.yaml file to set default configuration values.

Step 3: Define Kubernetes Resources

To deploy your application on Kubernetes, you need to define the necessary Kubernetes resources in the templates/ directory. Helm uses the Go template language to generate Kubernetes manifests from these templates.

For example, you can create a deployment.yaml template to define a Kubernetes Deployment:

apiVersion: apps/v1
kind: Deployment
metadata:
  name: {{ .Release.Name }}-deployment
spec:
  replicas: {{ .Values.replicaCount }}
  template:
    metadata:
      labels:
        app: {{ .Release.Name }}
    spec:
      containers:
        - name: {{ .Release.Name }}
          image: {{ .Values.image.repository }}:{{ .Values.image.tag }}
          ports:
            - containerPort: {{ .Values.containerPort }}

This template uses the values defined in values.yaml to customize the Deployment's name, replica count, image, and container port.

Step 4: Package and Install the Chart

Once you have defined your Helm chart and customized the templates, you can package and install it on a Kubernetes cluster. To package the chart, run the following command:

helm package my-chart

This will create a .tgz file containing the packaged chart.

To install the chart on a Kubernetes cluster, use the following command:

helm install my-release my-chart-0.1.0.tgz

Replace my-release with the desired release name and my-chart-0.1.0.tgz with the name of your packaged chart.

Conclusion

Congratulations! You have learned how to create a Helm chart for deploying applications on Kubernetes. By leveraging Helm's package management capabilities, you can simplify the deployment and management of your Kubernetes-based applications.

Feel free to explore the Helm documentation for more advanced features and best practices.

Happy charting!


cross-posted from: https://lemmy.run/post/10475

Testing Service Accounts in Kubernetes

Service accounts in Kubernetes are used to provide a secure way for applications and services to authenticate and interact with the Kubernetes API. Testing service accounts ensures their functionality and security. In this guide, we will explore different methods to test service accounts in Kubernetes.

1. Verifying Service Account Existence

To start testing service accounts, you first need to ensure they exist in your Kubernetes cluster. You can use the following command to list all the available service accounts:

kubectl get serviceaccounts

Verify that the service account you want to test is present in the output. If it's missing, you may need to create it using a YAML manifest or the kubectl create serviceaccount command.

2. Checking Service Account Permissions

After confirming the existence of the service account, the next step is to verify its permissions. Service accounts in Kubernetes are associated with roles or cluster roles, which define what resources and actions they can access.

To check the permissions of a service account, you can use the kubectl auth can-i command. For example, to check if a service account can create pods, run:

kubectl auth can-i create pods --as=system:serviceaccount:<namespace>:<service-account>

Replace <namespace> with the desired namespace and <service-account> with the name of the service account.

3. Testing Service Account Authentication

Service accounts authenticate with the Kubernetes API using bearer tokens. To test service account authentication, you can manually retrieve the token associated with the service account and use it to authenticate requests.

To get the token for a service account, run:

kubectl get secret <service-account-token-secret> -o jsonpath="{.data.token}" | base64 --decode

Replace <service-account-token-secret> with the actual name of the secret associated with the service account. This command decodes and outputs the service account token.

You can then use the obtained token to authenticate requests to the Kubernetes API, for example, by including it in the Authorization header using tools like curl or writing a simple program.

4. Testing Service Account RBAC Policies

Role-Based Access Control (RBAC) policies govern the access permissions for service accounts. It's crucial to test these policies to ensure service accounts have the appropriate level of access.

One way to test RBAC policies is by creating a Pod that uses the service account you want to test and attempting to perform actions that the service account should or shouldn't be allowed to do. Observe the behavior and verify if the access is granted or denied as expected.

5. Automated Testing

To streamline the testing process, you can create automated tests using testing frameworks and tools specific to Kubernetes. For example, the Kubernetes Test Framework (KTF) provides a set of libraries and utilities for writing tests for Kubernetes components, including service accounts.

Using such frameworks allows you to write comprehensive test cases to validate service account behavior, permissions, and RBAC policies automatically.

Conclusion

Testing service accounts in Kubernetes ensures their proper functioning and adherence to security policies. By verifying service account existence, checking permissions, testing authentication, and validating RBAC policies, you can confidently use and rely on service accounts in your Kubernetes deployments.

Remember, service accounts are a critical security component, so it's important to regularly test and review their configuration to prevent unauthorized access and potential security breaches.

[–] [email protected] 1 points 1 year ago

AFAIK, there is not centralize community for that.

[–] [email protected] 1 points 1 year ago (1 children)

This seems like a bug.

Also it could be that lemmy.world is overloaded and is stuck at processing to clear this.

Keep it documented and submit a bug report so that devs can look at it when they can.

[–] [email protected] 0 points 1 year ago (3 children)

Yeap, this is definitely weird.

How about you try to login in private/incognito?

Do you still see it?

If it is, I would advise you to submit a bug report to lemmy devs here.

[–] [email protected] 0 points 1 year ago (5 children)

Hmm, in that case, try to clean your browser cache.

[–] [email protected] 0 points 1 year ago (7 children)

You can go to the notifications and mark it as read by clicking the checkmark. It should disappear after that.

view more: ‹ prev next ›