maltfield

joined 1 year ago
 

In celebration of Bitcoin Black Friday 2023, we're offering a 10% discount on all BusKill cables sold between Nov 18 to Dec 03.

BusKill Bitcoin Black Friday Sale - Our Dead Man Switch Magnetic USB Breakaway cables are 10% off all orders paid with cryptocurrency

What is BusKill?

BusKill is a laptop kill-cord. It's a USB cable with a magnetic breakaway that you attach to your body and connect to your computer.

What is BusKill? (Explainer Video)
Watch the BusKill Explainer Video for more info youtube.com/v/qPwyoD_cQR4

If the connection between you to your computer is severed, then your device will lock, shutdown, or shred its encryption keys -- thus keeping your encrypted data safe from thieves that steal your device.

What is Bitcoin Black Friday?

Black Friday is ~1 month before Christmas, and it's the busiest shopping day in the US. The first "Bitcoin Friday" (launched by Jon Holmquist) was Nov 9th, 2012 (at the time, one bitcoin was ~$11). The following year, the two ideas merged to become Bitcoin Black Friday.

This year, we're joining Bitcoin Black Friday by offering our products at a 10% discount if you pay with cryptocurrency.

Why should I use cryptocurrencies?

We've always accepted cryptocurrencies because:

  1. They're more secure than pre-cryptocurrency payment methods
  2. They're a more egalitarian system than pre-cryptocurrency finance
  3. They're more environmentally friendly than pre-cryptocurrency financial systems
  4. The fees are less than pre-cryptocurrency transactions
  5. They allow for anonymous purchases online
  6. Their transactions are censorship-resistant

Security

Before cryptocurrencies, making an online transaction was horrendously insecure and backwards.
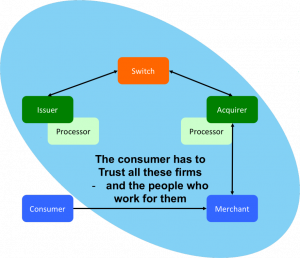
Diagram shows all the third parties that can steal your funds in a pull-based system: Merchant, Acquierer, Payment Processor, Switch, Issuer
"Conceptually, pull-based transactions are really not that different than giving three parties the password to your online banking service and trusting them to log in and take what they need. You have to trust the merchant, their IT supplier; the acquiring bank, their third-party processor; the card network; and your own card issuer---and everybody who works for them and has access to their systems. If a bad guy gets hold of your card details at any point in this process, they could drain your account.
The picture shows the scope of all the entities with access to your critical card information" source

Asymmetric cryptography has been available since the 1970s, but CNP (Card Not Present) transactions to this day still don't use public keys to sign transactions. Rather, you give your private keys (that is, your credit card number, expiry, etc) directly to the merchant and you authorize them to pull money out of your account (trusting that they take the right amount and not to loose those precious credentials).

Bitcoin flipped this around to actually make transactions secure. With bitcoin, you don't give others the keys to take money out of your account. Instead, transactions are push-based. You sign a transaction with your private keys, and those keys are shared with no-one.

Even today, pre-cryptocurrency transactions are abhorrently insecure. In the US or Europe, if someone knows your account number and bank, they can direct debit money out of your account. For the same reason, losses due to credit card theft is enormous. To quote Satoshi Nakamoto's criticism of pre-cryptocurrency transactions, "A certain percentage of fraud is accepted as unavoidable"

In fact, fraudulent transactions in the banking industry are so common that your bank will generally reimburse your account for any malicious transactions that you tell them about within 60-90 days. But if someone drains your account of all your money and you don't notice for 12 months? Too bad. All your money is gone.

Graphic shows a push-based model where a consumer pushes value directly to a merchant
In Bitcoin, transactions are push-based. source

Tokenization and 3DS are merely bandages on a fundamentally backwards, pull-based transaction model. But because bitcoin is push-based, it's magnitudes more secure.

Egalitarian

If you have a bank account, then you probably take a lot of things for granted. Like buying things online (with a credit card). Or getting cash when traveling abroad (from an ATM machine). Or taking out a loan so you can start a business.

Before crypto-currencies, it was very difficult to do these things unless you had a bank account. And in 2008 (the year with the first-ever bitcoin transaction), McKinsey & Company published a report concluding that half of the world's adult population is unbanked.

But with crypto-currencies, anyone with access to the internet and a computer or smart phone can use bitcoin to send and receive money online -- without needing to first obtain a bank account.

Environmentalism

The energy required to facilitate transactions in decentralized, blockchain-based cryptocurrencies like bitcoin is minuscule by comparison. And, most importantly, the amount of energy used to solve the proof-of-work problem does not grow as the number of transactions-per-second grows.

Traditional financial institutions require an enormous amount of overhead to facilitate transactions in their centralized networks. Unlike bitcoin, which was designed specifically to eliminate the unnecessary overhead created by a trusted third party, pre-cryptocurrency transactions required humans to verify transactions. These humans require office buildings. These office buildings require energy to build and maintain. And, most importantly, as the number of transactions-per-second grows on their network, the number of humans and office space also grows.

Bar Graph shows the comparison of energy usage of Bitcoin and various industries
Bitcoin versus other industries

yearly energy use, in TWh source |

This fact is often misunderstood because there's a lot of misinformation on the Internet that makes a few disingenuous modifications to the facts:

  1. They calculate the energy usage of the computers processing transactions only, maliciously omitting calculating the energy usage of the entire industry's infrastructure (eg energy used by office buildings)
  2. They calculate the energy usage per transaction, maliciously omitting the fact that the amount of energy expended by bitcoin miners is automatically adjusted by the proof-of-work algorithm (so energy usage does not increase as the network scales-up)
  3. They offer statistics about "energy usage" without mentioning the energy sources. It matters if the energy source is coal/nuclear/natural-gas or solar/wind/hydroelectric
"...estimates for what percentage of Bitcoin mining uses renewable energy vary widely. In December 2019, one report suggested that 73% of Bitcoin's energy consumption was carbon neutral, largely due to the abundance of hydro power in major mining hubs such as Southwest China and Scandinavia. On the other hand, the CCAF estimated in September 2020 that the figure is closer to 39%. But even if the lower number is correct, that's still almost twice as much [renewable energy sources] as the U.S. grid" Nic Carter Headshot
source: Harvard Business Review Nic Carter

The facts are that the energy usage of bitcoin is magnitudes less than the energy used by pre-cryptocurrency financial intuitions, that energy usage does not increase as the number of transactions processed by the network increases, and that mining bitcoin is often done with renewable energy.

The facts are that the energy usage of bitcoin is magnitudes less than the energy used by pre-cryptocurrency financial intuitions, that energy usage does not increase as the number of transactions processed by the network increases, and that mining bitcoin is often done with renewable energy.

Low Fees

The introduction to the Bitcoin White Paper (2008) clearly states that Bitcoin was created to reduce costs by using a distributed ledger (the blockchain) to eliminate the need for a trusted third party.

"Commerce on the Internet has come to rely almost exclusively on financial institutions serving as trusted third parties to process electronic payments. While the system works well enough for most transactions, it still suffers from the inherent weaknesses of the trust based model.
Completely non-reversible transactions are not really possible, since financial institutions cannot avoid mediating disputes. The cost of mediation increases transaction costs...
These costs and payment uncertainties can be avoided in person by using physical currency, but no mechanism exists to make payments over a communications channel without a trusted party.
What is needed is an electronic payment system based on cryptographic proof instead of trust, allowing any two willing parties to transact directly with each other without the need for a trusted third party. Transactions that are computationally impractical to reverse would protect sellers from fraud, and routine escrow mechanisms could easily be implemented to protect buyers. In this paper, we propose a solution to the double-spending problem using a peer-to-peer distributed timestamp server to generate computational proof of the chronological order of transactions." A hooded figure wearing a guy faux ask sits in lotus pose. Behind them is an illuminated personification of Bitcoin
source: Bitcoin Whitepaper Satoshi Nakamoto

At the time of writing, the average transaction fee for a bitcoin transaction is $0.06. And unlike pre-cryptocurrency transactions, you can increase or decrease the fee that you pay to increase or decrease the time it takes for the transaction to complete (at $0.06, it will get added to the blockchain in ~1 hour).

By comparison, the way to send funds internationally through the Internet via pre-cryptocurrency banks is via an international wire transfer. Fees very per bank, but they typically charge $15-$85 per transaction. And unlike bitcoin, wire transfers won't make move on nights and weekends, so they can take 1-7 days to complete.

Also, with bitcoin, that $0.06 transaction fee only applies when you're sending money. Many banks will also charge a fee for an incoming wire transfer. In bitcoin, there is no transaction fee to receive money.

Anonymity

Though early cryptocurrencies like Bitcoin don't ensure anonymity like newer privacy coins, ZCash and Monero were designed specifically to provide private transactions.

This allows our customers to purchase from us anonymously, which can be extremely important for activists and journalists whose lives are threatened by their adversaries.

Tweet from WikiLeaks that reads "WikiLeaks now accepts anonymous Bitcoin donations on 1HB5XMLmzFVj8ALj6mfBsbifRoD4miY36v"
WikiLeaks started accepting donations in Bitcoin 7 months after PayPal froze their account

We accept both ZCash and Monero. If you'd like us to accept another privacy coin, please contact us :)

Censorship-Resistant

Cryptocurrencies like bitcoin are peer-to-peer and permissionless. Transactions exchanging bitcoins occur directly between two parties. There is no middle-man that has the power to block, freeze, or reverse transactions. Before blockchains were used to maintain a public ledger and enable peer-to-peer transactions, we were dependent on big financial institutions to move money on our behalf through the internet. That antiquated system allowed them to censor transactions, such as donations made to media outlets reporting war crimes and donations to protest movements.

"For me, that is one of the coolest things about bitcoin...
People can potentially use it donate more anonymously to dissident groups and causes in a world where mass government surveillance threatens freedom of expression and certainly harms activists' ability to fundraise for their work, when people are afraid they could be targeted by a government for donating to a worthy cause." Evan Grer portrait
source Evan Greer

After PayPal froze WikiLeaks's donation account in 2010, WikiLeaks started accepting bicoin in 2011. From Occupy Wall Street to Ukraine, defenders of democracy have utilized permissionless cryptocurrencies to accept international donations without the risk of transactions made through financial institutions.

Buy BusKill with crypto

Don't risk loosing your crypto to a thief that steals your laptop. Get your own BusKill Cable at a 10% discount today!

Buy a BusKill Cable
https://buskill.in/buy

You can also buy a BusKill cable with bitcoin, monero, and other altcoins from our BusKill Store's .onion site.

Bitcoin Accepted Here

Monero Accepted Here


Stay safe,
The BusKill Team
https://www.buskill.in/
http://www.buskillvampfih2iucxhit3qp36i2zzql3u6pmkeafvlxs3tlmot5yad.onion


This article describes how to setup keyboard shortcuts in QubesOS so that you can temporarily disarm (pause) the BusKill laptop kill cord.

This allows the user to, for example, go to the bathroom without causing their computer to shutdown or self-destruct.

Arm & Disarm BusKill in QubesOS

This is a guide that builds on part one: A Laptop Kill Cord for QubesOS (1/2). Before reading this, you should already be familiar with how to setup udev rules for BusKill on QubesOS.

  1. A Laptop Kill Cord for QubesOS (1/2)
  2. Disarm BusKill in QubesOS (2/2)

ⓘ Note: This post is adapted from its original article on Tom Hocker's blog.

What is BusKill?

What if someone literally steals your laptop while you're working with classified information inside a Whonix DispVM? They'd also be able to recover data from previous DispVMs--as Disposable VM's rootfs virtual files are not securely shredded after your DispVM is destroyed.

Are you a security researcher, journalist, or intelligence operative that works in QubesOS--exploiting Qubes' brilliant security-through-compartimentalization to keep your data safe? Do you make use of Whonix Disposable VMs for your work? Great! This post is for you.

I'm sure your QubesOS laptop has Full Disk Encryption and you're using a strong passphrase. But what if someone literally steals your laptop while you're working with classified information inside a Whonix DispVM? Not only will they get access to all of your AppVM's private data and the currently-running Whonix DispVM's data, but there's a high chance they'd be able to recover data from previous DispVMs--as Disposable VM's rootfs virtual files (volatile.img) are not securely shredded after your DispVM is destroyed by Qubes!

Let's say you're a journalist, activist, whistleblower, or a human rights worker in an oppressive regime. Or an intelligence operative behind enemy lines doing research or preparing a top-secret document behind a locked door. What do you do to protect your data, sources, or assets when the secret police suddenly batter down your door? How quickly can you actually act to shutdown your laptop and shred your RAM and/or FDE encryption keys?

BusKill Demo
Watch the BusKill Explainer Video for more info youtube.com/v/qPwyoD_cQR4

BusKill utilizes a magnetic trip-wire that tethers your body to your laptop. If you suddenly jump to your feet or fall off your chair (in response to the battering ram crashing through your door) or your laptop is ripped off your table by a group of armed thugs, the data bus' magnetic connection will be severed. This event causes a configurable trigger to execute.

The BusKill trigger can be anything from:

  1. locking your screen or
  2. shutting down the computer or
  3. initiating a self-destruct sequence

While our last post described how to setup such a system in QubesOS with BusKill, this post will describe how to add keyboard shortcuts to arm & disarm the dead man switch (eg so you can go to the bathroom).

Disclaimer

This guide contains experimental files, commands, and software. The information contained in this article may or may not lead to corruption or total permanent deletion of some or all of your data. We've done our best to carefully guide the user so they know the risks of each BusKill trigger, but we cannot be responsible for any data loss that has occurred as a result of following this guide.

The contents of this guide is provided openly and is licensed under the CC-BY-SA license. The software included in this guide is licensed under the GNU GPLv3 license. All content here is consistent with the limitations of liabilities outlined in its respective licenses.

We highly recommend that any experiments with the scripts included in this article are used exclusively on a disposable machine containing no valuable data.

If data loss is a concern for you, then leave now and do not proceed with following this guide. You have been warned.

Release Note

Also be aware that, due to the risks outlined above, BusKill will not be released with this "self-destruct" trigger.

If you purchase a BusKill cable, it will only ship with non-destructive triggers that lock the screen or shutdown the computer. Advanced users can follow guides to add additional destructive triggers, such as the one described in this post, but they should do so at their own risk--taking carefully into consideration all of the warnings outlined above and throughout this article.

Again, if you buy a BusKill cable, the worst that can happen is your computer will abruptly shutdown.

Assumptions

This guide necessarily makes several assumptions outlined below.

sys-usb

In this guide, we assume that your QubesOS install has a USB-Qube named 'sys-usb' for handling USB events on behalf of dom0.

If you decided to combine your USB and networking Qubes at install time, then replace all references in this guide for 'sys-usb' to 'sys-net'.

If you decided to run your 'sys-usb' VM as a DispoableVM at install time, then replace all references in this guide for 'sys-usb' its Disposable TemplateVM (eg 'fedora-36-dvm').

..And if you chose not to isolate your USB devices, then may god help you.

Udev Device Matching

BusKill in Linux uses udev to detect when the USB's cable is severed. The exact udev rule that you use in the files below will depend on the drive you choose to use in your BusKill cable.

In this guide, we identify our BusKill-specific drive with the 'ENV{ID_MODEL}=="Micromax_A74"' udev property. You should replace this property with one that matches your BusKill-specific drive.

To determine how to query your USB drive for device-specific identifiers, see Introducing BusKill: A Kill Cord for your Laptop. Note that the `udevadm monitor --environment --udev` command should be run in the 'sys-usb' Qube.

ⓘ Note: If you'd prefer to buy a BusKill cable than make your own, you can buy one fully assembled here.

QubesOS Version

This guide was written for QubesOS v4.1.

[user@dom0 ~]$ cat /etc/redhat-release Qubes release 4.1.2 (R4.1)
[user@dom0 ~]$

BusKill Files

This section will describe what files should be created and where.

Due to the design of QubesOS, it takes a bit of mental gymnastics to understand what we're doing and why. It's important to keep in mind that, in QubesOS

  1. The keyboard and UI are configured in 'dom0'
  2. USB devices (like the BusKill device) are routed to the 'sys-usb' VM
  3. dom0 has the privilege to execute scripts inside other VMs (eg 'sys-usb')
  4. By design, VMs should *not* be able to send arbitrary commands to be executed in dom0
  5. ...but via the qubes-rpc, we can permit some VMs (eg 'sys-usb') to execute a script in dom0 (though for security reasons, ideally such that no data/input is sent from the less-trusted VM to dom0 -- other than the name of the script)

Due to the constraints listed above:

  1. We'll be configuring the disarm button as keyboard shortcut in dom0
  2. We'll be saving and executing the 'buskill-disarm.sh' script in 'sys-usb' (because these scripts manipulate our udev rules)
  3. The keyboard shortcut in dom0 will actually be executing the above script in 'sys-usb'

sys-usb

If you followed our previous guide to setting-up BusKill in QubesOS, then you should already have a file in 'sys-usb' at '/rw/config/buskill.rules'. You may even have modified it to trigger a LUKS Self-Destruct on removal of your BusKill device.

Because you're now experimenting with a new setup, let's go ahead and wipe out that old file with a new one that just executes a soft-shutdown. You might need some days to get used to the new disarm procedure, and you probably don't want to suddenly loose all your data due to an accidental false-positive!

Execute the following on your 'sys-usb' Qube:

mv /rw/config/buskill.rules /rw/config/buskill.rules.bak.`date "+%Y%m%d_%H%M%S"`
cat << EOF | sudo tee /rw/config/buskill.rules
################################################################################
# File:    sys-usb:/etc/udev/rules.d/buskill.rules -> /rw/config/buskill.rules
# Purpose: Add buskill rules. For more info, see: https://buskill.in/qubes-os/
# Authors: Michael Altfield 
# Created: 2020-01-02
# License: GNU GPLv3
################################################################################
ACTION=="remove", SUBSYSTEM=="usb", ENV{ID_MODEL}=="Micromax_A74", RUN+="/usr/bin/qrexec-client-vm dom0 buskill.softShutdown"
EOF
sudo ln -s /rw/config/buskill.rules /etc/udev/rules.d/
sudo udevadm control --reload

Now, let's add a new udev '.rules' file. This one will always just lock your screen, and it's what will be put in-place when BusKill is "disarmed".

Execute the following on your 'sys-usb' Qube:

cat << EOF | sudo tee /rw/config/buskill.lock.rules
################################################################################
# File:    sys-usb:/etc/udev/rules.d/buskill.rules -> /rw/config/buskill.lock.rules
# Purpose: Just lock the screen. For more info, see: https://buskill.in/qubes-os/
# Authors: Michael Altfield 
# Created: 2023-05-10
# License: GNU GPLv3
################################################################################
ACTION=="remove", SUBSYSTEM=="usb", ENV{ID_MODEL}=="Micromax_A74", RUN+="/usr/bin/qrexec-client-vm dom0 buskill.lock"
EOF

The careful reader will see that we're not actually disarming BusKill in the same sense as our BusKill GUI app. Indeed, what we're actually going to do is swap these two files for 30 seconds.

This way, if BusKill is armed and you remove the cable, your computer shuts-down.

But if you want to disarm, the procedure becomes:

  1. Hit the "Disarm BusKill" keyboard shortcut (see below)
  2. Wait for the toast popup message indicating that BusKill is now disarmed
  3. Remove the cable within 30 seconds
  4. Your screen locks (instead of shutting down)

Personally, I can't think of a QubesOS user that would want to leave their machine unlocked when they go to the bathroom, so I figured this approach would work better than an actual disarm.

Bonus: when you return from your break, just plug-in the BusKill cable in, and it'll already be armed (reducing the risk of user error due to forgetting to arm BusKill).

Now, let's add the actual 'buskill-disarm.sh' script to disarm BusKill:

Execute the following on your 'sys-usb' Qube:

cat << EOF | sudo tee /usr/local/bin/buskill-disarm.sh
#!/bin/bash
 
################################################################################
# File:    sys-usb:/usr/local/bin/buskill-disarm.sh
# Purpose: Temp disarm BusKill. For more info, see: https://buskill.in/qubes-os/
# Authors: Tom 
# Co-Auth: Michael Altfield 
# Created: 2023-05-10
# License: GNU GPLv3
################################################################################
 
# replace the 'shutdown' trigger with the 'lock' trigger
sudo rm /etc/udev/rules.d/buskill.rules
sudo ln -s /rw/config/buskill.lock.rules /etc/udev/rules.d/buskill.rules
sudo udevadm control --reload
 
# let the user know that BusKill is now temporarily disarmed
notify-send -t 21000 "BusKill" "Disarmed for 30 seconds" -i changes-allow
 
# wait 30 seconds
sleep 30
 
# replace the 'lock' trigger with the 'shutdown' trigger
sudo rm /etc/udev/rules.d/buskill.rules
sudo ln -s /rw/config/buskill.rules /etc/udev/rules.d/buskill.rules
sudo udevadm control --reload
notify-send -t 5000 "BusKill" "BusKill is Armed" -i changes-prevent
EOF
sudo chmod +x /usr/local/bin/buskill-disarm.sh

dom0

If you followed our previous guide to setting-up BusKill in QubesOS, then you shouldn't need to add any files to dom0. What you do need to do is setup some keyboard shortcuts.

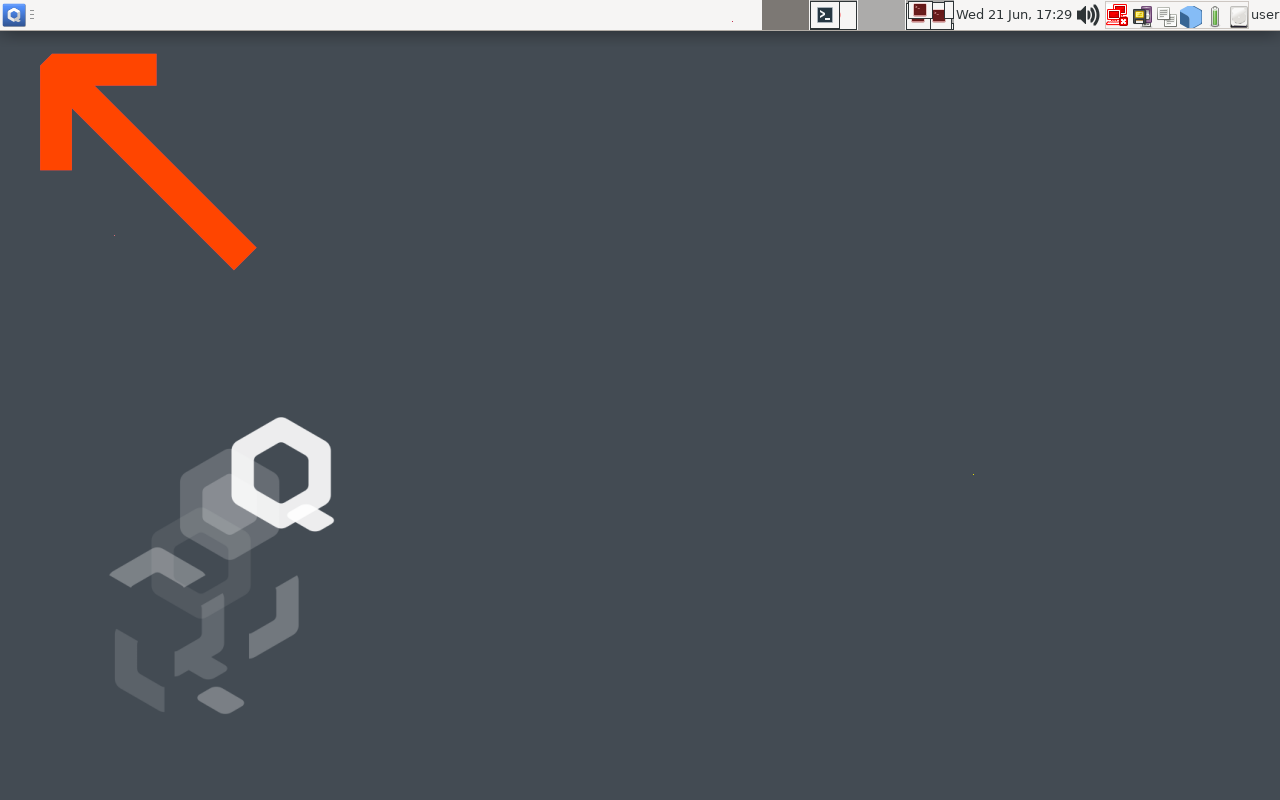
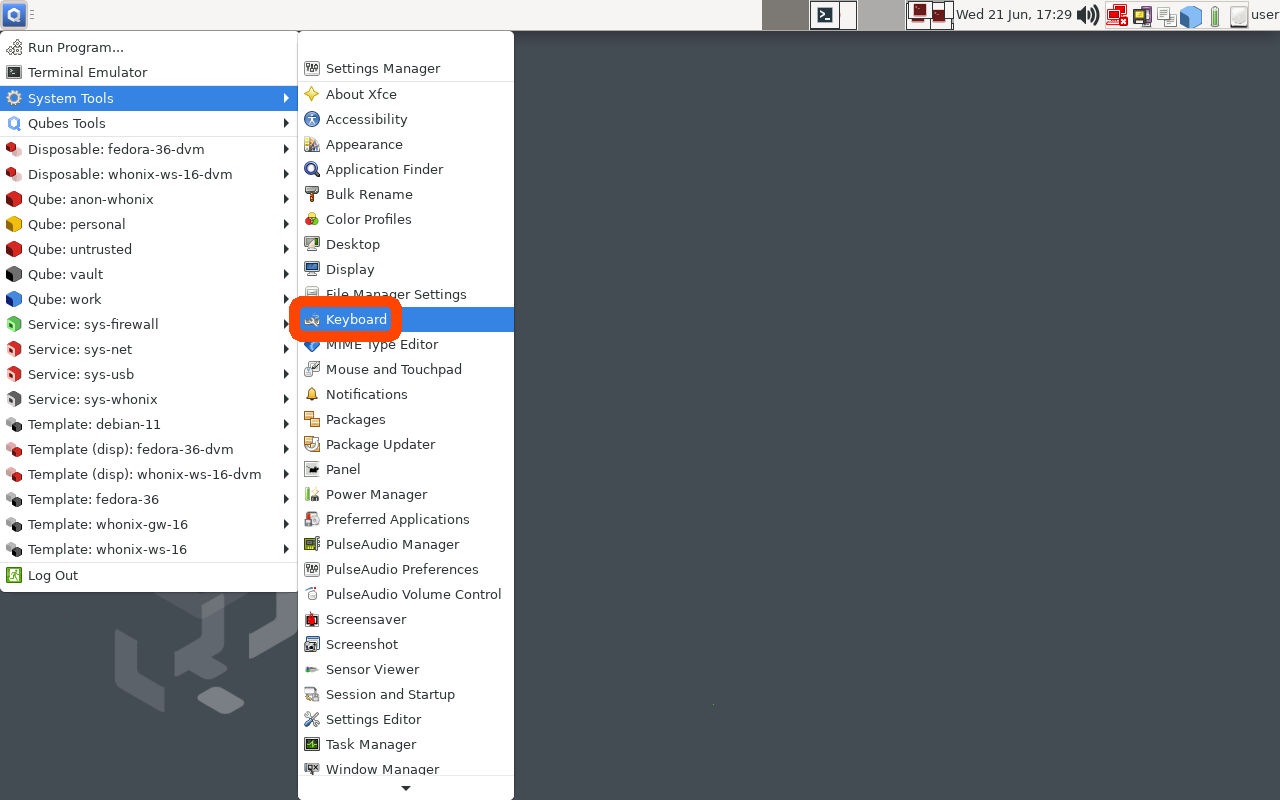
In the QubesOS GUI, click on the big Q "Start Menu" in the top-left of your XFCE panel to open the Applications menu. Navigate to 'System Tools' and click Keyboard

Screenshot of QubesOS with an arrow pointing to the "Q" Application Menu in the very top-left of the screen Screenshot of QubesOS Application Menu with "System Tools -> Keyboard" highlighted
Click the “Q” to open the QubesOS Application Menu Click System Tools -> Keyboard

Click the 'Application Shortcuts' Tab and then click the '+ Add' button on the bottom-left of the window.

Screenshot of QubesOS Keyboard Settings Window that shows the "Application Shortcuts" tab highlighted'alt Screenshot of QubesOS Keyboard Settings Window that shows the "+ Add" button highlightedalt
Click the “Application Shortcuts” tab to add a Keyboard Shortcut in Qubes Click the “Add” Button to add a new Keyboard Shortcut in Qubes

In the 'Command' input field, type the following

qvm-run sys-usb buskill-disarm.sh

The above command will execute a command in 'dom0' that will execute a command in 'sys-usb' that will execute the 'buskill-disarm.sh' script that we created above.

Screenshot of QubesOS Keyboard Settings Window that shows the \"OK\" button highlighted
After typing the command to be executed when the keyboard shortcut is pressed, click the "OK" button

Now click "OK" and, when prompted, type Ctrl+Shift+D (or whatever keyboard shortcut you want to bind to "Disarming BusKill").

Screenshot of QubesOS Keyboard Settings Window that shows the prompt "Press now the keyboard keys you want to use to trigger the command..."alt Screenshot of QubesOS Keyboard Settings Window that shows the selected Shortcut "Shift+Ctrl+D"
Type "Ctrl+Shift+D" or whatever keyboard shortcut you want to trigger BusKill to be disarmed for 30 seconds                                            

You should now have a keyboard shortcut binding for disarming BusKill!

Screenshot of QubesOSKeyboard Settings Window that shows the newly created keyboard shortcutfor \"Shift+Ctrl+D\" at the top of thelist

Test It!

At this point, you can test your new (temporary) BusKill Disarm functionality by:

  1. Plugging-in your BusKill cable
  2. Typing Ctrl+Shift+D
  3. Waiting for the toast popup message to appear indicating that BusKill is disarmed for 30 seconds
  4. Unplugging your BusKill cable

Your machine should lock, not shutdown.

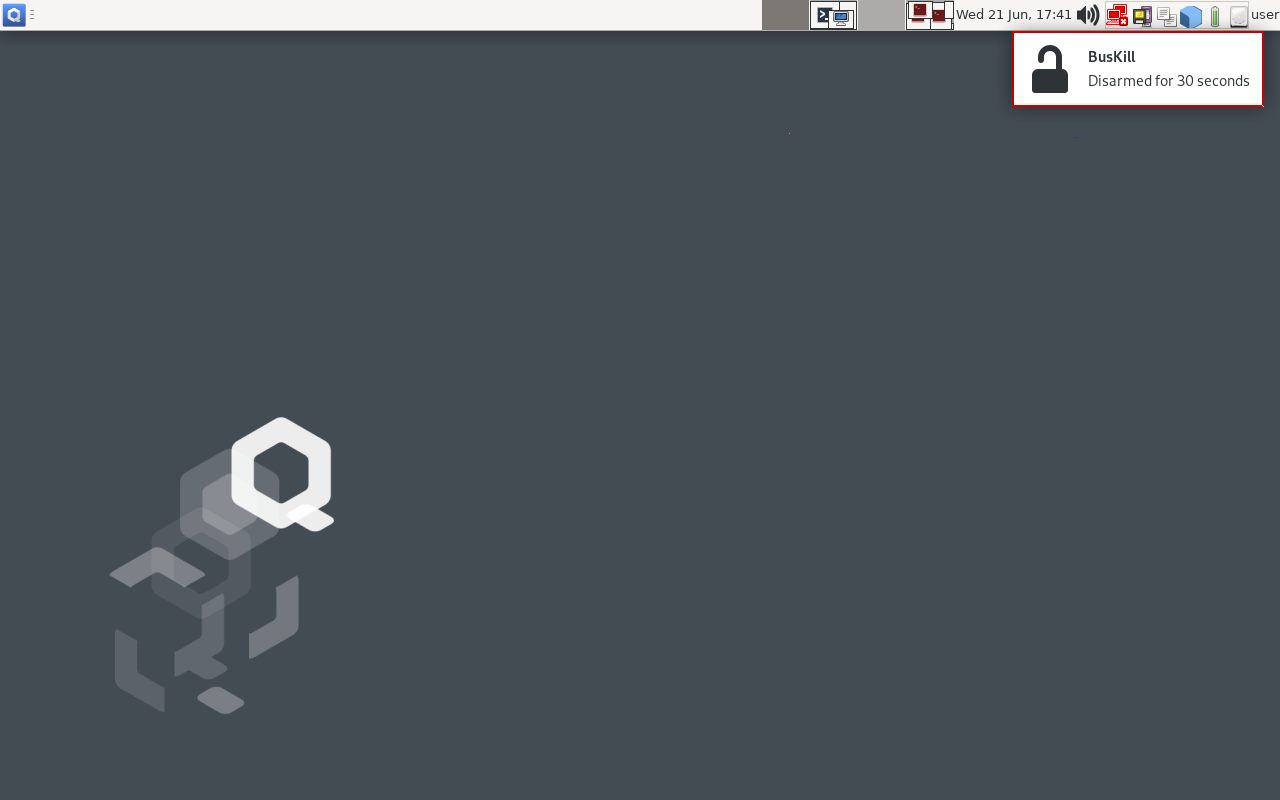
Screenshot of QubesOS with a toast message in the top-right that says \"BusKill Disarmed for 30 Seconds\"
After hitting the keyboard shortcut to disarm BusKill, you have 30 seconds to remove the cable

After 30 seconds, return to your computer and test the normal "arm" functionality:

  1. Plug-in your BusKill cable
  2. Unlock your screen
  3. Unplug your BusKill cable

Your computer should shutdown, not lock.

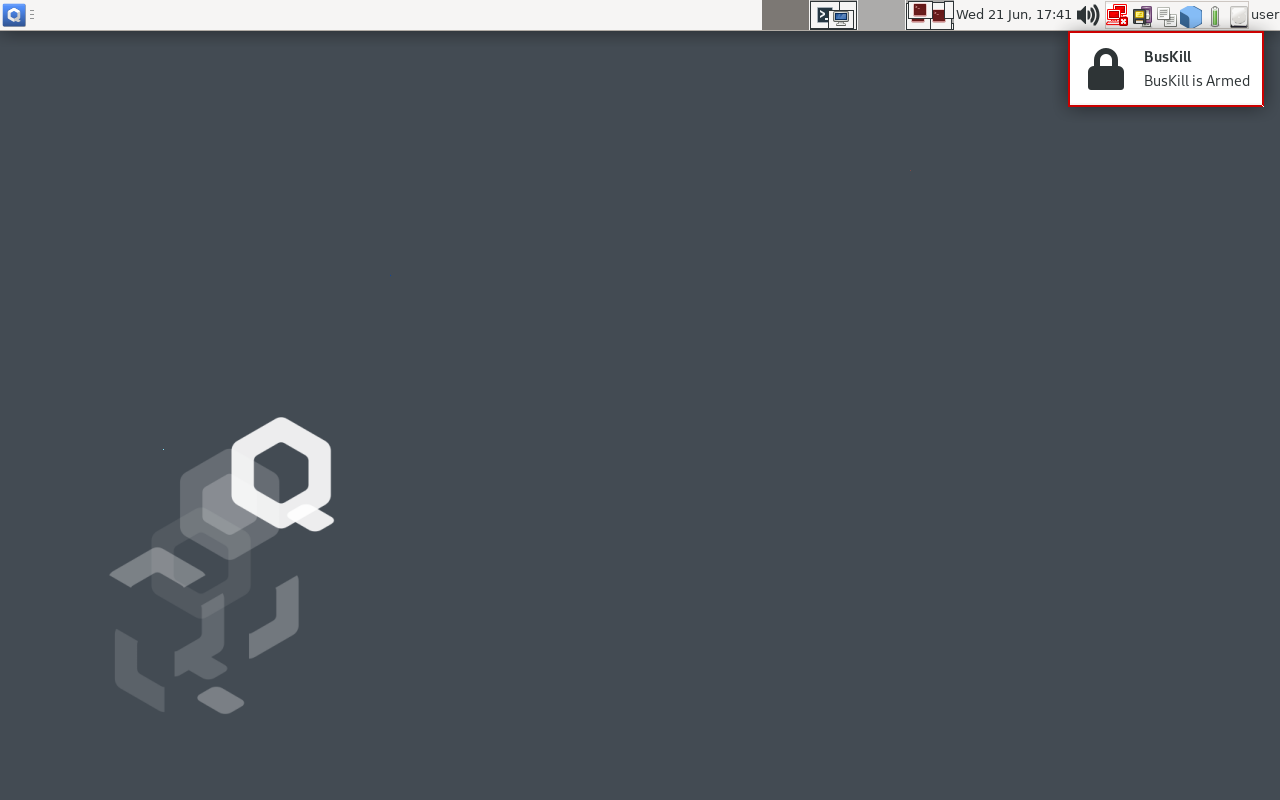
Screenshot of QubesOS with a toast message in the top-right that says \"BusKill is Armed\"
30 seconds after hitting the keyboard shortcut, BusKill will arm itself

Troubleshooting

Is unplugging your USB device doing nothing? Having other issues?

See the Troubleshooting section in our original guide to using BusKill on QubesOS.

Limitations/Improvements

Security is porous. All software has bugs. Nothing is 100% secure. For more limitations to using BusKill on QubesOS, see the Limitations section in our original guide to using BusKill on QubesOS.

Buy a BusKill Cable

We look forward to continuing to improve the BusKill software and making BusKill more accessible this year. If you want to help, please consider purchasing a BusKill cable for yourself or a loved one. It helps us fund further development, and you get your own BusKill cable to keep you or your loved ones safe.

You can also buy a BusKill cable with bitcoin, monero, and other altcoins from our BusKill Store's .onion site.

Stay safe,
The BusKill Team
https://www.buskill.in/
http://www.buskillvampfih2iucxhit3qp36i2zzql3u6pmkeafvlxs3tlmot5yad.onion


This article describes how to setup keyboard shortcuts in QubesOS so that you can temporarily disarm (pause) the BusKill laptop kill cord.

This allows the user to, for example, go to the bathroom without causing their computer to shutdown or self-destruct.

Arm & Disarm BusKill in QubesOS

This is a guide that builds on part one: A Laptop Kill Cord for QubesOS (1/2). Before reading this, you should already be familiar with how to setup udev rules for BusKill on QubesOS.

  1. A Laptop Kill Cord for QubesOS (1/2)
  2. Disarm BusKill in QubesOS (2/2)

ⓘ Note: This post is adapted from its original article on Tom Hocker's blog.

What is BusKill?

What if someone literally steals your laptop while you're working with classified information inside a Whonix DispVM? They'd also be able to recover data from previous DispVMs--as Disposable VM's rootfs virtual files are not securely shredded after your DispVM is destroyed.

Are you a security researcher, journalist, or intelligence operative that works in QubesOS--exploiting Qubes' brilliant security-through-compartimentalization to keep your data safe? Do you make use of Whonix Disposable VMs for your work? Great! This post is for you.

I'm sure your QubesOS laptop has Full Disk Encryption and you're using a strong passphrase. But what if someone literally steals your laptop while you're working with classified information inside a Whonix DispVM? Not only will they get access to all of your AppVM's private data and the currently-running Whonix DispVM's data, but there's a high chance they'd be able to recover data from previous DispVMs--as Disposable VM's rootfs virtual files (volatile.img) are not securely shredded after your DispVM is destroyed by Qubes!

Let's say you're a journalist, activist, whistleblower, or a human rights worker in an oppressive regime. Or an intelligence operative behind enemy lines doing research or preparing a top-secret document behind a locked door. What do you do to protect your data, sources, or assets when the secret police suddenly batter down your door? How quickly can you actually act to shutdown your laptop and shred your RAM and/or FDE encryption keys?

BusKill Demo
Watch the BusKill Explainer Video for more info youtube.com/v/qPwyoD_cQR4

BusKill utilizes a magnetic trip-wire that tethers your body to your laptop. If you suddenly jump to your feet or fall off your chair (in response to the battering ram crashing through your door) or your laptop is ripped off your table by a group of armed thugs, the data bus' magnetic connection will be severed. This event causes a configurable trigger to execute.

The BusKill trigger can be anything from:

  1. locking your screen or
  2. shutting down the computer or
  3. initiating a self-destruct sequence

While our last post described how to setup such a system in QubesOS with BusKill, this post will describe how to add keyboard shortcuts to arm & disarm the dead man switch (eg so you can go to the bathroom).

Disclaimer

This guide contains experimental files, commands, and software. The information contained in this article may or may not lead to corruption or total permanent deletion of some or all of your data. We've done our best to carefully guide the user so they know the risks of each BusKill trigger, but we cannot be responsible for any data loss that has occurred as a result of following this guide.

The contents of this guide is provided openly and is licensed under the CC-BY-SA license. The software included in this guide is licensed under the GNU GPLv3 license. All content here is consistent with the limitations of liabilities outlined in its respective licenses.

We highly recommend that any experiments with the scripts included in this article are used exclusively on a disposable machine containing no valuable data.

If data loss is a concern for you, then leave now and do not proceed with following this guide. You have been warned.

Release Note

Also be aware that, due to the risks outlined above, BusKill will not be released with this "self-destruct" trigger.

If you purchase a BusKill cable, it will only ship with non-destructive triggers that lock the screen or shutdown the computer. Advanced users can follow guides to add additional destructive triggers, such as the one described in this post, but they should do so at their own risk--taking carefully into consideration all of the warnings outlined above and throughout this article.

Again, if you buy a BusKill cable, the worst that can happen is your computer will abruptly shutdown.

Assumptions

This guide necessarily makes several assumptions outlined below.

sys-usb

In this guide, we assume that your QubesOS install has a USB-Qube named 'sys-usb' for handling USB events on behalf of dom0.

If you decided to combine your USB and networking Qubes at install time, then replace all references in this guide for 'sys-usb' to 'sys-net'.

If you decided to run your 'sys-usb' VM as a DispoableVM at install time, then replace all references in this guide for 'sys-usb' its Disposable TemplateVM (eg 'fedora-36-dvm').

..And if you chose not to isolate your USB devices, then may god help you.

Udev Device Matching

BusKill in Linux uses udev to detect when the USB's cable is severed. The exact udev rule that you use in the files below will depend on the drive you choose to use in your BusKill cable.

In this guide, we identify our BusKill-specific drive with the 'ENV{ID_MODEL}=="Micromax_A74"' udev property. You should replace this property with one that matches your BusKill-specific drive.

To determine how to query your USB drive for device-specific identifiers, see Introducing BusKill: A Kill Cord for your Laptop. Note that the `udevadm monitor --environment --udev` command should be run in the 'sys-usb' Qube.

ⓘ Note: If you'd prefer to buy a BusKill cable than make your own, you can buy one fully assembled here.

QubesOS Version

This guide was written for QubesOS v4.1.

[user@dom0 ~]$ cat /etc/redhat-release Qubes release 4.1.2 (R4.1)
[user@dom0 ~]$

BusKill Files

This section will describe what files should be created and where.

Due to the design of QubesOS, it takes a bit of mental gymnastics to understand what we're doing and why. It's important to keep in mind that, in QubesOS

  1. The keyboard and UI are configured in 'dom0'
  2. USB devices (like the BusKill device) are routed to the 'sys-usb' VM
  3. dom0 has the privilege to execute scripts inside other VMs (eg 'sys-usb')
  4. By design, VMs should *not* be able to send arbitrary commands to be executed in dom0
  5. ...but via the qubes-rpc, we can permit some VMs (eg 'sys-usb') to execute a script in dom0 (though for security reasons, ideally such that no data/input is sent from the less-trusted VM to dom0 -- other than the name of the script)

Due to the constraints listed above:

  1. We'll be configuring the disarm button as keyboard shortcut in dom0
  2. We'll be saving and executing the 'buskill-disarm.sh' script in 'sys-usb' (because these scripts manipulate our udev rules)
  3. The keyboard shortcut in dom0 will actually be executing the above script in 'sys-usb'

sys-usb

If you followed our previous guide to setting-up BusKill in QubesOS, then you should already have a file in 'sys-usb' at '/rw/config/buskill.rules'. You may even have modified it to trigger a LUKS Self-Destruct on removal of your BusKill device.

Because you're now experimenting with a new setup, let's go ahead and wipe out that old file with a new one that just executes a soft-shutdown. You might need some days to get used to the new disarm procedure, and you probably don't want to suddenly loose all your data due to an accidental false-positive!

Execute the following on your 'sys-usb' Qube:

mv /rw/config/buskill.rules /rw/config/buskill.rules.bak.`date "+%Y%m%d_%H%M%S"`
cat << EOF | sudo tee /rw/config/buskill.rules
################################################################################
# File:    sys-usb:/etc/udev/rules.d/buskill.rules -> /rw/config/buskill.rules
# Purpose: Add buskill rules. For more info, see: https://buskill.in/qubes-os/
# Authors: Michael Altfield 
# Created: 2020-01-02
# License: GNU GPLv3
################################################################################
ACTION=="remove", SUBSYSTEM=="usb", ENV{ID_MODEL}=="Micromax_A74", RUN+="/usr/bin/qrexec-client-vm dom0 buskill.softShutdown"
EOF
sudo ln -s /rw/config/buskill.rules /etc/udev/rules.d/
sudo udevadm control --reload

Now, let's add a new udev '.rules' file. This one will always just lock your screen, and it's what will be put in-place when BusKill is "disarmed".

Execute the following on your 'sys-usb' Qube:

cat << EOF | sudo tee /rw/config/buskill.lock.rules
################################################################################
# File:    sys-usb:/etc/udev/rules.d/buskill.rules -> /rw/config/buskill.lock.rules
# Purpose: Just lock the screen. For more info, see: https://buskill.in/qubes-os/
# Authors: Michael Altfield 
# Created: 2023-05-10
# License: GNU GPLv3
################################################################################
ACTION=="remove", SUBSYSTEM=="usb", ENV{ID_MODEL}=="Micromax_A74", RUN+="/usr/bin/qrexec-client-vm dom0 buskill.lock"
EOF

The careful reader will see that we're not actually disarming BusKill in the same sense as our BusKill GUI app. Indeed, what we're actually going to do is swap these two files for 30 seconds.

This way, if BusKill is armed and you remove the cable, your computer shuts-down.

But if you want to disarm, the procedure becomes:

  1. Hit the "Disarm BusKill" keyboard shortcut (see below)
  2. Wait for the toast popup message indicating that BusKill is now disarmed
  3. Remove the cable within 30 seconds
  4. Your screen locks (instead of shutting down)

Personally, I can't think of a QubesOS user that would want to leave their machine unlocked when they go to the bathroom, so I figured this approach would work better than an actual disarm.

Bonus: when you return from your break, just plug-in the BusKill cable in, and it'll already be armed (reducing the risk of user error due to forgetting to arm BusKill).

Now, let's add the actual 'buskill-disarm.sh' script to disarm BusKill:

Execute the following on your 'sys-usb' Qube:

cat << EOF | sudo tee /usr/local/bin/buskill-disarm.sh
#!/bin/bash
 
################################################################################
# File:    sys-usb:/usr/local/bin/buskill-disarm.sh
# Purpose: Temp disarm BusKill. For more info, see: https://buskill.in/qubes-os/
# Authors: Tom 
# Co-Auth: Michael Altfield 
# Created: 2023-05-10
# License: GNU GPLv3
################################################################################
 
# replace the 'shutdown' trigger with the 'lock' trigger
sudo rm /etc/udev/rules.d/buskill.rules
sudo ln -s /rw/config/buskill.lock.rules /etc/udev/rules.d/buskill.rules
sudo udevadm control --reload
 
# let the user know that BusKill is now temporarily disarmed
notify-send -t 21000 "BusKill" "Disarmed for 30 seconds" -i changes-allow
 
# wait 30 seconds
sleep 30
 
# replace the 'lock' trigger with the 'shutdown' trigger
sudo rm /etc/udev/rules.d/buskill.rules
sudo ln -s /rw/config/buskill.rules /etc/udev/rules.d/buskill.rules
sudo udevadm control --reload
notify-send -t 5000 "BusKill" "BusKill is Armed" -i changes-prevent
EOF
sudo chmod +x /usr/local/bin/buskill-disarm.sh

dom0

If you followed our previous guide to setting-up BusKill in QubesOS, then you shouldn't need to add any files to dom0. What you do need to do is setup some keyboard shortcuts.

In the QubesOS GUI, click on the big Q "Start Menu" in the top-left of your XFCE panel to open the Applications menu. Navigate to 'System Tools' and click Keyboard

Screenshot of QubesOS with an arrow pointing to the "Q" Application Menu in the very top-left of the screen Screenshot of QubesOS Application Menu with "System Tools -> Keyboard" highlighted
Click the “Q” to open the QubesOS Application Menu Click System Tools -> Keyboard

Click the 'Application Shortcuts' Tab and then click the '+ Add' button on the bottom-left of the window.

Screenshot of QubesOS Keyboard Settings Window that shows the "Application Shortcuts" tab highlighted'alt Screenshot of QubesOS Keyboard Settings Window that shows the "+ Add" button highlightedalt
Click the “Application Shortcuts” tab to add a Keyboard Shortcut in Qubes Click the “Add” Button to add a new Keyboard Shortcut in Qubes

In the 'Command' input field, type the following

qvm-run sys-usb buskill-disarm.sh

The above command will execute a command in 'dom0' that will execute a command in 'sys-usb' that will execute the 'buskill-disarm.sh' script that we created above.

Screenshot of QubesOS Keyboard Settings Window that shows the \"OK\" button highlighted
After typing the command to be executed when the keyboard shortcut is pressed, click the "OK" button

Now click "OK" and, when prompted, type Ctrl+Shift+D (or whatever keyboard shortcut you want to bind to "Disarming BusKill").

Screenshot of QubesOS Keyboard Settings Window that shows the prompt "Press now the keyboard keys you want to use to trigger the command..."alt Screenshot of QubesOS Keyboard Settings Window that shows the selected Shortcut "Shift+Ctrl+D"
Type "Ctrl+Shift+D" or whatever keyboard shortcut you want to trigger BusKill to be disarmed for 30 seconds                                            

You should now have a keyboard shortcut binding for disarming BusKill!

Screenshot of QubesOSKeyboard Settings Window that shows the newly created keyboard shortcutfor \"Shift+Ctrl+D\" at the top of thelist

Test It!

At this point, you can test your new (temporary) BusKill Disarm functionality by:

  1. Plugging-in your BusKill cable
  2. Typing Ctrl+Shift+D
  3. Waiting for the toast popup message to appear indicating that BusKill is disarmed for 30 seconds
  4. Unplugging your BusKill cable

Your machine should lock, not shutdown.

Screenshot of QubesOS with a toast message in the top-right that says \"BusKill Disarmed for 30 Seconds\"
After hitting the keyboard shortcut to disarm BusKill, you have 30 seconds to remove the cable

After 30 seconds, return to your computer and test the normal "arm" functionality:

  1. Plug-in your BusKill cable
  2. Unlock your screen
  3. Unplug your BusKill cable

Your computer should shutdown, not lock.

Screenshot of QubesOS with a toast message in the top-right that says \"BusKill is Armed\"
30 seconds after hitting the keyboard shortcut, BusKill will arm itself

Troubleshooting

Is unplugging your USB device doing nothing? Having other issues?

See the Troubleshooting section in our original guide to using BusKill on QubesOS.

Limitations/Improvements

Security is porous. All software has bugs. Nothing is 100% secure. For more limitations to using BusKill on QubesOS, see the Limitations section in our original guide to using BusKill on QubesOS.

Buy a BusKill Cable

We look forward to continuing to improve the BusKill software and making BusKill more accessible this year. If you want to help, please consider purchasing a BusKill cable for yourself or a loved one. It helps us fund further development, and you get your own BusKill cable to keep you or your loved ones safe.

You can also buy a BusKill cable with bitcoin, monero, and other altcoins from our BusKill Store's .onion site.

Stay safe,
The BusKill Team
https://www.buskill.in/
http://www.buskillvampfih2iucxhit3qp36i2zzql3u6pmkeafvlxs3tlmot5yad.onion
 

This article describes how to setup keyboard shortcuts in QubesOS so that you can temporarily disarm (pause) the BusKill laptop kill cord.

This allows the user to, for example, go to the bathroom without causing their computer to shutdown or self-destruct.

Arm & Disarm BusKill in QubesOS

This is a guide that builds on part one: A Laptop Kill Cord for QubesOS (1/2). Before reading this, you should already be familiar with how to setup udev rules for BusKill on QubesOS.

  1. A Laptop Kill Cord for QubesOS (1/2)
  2. Disarm BusKill in QubesOS (2/2)

ⓘ Note: This post is adapted from its original article on Tom Hocker's blog.

What is BusKill?

What if someone literally steals your laptop while you're working with classified information inside a Whonix DispVM? They'd also be able to recover data from previous DispVMs--as Disposable VM's rootfs virtual files are not securely shredded after your DispVM is destroyed.

Are you a security researcher, journalist, or intelligence operative that works in QubesOS--exploiting Qubes' brilliant security-through-compartimentalization to keep your data safe? Do you make use of Whonix Disposable VMs for your work? Great! This post is for you.

I'm sure your QubesOS laptop has Full Disk Encryption and you're using a strong passphrase. But what if someone literally steals your laptop while you're working with classified information inside a Whonix DispVM? Not only will they get access to all of your AppVM's private data and the currently-running Whonix DispVM's data, but there's a high chance they'd be able to recover data from previous DispVMs--as Disposable VM's rootfs virtual files (volatile.img) are not securely shredded after your DispVM is destroyed by Qubes!

Let's say you're a journalist, activist, whistleblower, or a human rights worker in an oppressive regime. Or an intelligence operative behind enemy lines doing research or preparing a top-secret document behind a locked door. What do you do to protect your data, sources, or assets when the secret police suddenly batter down your door? How quickly can you actually act to shutdown your laptop and shred your RAM and/or FDE encryption keys?

BusKill Demo
Watch the BusKill Explainer Video for more info youtube.com/v/qPwyoD_cQR4

BusKill utilizes a magnetic trip-wire that tethers your body to your laptop. If you suddenly jump to your feet or fall off your chair (in response to the battering ram crashing through your door) or your laptop is ripped off your table by a group of armed thugs, the data bus' magnetic connection will be severed. This event causes a configurable trigger to execute.

The BusKill trigger can be anything from:

  1. locking your screen or
  2. shutting down the computer or
  3. initiating a self-destruct sequence

While our last post described how to setup such a system in QubesOS with BusKill, this post will describe how to add keyboard shortcuts to arm & disarm the dead man switch (eg so you can go to the bathroom).

Disclaimer

This guide contains experimental files, commands, and software. The information contained in this article may or may not lead to corruption or total permanent deletion of some or all of your data. We've done our best to carefully guide the user so they know the risks of each BusKill trigger, but we cannot be responsible for any data loss that has occurred as a result of following this guide.

The contents of this guide is provided openly and is licensed under the CC-BY-SA license. The software included in this guide is licensed under the GNU GPLv3 license. All content here is consistent with the limitations of liabilities outlined in its respective licenses.

We highly recommend that any experiments with the scripts included in this article are used exclusively on a disposable machine containing no valuable data.

If data loss is a concern for you, then leave now and do not proceed with following this guide. You have been warned.

Release Note

Also be aware that, due to the risks outlined above, BusKill will not be released with this "self-destruct" trigger.

If you purchase a BusKill cable, it will only ship with non-destructive triggers that lock the screen or shutdown the computer. Advanced users can follow guides to add additional destructive triggers, such as the one described in this post, but they should do so at their own risk--taking carefully into consideration all of the warnings outlined above and throughout this article.

Again, if you buy a BusKill cable, the worst that can happen is your computer will abruptly shutdown.

Assumptions

This guide necessarily makes several assumptions outlined below.

sys-usb

In this guide, we assume that your QubesOS install has a USB-Qube named 'sys-usb' for handling USB events on behalf of dom0.

If you decided to combine your USB and networking Qubes at install time, then replace all references in this guide for 'sys-usb' to 'sys-net'.

If you decided to run your 'sys-usb' VM as a DispoableVM at install time, then replace all references in this guide for 'sys-usb' its Disposable TemplateVM (eg 'fedora-36-dvm').

..And if you chose not to isolate your USB devices, then may god help you.

Udev Device Matching

BusKill in Linux uses udev to detect when the USB's cable is severed. The exact udev rule that you use in the files below will depend on the drive you choose to use in your BusKill cable.

In this guide, we identify our BusKill-specific drive with the 'ENV{ID_MODEL}=="Micromax_A74"' udev property. You should replace this property with one that matches your BusKill-specific drive.

To determine how to query your USB drive for device-specific identifiers, see Introducing BusKill: A Kill Cord for your Laptop. Note that the `udevadm monitor --environment --udev` command should be run in the 'sys-usb' Qube.

ⓘ Note: If you'd prefer to buy a BusKill cable than make your own, you can buy one fully assembled here.

QubesOS Version

This guide was written for QubesOS v4.1.

[user@dom0 ~]$ cat /etc/redhat-release Qubes release 4.1.2 (R4.1)
[user@dom0 ~]$

BusKill Files

This section will describe what files should be created and where.

Due to the design of QubesOS, it takes a bit of mental gymnastics to understand what we're doing and why. It's important to keep in mind that, in QubesOS

  1. The keyboard and UI are configured in 'dom0'
  2. USB devices (like the BusKill device) are routed to the 'sys-usb' VM
  3. dom0 has the privilege to execute scripts inside other VMs (eg 'sys-usb')
  4. By design, VMs should *not* be able to send arbitrary commands to be executed in dom0
  5. ...but via the qubes-rpc, we can permit some VMs (eg 'sys-usb') to execute a script in dom0 (though for security reasons, ideally such that no data/input is sent from the less-trusted VM to dom0 -- other than the name of the script)

Due to the constraints listed above:

  1. We'll be configuring the disarm button as keyboard shortcut in dom0
  2. We'll be saving and executing the 'buskill-disarm.sh' script in 'sys-usb' (because these scripts manipulate our udev rules)
  3. The keyboard shortcut in dom0 will actually be executing the above script in 'sys-usb'

sys-usb

If you followed our previous guide to setting-up BusKill in QubesOS, then you should already have a file in 'sys-usb' at '/rw/config/buskill.rules'. You may even have modified it to trigger a LUKS Self-Destruct on removal of your BusKill device.

Because you're now experimenting with a new setup, let's go ahead and wipe out that old file with a new one that just executes a soft-shutdown. You might need some days to get used to the new disarm procedure, and you probably don't want to suddenly loose all your data due to an accidental false-positive!

Execute the following on your 'sys-usb' Qube:

mv /rw/config/buskill.rules /rw/config/buskill.rules.bak.`date "+%Y%m%d_%H%M%S"`
cat << EOF | sudo tee /rw/config/buskill.rules
################################################################################
# File:    sys-usb:/etc/udev/rules.d/buskill.rules -> /rw/config/buskill.rules
# Purpose: Add buskill rules. For more info, see: https://buskill.in/qubes-os/
# Authors: Michael Altfield 
# Created: 2020-01-02
# License: GNU GPLv3
################################################################################
ACTION=="remove", SUBSYSTEM=="usb", ENV{ID_MODEL}=="Micromax_A74", RUN+="/usr/bin/qrexec-client-vm dom0 buskill.softShutdown"
EOF
sudo ln -s /rw/config/buskill.rules /etc/udev/rules.d/
sudo udevadm control --reload

Now, let's add a new udev '.rules' file. This one will always just lock your screen, and it's what will be put in-place when BusKill is "disarmed".

Execute the following on your 'sys-usb' Qube:

cat << EOF | sudo tee /rw/config/buskill.lock.rules
################################################################################
# File:    sys-usb:/etc/udev/rules.d/buskill.rules -> /rw/config/buskill.lock.rules
# Purpose: Just lock the screen. For more info, see: https://buskill.in/qubes-os/
# Authors: Michael Altfield 
# Created: 2023-05-10
# License: GNU GPLv3
################################################################################
ACTION=="remove", SUBSYSTEM=="usb", ENV{ID_MODEL}=="Micromax_A74", RUN+="/usr/bin/qrexec-client-vm dom0 buskill.lock"
EOF

The careful reader will see that we're not actually disarming BusKill in the same sense as our BusKill GUI app. Indeed, what we're actually going to do is swap these two files for 30 seconds.

This way, if BusKill is armed and you remove the cable, your computer shuts-down.

But if you want to disarm, the procedure becomes:

  1. Hit the "Disarm BusKill" keyboard shortcut (see below)
  2. Wait for the toast popup message indicating that BusKill is now disarmed
  3. Remove the cable within 30 seconds
  4. Your screen locks (instead of shutting down)

Personally, I can't think of a QubesOS user that would want to leave their machine unlocked when they go to the bathroom, so I figured this approach would work better than an actual disarm.

Bonus: when you return from your break, just plug-in the BusKill cable in, and it'll already be armed (reducing the risk of user error due to forgetting to arm BusKill).

Now, let's add the actual 'buskill-disarm.sh' script to disarm BusKill:

Execute the following on your 'sys-usb' Qube:

cat << EOF | sudo tee /usr/local/bin/buskill-disarm.sh
#!/bin/bash
 
################################################################################
# File:    sys-usb:/usr/local/bin/buskill-disarm.sh
# Purpose: Temp disarm BusKill. For more info, see: https://buskill.in/qubes-os/
# Authors: Tom 
# Co-Auth: Michael Altfield 
# Created: 2023-05-10
# License: GNU GPLv3
################################################################################
 
# replace the 'shutdown' trigger with the 'lock' trigger
sudo rm /etc/udev/rules.d/buskill.rules
sudo ln -s /rw/config/buskill.lock.rules /etc/udev/rules.d/buskill.rules
sudo udevadm control --reload
 
# let the user know that BusKill is now temporarily disarmed
notify-send -t 21000 "BusKill" "Disarmed for 30 seconds" -i changes-allow
 
# wait 30 seconds
sleep 30
 
# replace the 'lock' trigger with the 'shutdown' trigger
sudo rm /etc/udev/rules.d/buskill.rules
sudo ln -s /rw/config/buskill.rules /etc/udev/rules.d/buskill.rules
sudo udevadm control --reload
notify-send -t 5000 "BusKill" "BusKill is Armed" -i changes-prevent
EOF
sudo chmod +x /usr/local/bin/buskill-disarm.sh

dom0

If you followed our previous guide to setting-up BusKill in QubesOS, then you shouldn't need to add any files to dom0. What you do need to do is setup some keyboard shortcuts.

In the QubesOS GUI, click on the big Q "Start Menu" in the top-left of your XFCE panel to open the Applications menu. Navigate to 'System Tools' and click Keyboard

Screenshot of QubesOS with an arrow pointing to the "Q" Application Menu in the very top-left of the screen Screenshot of QubesOS Application Menu with "System Tools -> Keyboard" highlighted
Click the “Q” to open the QubesOS Application Menu Click System Tools -> Keyboard

Click the 'Application Shortcuts' Tab and then click the '+ Add' button on the bottom-left of the window.

Screenshot of QubesOS Keyboard Settings Window that shows the "Application Shortcuts" tab highlighted'alt Screenshot of QubesOS Keyboard Settings Window that shows the "+ Add" button highlightedalt
Click the “Application Shortcuts” tab to add a Keyboard Shortcut in Qubes Click the “Add” Button to add a new Keyboard Shortcut in Qubes

In the 'Command' input field, type the following

qvm-run sys-usb buskill-disarm.sh

The above command will execute a command in 'dom0' that will execute a command in 'sys-usb' that will execute the 'buskill-disarm.sh' script that we created above.

Screenshot of QubesOS Keyboard Settings Window that shows the \"OK\" button highlighted
After typing the command to be executed when the keyboard shortcut is pressed, click the "OK" button

Now click "OK" and, when prompted, type Ctrl+Shift+D (or whatever keyboard shortcut you want to bind to "Disarming BusKill").

Screenshot of QubesOS Keyboard Settings Window that shows the prompt "Press now the keyboard keys you want to use to trigger the command..."alt Screenshot of QubesOS Keyboard Settings Window that shows the selected Shortcut "Shift+Ctrl+D"
Type "Ctrl+Shift+D" or whatever keyboard shortcut you want to trigger BusKill to be disarmed for 30 seconds                                            

You should now have a keyboard shortcut binding for disarming BusKill!

Screenshot of QubesOSKeyboard Settings Window that shows the newly created keyboard shortcutfor \"Shift+Ctrl+D\" at the top of thelist

Test It!

At this point, you can test your new (temporary) BusKill Disarm functionality by:

  1. Plugging-in your BusKill cable
  2. Typing Ctrl+Shift+D
  3. Waiting for the toast popup message to appear indicating that BusKill is disarmed for 30 seconds
  4. Unplugging your BusKill cable

Your machine should lock, not shutdown.

Screenshot of QubesOS with a toast message in the top-right that says \"BusKill Disarmed for 30 Seconds\"
After hitting the keyboard shortcut to disarm BusKill, you have 30 seconds to remove the cable

After 30 seconds, return to your computer and test the normal "arm" functionality:

  1. Plug-in your BusKill cable
  2. Unlock your screen
  3. Unplug your BusKill cable

Your computer should shutdown, not lock.

Screenshot of QubesOS with a toast message in the top-right that says \"BusKill is Armed\"
30 seconds after hitting the keyboard shortcut, BusKill will arm itself

Troubleshooting

Is unplugging your USB device doing nothing? Having other issues?

See the Troubleshooting section in our original guide to using BusKill on QubesOS.

Limitations/Improvements

Security is porous. All software has bugs. Nothing is 100% secure. For more limitations to using BusKill on QubesOS, see the Limitations section in our original guide to using BusKill on QubesOS.

Buy a BusKill Cable

We look forward to continuing to improve the BusKill software and making BusKill more accessible this year. If you want to help, please consider purchasing a BusKill cable for yourself or a loved one. It helps us fund further development, and you get your own BusKill cable to keep you or your loved ones safe.

You can also buy a BusKill cable with bitcoin, monero, and other altcoins from our BusKill Store's .onion site.

Stay safe,
The BusKill Team
https://www.buskill.in/
http://www.buskillvampfih2iucxhit3qp36i2zzql3u6pmkeafvlxs3tlmot5yad.onion
 

This article describes how to setup keyboard shortcuts in QubesOS so that you can temporarily disarm (pause) the BusKill laptop kill cord.

This allows the user to, for example, go to the bathroom without causing their computer to shutdown or self-destruct.

Arm & Disarm BusKill in QubesOS

This is a guide that builds on part one: A Laptop Kill Cord for QubesOS (1/2). Before reading this, you should already be familiar with how to setup udev rules for BusKill on QubesOS.

  1. A Laptop Kill Cord for QubesOS (1/2)
  2. Disarm BusKill in QubesOS (2/2)

ⓘ Note: This post is adapted from its original article on Tom Hocker's blog.

What is BusKill?

What if someone literally steals your laptop while you're working with classified information inside a Whonix DispVM? They'd also be able to recover data from previous DispVMs--as Disposable VM's rootfs virtual files are not securely shredded after your DispVM is destroyed.

Are you a security researcher, journalist, or intelligence operative that works in QubesOS--exploiting Qubes' brilliant security-through-compartimentalization to keep your data safe? Do you make use of Whonix Disposable VMs for your work? Great! This post is for you.

I'm sure your QubesOS laptop has Full Disk Encryption and you're using a strong passphrase. But what if someone literally steals your laptop while you're working with classified information inside a Whonix DispVM? Not only will they get access to all of your AppVM's private data and the currently-running Whonix DispVM's data, but there's a high chance they'd be able to recover data from previous DispVMs--as Disposable VM's rootfs virtual files (volatile.img) are not securely shredded after your DispVM is destroyed by Qubes!

Let's say you're a journalist, activist, whistleblower, or a human rights worker in an oppressive regime. Or an intelligence operative behind enemy lines doing research or preparing a top-secret document behind a locked door. What do you do to protect your data, sources, or assets when the secret police suddenly batter down your door? How quickly can you actually act to shutdown your laptop and shred your RAM and/or FDE encryption keys?

BusKill Demo
Watch the BusKill Explainer Video for more info youtube.com/v/qPwyoD_cQR4

BusKill utilizes a magnetic trip-wire that tethers your body to your laptop. If you suddenly jump to your feet or fall off your chair (in response to the battering ram crashing through your door) or your laptop is ripped off your table by a group of armed thugs, the data bus' magnetic connection will be severed. This event causes a configurable trigger to execute.

The BusKill trigger can be anything from:

  1. locking your screen or
  2. shutting down the computer or
  3. initiating a self-destruct sequence

While our last post described how to setup such a system in QubesOS with BusKill, this post will describe how to add keyboard shortcuts to arm & disarm the dead man switch (eg so you can go to the bathroom).

Disclaimer

This guide contains experimental files, commands, and software. The information contained in this article may or may not lead to corruption or total permanent deletion of some or all of your data. We've done our best to carefully guide the user so they know the risks of each BusKill trigger, but we cannot be responsible for any data loss that has occurred as a result of following this guide.

The contents of this guide is provided openly and is licensed under the CC-BY-SA license. The software included in this guide is licensed under the GNU GPLv3 license. All content here is consistent with the limitations of liabilities outlined in its respective licenses.

We highly recommend that any experiments with the scripts included in this article are used exclusively on a disposable machine containing no valuable data.

If data loss is a concern for you, then leave now and do not proceed with following this guide. You have been warned.

Release Note

Also be aware that, due to the risks outlined above, BusKill will not be released with this "self-destruct" trigger.

If you purchase a BusKill cable, it will only ship with non-destructive triggers that lock the screen or shutdown the computer. Advanced users can follow guides to add additional destructive triggers, such as the one described in this post, but they should do so at their own risk--taking carefully into consideration all of the warnings outlined above and throughout this article.

Again, if you buy a BusKill cable, the worst that can happen is your computer will abruptly shutdown.

Assumptions

This guide necessarily makes several assumptions outlined below.

sys-usb

In this guide, we assume that your QubesOS install has a USB-Qube named 'sys-usb' for handling USB events on behalf of dom0.

If you decided to combine your USB and networking Qubes at install time, then replace all references in this guide for 'sys-usb' to 'sys-net'.

If you decided to run your 'sys-usb' VM as a DispoableVM at install time, then replace all references in this guide for 'sys-usb' its Disposable TemplateVM (eg 'fedora-36-dvm').

..And if you chose not to isolate your USB devices, then may god help you.

Udev Device Matching

BusKill in Linux uses udev to detect when the USB's cable is severed. The exact udev rule that you use in the files below will depend on the drive you choose to use in your BusKill cable.

In this guide, we identify our BusKill-specific drive with the 'ENV{ID_MODEL}=="Micromax_A74"' udev property. You should replace this property with one that matches your BusKill-specific drive.

To determine how to query your USB drive for device-specific identifiers, see Introducing BusKill: A Kill Cord for your Laptop. Note that the `udevadm monitor --environment --udev` command should be run in the 'sys-usb' Qube.

ⓘ Note: If you'd prefer to buy a BusKill cable than make your own, you can buy one fully assembled here.

QubesOS Version

This guide was written for QubesOS v4.1.

[user@dom0 ~]$ cat /etc/redhat-release Qubes release 4.1.2 (R4.1)
[user@dom0 ~]$

BusKill Files

This section will describe what files should be created and where.

Due to the design of QubesOS, it takes a bit of mental gymnastics to understand what we're doing and why. It's important to keep in mind that, in QubesOS

  1. The keyboard and UI are configured in 'dom0'
  2. USB devices (like the BusKill device) are routed to the 'sys-usb' VM
  3. dom0 has the privilege to execute scripts inside other VMs (eg 'sys-usb')
  4. By design, VMs should *not* be able to send arbitrary commands to be executed in dom0
  5. ...but via the qubes-rpc, we can permit some VMs (eg 'sys-usb') to execute a script in dom0 (though for security reasons, ideally such that no data/input is sent from the less-trusted VM to dom0 -- other than the name of the script)

Due to the constraints listed above:

  1. We'll be configuring the disarm button as keyboard shortcut in dom0
  2. We'll be saving and executing the 'buskill-disarm.sh' script in 'sys-usb' (because these scripts manipulate our udev rules)
  3. The keyboard shortcut in dom0 will actually be executing the above script in 'sys-usb'

sys-usb

If you followed our previous guide to setting-up BusKill in QubesOS, then you should already have a file in 'sys-usb' at '/rw/config/buskill.rules'. You may even have modified it to trigger a LUKS Self-Destruct on removal of your BusKill device.

Because you're now experimenting with a new setup, let's go ahead and wipe out that old file with a new one that just executes a soft-shutdown. You might need some days to get used to the new disarm procedure, and you probably don't want to suddenly loose all your data due to an accidental false-positive!

Execute the following on your 'sys-usb' Qube:

mv /rw/config/buskill.rules /rw/config/buskill.rules.bak.`date "+%Y%m%d_%H%M%S"`
cat << EOF | sudo tee /rw/config/buskill.rules
################################################################################
# File:    sys-usb:/etc/udev/rules.d/buskill.rules -> /rw/config/buskill.rules
# Purpose: Add buskill rules. For more info, see: https://buskill.in/qubes-os/
# Authors: Michael Altfield 
# Created: 2020-01-02
# License: GNU GPLv3
################################################################################
ACTION=="remove", SUBSYSTEM=="usb", ENV{ID_MODEL}=="Micromax_A74", RUN+="/usr/bin/qrexec-client-vm dom0 buskill.softShutdown"
EOF
sudo ln -s /rw/config/buskill.rules /etc/udev/rules.d/
sudo udevadm control --reload

Now, let's add a new udev '.rules' file. This one will always just lock your screen, and it's what will be put in-place when BusKill is "disarmed".

Execute the following on your 'sys-usb' Qube:

cat << EOF | sudo tee /rw/config/buskill.lock.rules
################################################################################
# File:    sys-usb:/etc/udev/rules.d/buskill.rules -> /rw/config/buskill.lock.rules
# Purpose: Just lock the screen. For more info, see: https://buskill.in/qubes-os/
# Authors: Michael Altfield 
# Created: 2023-05-10
# License: GNU GPLv3
################################################################################
ACTION=="remove", SUBSYSTEM=="usb", ENV{ID_MODEL}=="Micromax_A74", RUN+="/usr/bin/qrexec-client-vm dom0 buskill.lock"
EOF

The careful reader will see that we're not actually disarming BusKill in the same sense as our BusKill GUI app. Indeed, what we're actually going to do is swap these two files for 30 seconds.

This way, if BusKill is armed and you remove the cable, your computer shuts-down.

But if you want to disarm, the procedure becomes:

  1. Hit the "Disarm BusKill" keyboard shortcut (see below)
  2. Wait for the toast popup message indicating that BusKill is now disarmed
  3. Remove the cable within 30 seconds
  4. Your screen locks (instead of shutting down)

Personally, I can't think of a QubesOS user that would want to leave their machine unlocked when they go to the bathroom, so I figured this approach would work better than an actual disarm.

Bonus: when you return from your break, just plug-in the BusKill cable in, and it'll already be armed (reducing the risk of user error due to forgetting to arm BusKill).

Now, let's add the actual 'buskill-disarm.sh' script to disarm BusKill:

Execute the following on your 'sys-usb' Qube:

cat << EOF | sudo tee /usr/local/bin/buskill-disarm.sh
#!/bin/bash
 
################################################################################
# File:    sys-usb:/usr/local/bin/buskill-disarm.sh
# Purpose: Temp disarm BusKill. For more info, see: https://buskill.in/qubes-os/
# Authors: Tom 
# Co-Auth: Michael Altfield 
# Created: 2023-05-10
# License: GNU GPLv3
################################################################################
 
# replace the 'shutdown' trigger with the 'lock' trigger
sudo rm /etc/udev/rules.d/buskill.rules
sudo ln -s /rw/config/buskill.lock.rules /etc/udev/rules.d/buskill.rules
sudo udevadm control --reload
 
# let the user know that BusKill is now temporarily disarmed
notify-send -t 21000 "BusKill" "Disarmed for 30 seconds" -i changes-allow
 
# wait 30 seconds
sleep 30
 
# replace the 'lock' trigger with the 'shutdown' trigger
sudo rm /etc/udev/rules.d/buskill.rules
sudo ln -s /rw/config/buskill.rules /etc/udev/rules.d/buskill.rules
sudo udevadm control --reload
notify-send -t 5000 "BusKill" "BusKill is Armed" -i changes-prevent
EOF
sudo chmod +x /usr/local/bin/buskill-disarm.sh

dom0

If you followed our previous guide to setting-up BusKill in QubesOS, then you shouldn't need to add any files to dom0. What you do need to do is setup some keyboard shortcuts.

In the QubesOS GUI, click on the big Q "Start Menu" in the top-left of your XFCE panel to open the Applications menu. Navigate to 'System Tools' and click Keyboard

Screenshot of QubesOS with an arrow pointing to the "Q" Application Menu in the very top-left of the screen Screenshot of QubesOS Application Menu with "System Tools -> Keyboard" highlighted
Click the “Q” to open the QubesOS Application Menu Click System Tools -> Keyboard

Click the 'Application Shortcuts' Tab and then click the '+ Add' button on the bottom-left of the window.

Screenshot of QubesOS Keyboard Settings Window that shows the "Application Shortcuts" tab highlighted'alt Screenshot of QubesOS Keyboard Settings Window that shows the "+ Add" button highlightedalt
Click the “Application Shortcuts” tab to add a Keyboard Shortcut in Qubes Click the “Add” Button to add a new Keyboard Shortcut in Qubes

In the 'Command' input field, type the following

qvm-run sys-usb buskill-disarm.sh

The above command will execute a command in 'dom0' that will execute a command in 'sys-usb' that will execute the 'buskill-disarm.sh' script that we created above.

Screenshot of QubesOS Keyboard Settings Window that shows the \"OK\" button highlighted
After typing the command to be executed when the keyboard shortcut is pressed, click the "OK" button

Now click "OK" and, when prompted, type Ctrl+Shift+D (or whatever keyboard shortcut you want to bind to "Disarming BusKill").

Screenshot of QubesOS Keyboard Settings Window that shows the prompt "Press now the keyboard keys you want to use to trigger the command..."alt Screenshot of QubesOS Keyboard Settings Window that shows the selected Shortcut "Shift+Ctrl+D"
Type "Ctrl+Shift+D" or whatever keyboard shortcut you want to trigger BusKill to be disarmed for 30 seconds                                            

You should now have a keyboard shortcut binding for disarming BusKill!

Screenshot of QubesOSKeyboard Settings Window that shows the newly created keyboard shortcutfor \"Shift+Ctrl+D\" at the top of thelist

Test It!

At this point, you can test your new (temporary) BusKill Disarm functionality by:

  1. Plugging-in your BusKill cable
  2. Typing Ctrl+Shift+D
  3. Waiting for the toast popup message to appear indicating that BusKill is disarmed for 30 seconds
  4. Unplugging your BusKill cable

Your machine should lock, not shutdown.

Screenshot of QubesOS with a toast message in the top-right that says \"BusKill Disarmed for 30 Seconds\"
After hitting the keyboard shortcut to disarm BusKill, you have 30 seconds to remove the cable

After 30 seconds, return to your computer and test the normal "arm" functionality:

  1. Plug-in your BusKill cable
  2. Unlock your screen
  3. Unplug your BusKill cable

Your computer should shutdown, not lock.

Screenshot of QubesOS with a toast message in the top-right that says \"BusKill is Armed\"
30 seconds after hitting the keyboard shortcut, BusKill will arm itself

Troubleshooting

Is unplugging your USB device doing nothing? Having other issues?

See the Troubleshooting section in our original guide to using BusKill on QubesOS.

Limitations/Improvements

Security is porous. All software has bugs. Nothing is 100% secure. For more limitations to using BusKill on QubesOS, see the Limitations section in our original guide to using BusKill on QubesOS.

Buy a BusKill Cable

We look forward to continuing to improve the BusKill software and making BusKill more accessible this year. If you want to help, please consider purchasing a BusKill cable for yourself or a loved one. It helps us fund further development, and you get your own BusKill cable to keep you or your loved ones safe.

You can also buy a BusKill cable with bitcoin, monero, and other altcoins from our BusKill Store's .onion site.

Stay safe,
The BusKill Team
https://www.buskill.in/
http://www.buskillvampfih2iucxhit3qp36i2zzql3u6pmkeafvlxs3tlmot5yad.onion
 

This article describes how to setup keyboard shortcuts in QubesOS so that you can temporarily disarm (pause) the BusKill laptop kill cord.

This allows the user to, for example, go to the bathroom without causing their computer to shutdown or self-destruct.

Arm & Disarm BusKill in QubesOS

This is a guide that builds on part one: A Laptop Kill Cord for QubesOS (1/2). Before reading this, you should already be familiar with how to setup udev rules for BusKill on QubesOS.

  1. A Laptop Kill Cord for QubesOS (1/2)
  2. Disarm BusKill in QubesOS (2/2)

ⓘ Note: This post is adapted from its original article on Tom Hocker's blog.

What is BusKill?

What if someone literally steals your laptop while you're working with classified information inside a Whonix DispVM? They'd also be able to recover data from previous DispVMs--as Disposable VM's rootfs virtual files are not securely shredded after your DispVM is destroyed.

Are you a security researcher, journalist, or intelligence operative that works in QubesOS--exploiting Qubes' brilliant security-through-compartimentalization to keep your data safe? Do you make use of Whonix Disposable VMs for your work? Great! This post is for you.

I'm sure your QubesOS laptop has Full Disk Encryption and you're using a strong passphrase. But what if someone literally steals your laptop while you're working with classified information inside a Whonix DispVM? Not only will they get access to all of your AppVM's private data and the currently-running Whonix DispVM's data, but there's a high chance they'd be able to recover data from previous DispVMs--as Disposable VM's rootfs virtual files (volatile.img) are not securely shredded after your DispVM is destroyed by Qubes!

Let's say you're a journalist, activist, whistleblower, or a human rights worker in an oppressive regime. Or an intelligence operative behind enemy lines doing research or preparing a top-secret document behind a locked door. What do you do to protect your data, sources, or assets when the secret police suddenly batter down your door? How quickly can you actually act to shutdown your laptop and shred your RAM and/or FDE encryption keys?

BusKill Demo
Watch the BusKill Explainer Video for more info youtube.com/v/qPwyoD_cQR4

BusKill utilizes a magnetic trip-wire that tethers your body to your laptop. If you suddenly jump to your feet or fall off your chair (in response to the battering ram crashing through your door) or your laptop is ripped off your table by a group of armed thugs, the data bus' magnetic connection will be severed. This event causes a configurable trigger to execute.

The BusKill trigger can be anything from:

  1. locking your screen or
  2. shutting down the computer or
  3. initiating a self-destruct sequence

While our last post described how to setup such a system in QubesOS with BusKill, this post will describe how to add keyboard shortcuts to arm & disarm the dead man switch (eg so you can go to the bathroom).

Disclaimer

This guide contains experimental files, commands, and software. The information contained in this article may or may not lead to corruption or total permanent deletion of some or all of your data. We've done our best to carefully guide the user so they know the risks of each BusKill trigger, but we cannot be responsible for any data loss that has occurred as a result of following this guide.

The contents of this guide is provided openly and is licensed under the CC-BY-SA license. The software included in this guide is licensed under the GNU GPLv3 license. All content here is consistent with the limitations of liabilities outlined in its respective licenses.

We highly recommend that any experiments with the scripts included in this article are used exclusively on a disposable machine containing no valuable data.

If data loss is a concern for you, then leave now and do not proceed with following this guide. You have been warned.

Release Note

Also be aware that, due to the risks outlined above, BusKill will not be released with this "self-destruct" trigger.

If you purchase a BusKill cable, it will only ship with non-destructive triggers that lock the screen or shutdown the computer. Advanced users can follow guides to add additional destructive triggers, such as the one described in this post, but they should do so at their own risk--taking carefully into consideration all of the warnings outlined above and throughout this article.

Again, if you buy a BusKill cable, the worst that can happen is your computer will abruptly shutdown.

Assumptions

This guide necessarily makes several assumptions outlined below.

sys-usb

In this guide, we assume that your QubesOS install has a USB-Qube named 'sys-usb' for handling USB events on behalf of dom0.

If you decided to combine your USB and networking Qubes at install time, then replace all references in this guide for 'sys-usb' to 'sys-net'.

If you decided to run your 'sys-usb' VM as a DispoableVM at install time, then replace all references in this guide for 'sys-usb' its Disposable TemplateVM (eg 'fedora-36-dvm').

..And if you chose not to isolate your USB devices, then may god help you.

Udev Device Matching

BusKill in Linux uses udev to detect when the USB's cable is severed. The exact udev rule that you use in the files below will depend on the drive you choose to use in your BusKill cable.

In this guide, we identify our BusKill-specific drive with the 'ENV{ID_MODEL}=="Micromax_A74"' udev property. You should replace this property with one that matches your BusKill-specific drive.

To determine how to query your USB drive for device-specific identifiers, see Introducing BusKill: A Kill Cord for your Laptop. Note that the `udevadm monitor --environment --udev` command should be run in the 'sys-usb' Qube.

ⓘ Note: If you'd prefer to buy a BusKill cable than make your own, you can buy one fully assembled here.

QubesOS Version

This guide was written for QubesOS v4.1.

[user@dom0 ~]$ cat /etc/redhat-release Qubes release 4.1.2 (R4.1)
[user@dom0 ~]$

BusKill Files

This section will describe what files should be created and where.

Due to the design of QubesOS, it takes a bit of mental gymnastics to understand what we're doing and why. It's important to keep in mind that, in QubesOS

  1. The keyboard and UI are configured in 'dom0'
  2. USB devices (like the BusKill device) are routed to the 'sys-usb' VM
  3. dom0 has the privilege to execute scripts inside other VMs (eg 'sys-usb')
  4. By design, VMs should *not* be able to send arbitrary commands to be executed in dom0
  5. ...but via the qubes-rpc, we can permit some VMs (eg 'sys-usb') to execute a script in dom0 (though for security reasons, ideally such that no data/input is sent from the less-trusted VM to dom0 -- other than the name of the script)

Due to the constraints listed above:

  1. We'll be configuring the disarm button as keyboard shortcut in dom0
  2. We'll be saving and executing the 'buskill-disarm.sh' script in 'sys-usb' (because these scripts manipulate our udev rules)
  3. The keyboard shortcut in dom0 will actually be executing the above script in 'sys-usb'

sys-usb

If you followed our previous guide to setting-up BusKill in QubesOS, then you should already have a file in 'sys-usb' at '/rw/config/buskill.rules'. You may even have modified it to trigger a LUKS Self-Destruct on removal of your BusKill device.

Because you're now experimenting with a new setup, let's go ahead and wipe out that old file with a new one that just executes a soft-shutdown. You might need some days to get used to the new disarm procedure, and you probably don't want to suddenly loose all your data due to an accidental false-positive!

Execute the following on your 'sys-usb' Qube:

mv /rw/config/buskill.rules /rw/config/buskill.rules.bak.`date "+%Y%m%d_%H%M%S"`
cat << EOF | sudo tee /rw/config/buskill.rules
################################################################################
# File:    sys-usb:/etc/udev/rules.d/buskill.rules -> /rw/config/buskill.rules
# Purpose: Add buskill rules. For more info, see: https://buskill.in/qubes-os/
# Authors: Michael Altfield 
# Created: 2020-01-02
# License: GNU GPLv3
################################################################################
ACTION=="remove", SUBSYSTEM=="usb", ENV{ID_MODEL}=="Micromax_A74", RUN+="/usr/bin/qrexec-client-vm dom0 buskill.softShutdown"
EOF
sudo ln -s /rw/config/buskill.rules /etc/udev/rules.d/
sudo udevadm control --reload

Now, let's add a new udev '.rules' file. This one will always just lock your screen, and it's what will be put in-place when BusKill is "disarmed".

Execute the following on your 'sys-usb' Qube:

cat << EOF | sudo tee /rw/config/buskill.lock.rules
################################################################################
# File:    sys-usb:/etc/udev/rules.d/buskill.rules -> /rw/config/buskill.lock.rules
# Purpose: Just lock the screen. For more info, see: https://buskill.in/qubes-os/
# Authors: Michael Altfield 
# Created: 2023-05-10
# License: GNU GPLv3
################################################################################
ACTION=="remove", SUBSYSTEM=="usb", ENV{ID_MODEL}=="Micromax_A74", RUN+="/usr/bin/qrexec-client-vm dom0 buskill.lock"
EOF

The careful reader will see that we're not actually disarming BusKill in the same sense as our BusKill GUI app. Indeed, what we're actually going to do is swap these two files for 30 seconds.

This way, if BusKill is armed and you remove the cable, your computer shuts-down.

But if you want to disarm, the procedure becomes:

  1. Hit the "Disarm BusKill" keyboard shortcut (see below)
  2. Wait for the toast popup message indicating that BusKill is now disarmed
  3. Remove the cable within 30 seconds
  4. Your screen locks (instead of shutting down)

Personally, I can't think of a QubesOS user that would want to leave their machine unlocked when they go to the bathroom, so I figured this approach would work better than an actual disarm.

Bonus: when you return from your break, just plug-in the BusKill cable in, and it'll already be armed (reducing the risk of user error due to forgetting to arm BusKill).

Now, let's add the actual 'buskill-disarm.sh' script to disarm BusKill:

Execute the following on your 'sys-usb' Qube:

cat << EOF | sudo tee /usr/local/bin/buskill-disarm.sh
#!/bin/bash
 
################################################################################
# File:    sys-usb:/usr/local/bin/buskill-disarm.sh
# Purpose: Temp disarm BusKill. For more info, see: https://buskill.in/qubes-os/
# Authors: Tom 
# Co-Auth: Michael Altfield 
# Created: 2023-05-10
# License: GNU GPLv3
################################################################################
 
# replace the 'shutdown' trigger with the 'lock' trigger
sudo rm /etc/udev/rules.d/buskill.rules
sudo ln -s /rw/config/buskill.lock.rules /etc/udev/rules.d/buskill.rules
sudo udevadm control --reload
 
# let the user know that BusKill is now temporarily disarmed
notify-send -t 21000 "BusKill" "Disarmed for 30 seconds" -i changes-allow
 
# wait 30 seconds
sleep 30
 
# replace the 'lock' trigger with the 'shutdown' trigger
sudo rm /etc/udev/rules.d/buskill.rules
sudo ln -s /rw/config/buskill.rules /etc/udev/rules.d/buskill.rules
sudo udevadm control --reload
notify-send -t 5000 "BusKill" "BusKill is Armed" -i changes-prevent
EOF
sudo chmod +x /usr/local/bin/buskill-disarm.sh

dom0

If you followed our previous guide to setting-up BusKill in QubesOS, then you shouldn't need to add any files to dom0. What you do need to do is setup some keyboard shortcuts.

In the QubesOS GUI, click on the big Q "Start Menu" in the top-left of your XFCE panel to open the Applications menu. Navigate to 'System Tools' and click Keyboard

Screenshot of QubesOS with an arrow pointing to the "Q" Application Menu in the very top-left of the screen Screenshot of QubesOS Application Menu with "System Tools -> Keyboard" highlighted
Click the “Q” to open the QubesOS Application Menu Click System Tools -> Keyboard

Click the 'Application Shortcuts' Tab and then click the '+ Add' button on the bottom-left of the window.

Screenshot of QubesOS Keyboard Settings Window that shows the "Application Shortcuts" tab highlighted'alt Screenshot of QubesOS Keyboard Settings Window that shows the "+ Add" button highlightedalt
Click the “Application Shortcuts” tab to add a Keyboard Shortcut in Qubes Click the “Add” Button to add a new Keyboard Shortcut in Qubes

In the 'Command' input field, type the following

qvm-run sys-usb buskill-disarm.sh

The above command will execute a command in 'dom0' that will execute a command in 'sys-usb' that will execute the 'buskill-disarm.sh' script that we created above.

Screenshot of QubesOS Keyboard Settings Window that shows the \"OK\" button highlighted
After typing the command to be executed when the keyboard shortcut is pressed, click the "OK" button

Now click "OK" and, when prompted, type Ctrl+Shift+D (or whatever keyboard shortcut you want to bind to "Disarming BusKill").

Screenshot of QubesOS Keyboard Settings Window that shows the prompt "Press now the keyboard keys you want to use to trigger the command..."alt Screenshot of QubesOS Keyboard Settings Window that shows the selected Shortcut "Shift+Ctrl+D"
Type "Ctrl+Shift+D" or whatever keyboard shortcut you want to trigger BusKill to be disarmed for 30 seconds                                            

You should now have a keyboard shortcut binding for disarming BusKill!

Screenshot of QubesOSKeyboard Settings Window that shows the newly created keyboard shortcutfor \"Shift+Ctrl+D\" at the top of thelist

Test It!

At this point, you can test your new (temporary) BusKill Disarm functionality by:

  1. Plugging-in your BusKill cable
  2. Typing Ctrl+Shift+D
  3. Waiting for the toast popup message to appear indicating that BusKill is disarmed for 30 seconds
  4. Unplugging your BusKill cable

Your machine should lock, not shutdown.

Screenshot of QubesOS with a toast message in the top-right that says \"BusKill Disarmed for 30 Seconds\"
After hitting the keyboard shortcut to disarm BusKill, you have 30 seconds to remove the cable

After 30 seconds, return to your computer and test the normal "arm" functionality:

  1. Plug-in your BusKill cable
  2. Unlock your screen
  3. Unplug your BusKill cable

Your computer should shutdown, not lock.

Screenshot of QubesOS with a toast message in the top-right that says \"BusKill is Armed\"
30 seconds after hitting the keyboard shortcut, BusKill will arm itself

Troubleshooting

Is unplugging your USB device doing nothing? Having other issues?

See the Troubleshooting section in our original guide to using BusKill on QubesOS.

Limitations/Improvements

Security is porous. All software has bugs. Nothing is 100% secure. For more limitations to using BusKill on QubesOS, see the Limitations section in our original guide to using BusKill on QubesOS.

Buy a BusKill Cable

We look forward to continuing to improve the BusKill software and making BusKill more accessible this year. If you want to help, please consider purchasing a BusKill cable for yourself or a loved one. It helps us fund further development, and you get your own BusKill cable to keep you or your loved ones safe.

You can also buy a BusKill cable with bitcoin, monero, and other altcoins from our BusKill Store's .onion site.

Stay safe,
The BusKill Team
https://www.buskill.in/
http://www.buskillvampfih2iucxhit3qp36i2zzql3u6pmkeafvlxs3tlmot5yad.onion
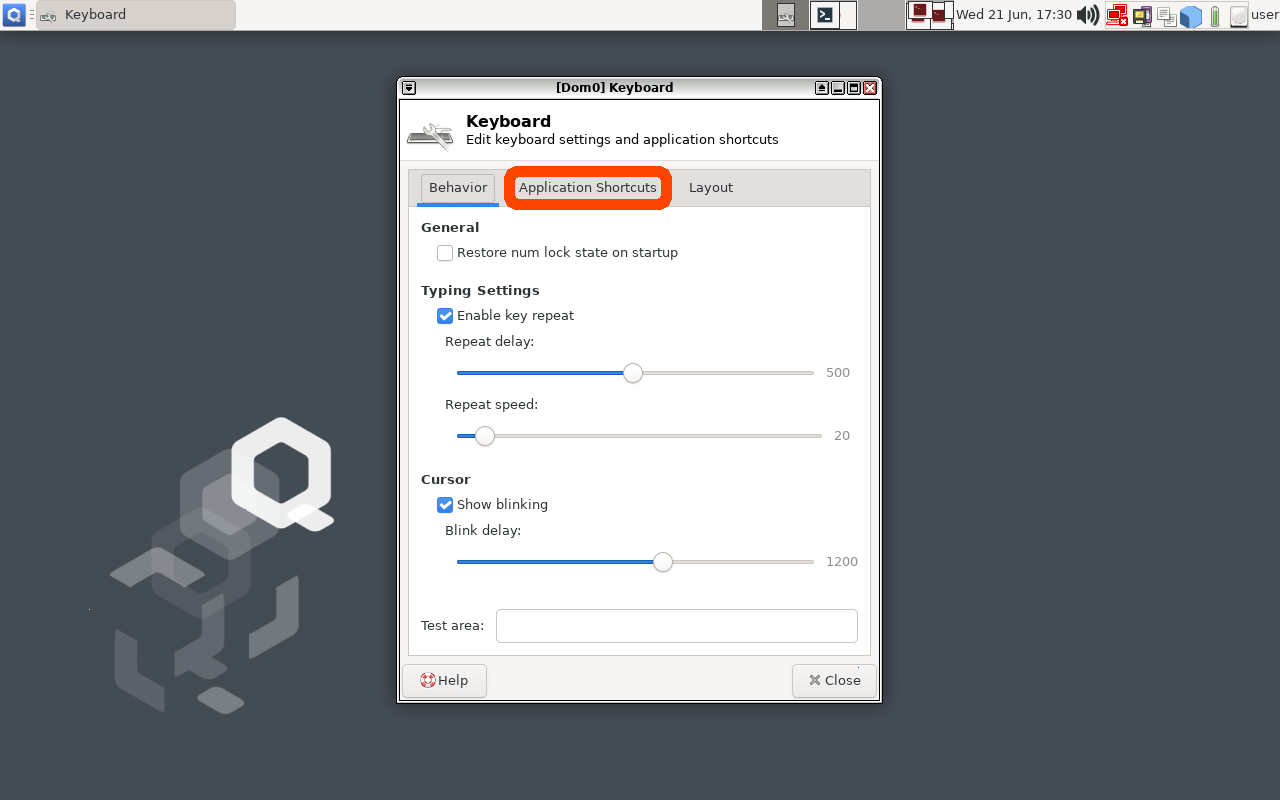
 

This article describes how to setup keyboard shortcuts in QubesOS so that you can temporarily disarm (pause) the BusKill laptop kill cord.

This allows the user to, for example, go to the bathroom without causing their computer to shutdown or self-destruct.

Arm & Disarm BusKill in QubesOS

This is a guide that builds on part one: A Laptop Kill Cord for QubesOS (1/2). Before reading this, you should already be familiar with how to setup udev rules for BusKill on QubesOS.

  1. A Laptop Kill Cord for QubesOS (1/2)
  2. Disarm BusKill in QubesOS (2/2)

ⓘ Note: This post is adapted from its original article on Tom Hocker's blog.

What is BusKill?

What if someone literally steals your laptop while you're working with classified information inside a Whonix DispVM? They'd also be able to recover data from previous DispVMs--as Disposable VM's rootfs virtual files are not securely shredded after your DispVM is destroyed.

Are you a security researcher, journalist, or intelligence operative that works in QubesOS--exploiting Qubes' brilliant security-through-compartimentalization to keep your data safe? Do you make use of Whonix Disposable VMs for your work? Great! This post is for you.

I'm sure your QubesOS laptop has Full Disk Encryption and you're using a strong passphrase. But what if someone literally steals your laptop while you're working with classified information inside a Whonix DispVM? Not only will they get access to all of your AppVM's private data and the currently-running Whonix DispVM's data, but there's a high chance they'd be able to recover data from previous DispVMs--as Disposable VM's rootfs virtual files (volatile.img) are not securely shredded after your DispVM is destroyed by Qubes!

Let's say you're a journalist, activist, whistleblower, or a human rights worker in an oppressive regime. Or an intelligence operative behind enemy lines doing research or preparing a top-secret document behind a locked door. What do you do to protect your data, sources, or assets when the secret police suddenly batter down your door? How quickly can you actually act to shutdown your laptop and shred your RAM and/or FDE encryption keys?

BusKill Demo
Watch the BusKill Explainer Video for more info youtube.com/v/qPwyoD_cQR4

BusKill utilizes a magnetic trip-wire that tethers your body to your laptop. If you suddenly jump to your feet or fall off your chair (in response to the battering ram crashing through your door) or your laptop is ripped off your table by a group of armed thugs, the data bus' magnetic connection will be severed. This event causes a configurable trigger to execute.

The BusKill trigger can be anything from:

  1. locking your screen or
  2. shutting down the computer or
  3. initiating a self-destruct sequence

While our last post described how to setup such a system in QubesOS with BusKill, this post will describe how to add keyboard shortcuts to arm & disarm the dead man switch (eg so you can go to the bathroom).

Disclaimer

This guide contains experimental files, commands, and software. The information contained in this article may or may not lead to corruption or total permanent deletion of some or all of your data. We've done our best to carefully guide the user so they know the risks of each BusKill trigger, but we cannot be responsible for any data loss that has occurred as a result of following this guide.

The contents of this guide is provided openly and is licensed under the CC-BY-SA license. The software included in this guide is licensed under the GNU GPLv3 license. All content here is consistent with the limitations of liabilities outlined in its respective licenses.

We highly recommend that any experiments with the scripts included in this article are used exclusively on a disposable machine containing no valuable data.

If data loss is a concern for you, then leave now and do not proceed with following this guide. You have been warned.

Release Note

Also be aware that, due to the risks outlined above, BusKill will not be released with this "self-destruct" trigger.

If you purchase a BusKill cable, it will only ship with non-destructive triggers that lock the screen or shutdown the computer. Advanced users can follow guides to add additional destructive triggers, such as the one described in this post, but they should do so at their own risk--taking carefully into consideration all of the warnings outlined above and throughout this article.

Again, if you buy a BusKill cable, the worst that can happen is your computer will abruptly shutdown.

Assumptions

This guide necessarily makes several assumptions outlined below.

sys-usb

In this guide, we assume that your QubesOS install has a USB-Qube named 'sys-usb' for handling USB events on behalf of dom0.

If you decided to combine your USB and networking Qubes at install time, then replace all references in this guide for 'sys-usb' to 'sys-net'.

If you decided to run your 'sys-usb' VM as a DispoableVM at install time, then replace all references in this guide for 'sys-usb' its Disposable TemplateVM (eg 'fedora-36-dvm').

..And if you chose not to isolate your USB devices, then may god help you.

Udev Device Matching

BusKill in Linux uses udev to detect when the USB's cable is severed. The exact udev rule that you use in the files below will depend on the drive you choose to use in your BusKill cable.

In this guide, we identify our BusKill-specific drive with the 'ENV{ID_MODEL}=="Micromax_A74"' udev property. You should replace this property with one that matches your BusKill-specific drive.

To determine how to query your USB drive for device-specific identifiers, see Introducing BusKill: A Kill Cord for your Laptop. Note that the `udevadm monitor --environment --udev` command should be run in the 'sys-usb' Qube.

ⓘ Note: If you'd prefer to buy a BusKill cable than make your own, you can buy one fully assembled here.

QubesOS Version

This guide was written for QubesOS v4.1.

[user@dom0 ~]$ cat /etc/redhat-release Qubes release 4.1.2 (R4.1)
[user@dom0 ~]$

BusKill Files

This section will describe what files should be created and where.

Due to the design of QubesOS, it takes a bit of mental gymnastics to understand what we're doing and why. It's important to keep in mind that, in QubesOS

  1. The keyboard and UI are configured in 'dom0'
  2. USB devices (like the BusKill device) are routed to the 'sys-usb' VM
  3. dom0 has the privilege to execute scripts inside other VMs (eg 'sys-usb')
  4. By design, VMs should *not* be able to send arbitrary commands to be executed in dom0
  5. ...but via the qubes-rpc, we can permit some VMs (eg 'sys-usb') to execute a script in dom0 (though for security reasons, ideally such that no data/input is sent from the less-trusted VM to dom0 -- other than the name of the script)

Due to the constraints listed above:

  1. We'll be configuring the disarm button as keyboard shortcut in dom0
  2. We'll be saving and executing the 'buskill-disarm.sh' script in 'sys-usb' (because these scripts manipulate our udev rules)
  3. The keyboard shortcut in dom0 will actually be executing the above script in 'sys-usb'

sys-usb

If you followed our previous guide to setting-up BusKill in QubesOS, then you should already have a file in 'sys-usb' at '/rw/config/buskill.rules'. You may even have modified it to trigger a LUKS Self-Destruct on removal of your BusKill device.

Because you're now experimenting with a new setup, let's go ahead and wipe out that old file with a new one that just executes a soft-shutdown. You might need some days to get used to the new disarm procedure, and you probably don't want to suddenly loose all your data due to an accidental false-positive!

Execute the following on your 'sys-usb' Qube:

mv /rw/config/buskill.rules /rw/config/buskill.rules.bak.`date "+%Y%m%d_%H%M%S"`
cat << EOF | sudo tee /rw/config/buskill.rules
################################################################################
# File:    sys-usb:/etc/udev/rules.d/buskill.rules -> /rw/config/buskill.rules
# Purpose: Add buskill rules. For more info, see: https://buskill.in/qubes-os/
# Authors: Michael Altfield 
# Created: 2020-01-02
# License: GNU GPLv3
################################################################################
ACTION=="remove", SUBSYSTEM=="usb", ENV{ID_MODEL}=="Micromax_A74", RUN+="/usr/bin/qrexec-client-vm dom0 buskill.softShutdown"
EOF
sudo ln -s /rw/config/buskill.rules /etc/udev/rules.d/
sudo udevadm control --reload

Now, let's add a new udev '.rules' file. This one will always just lock your screen, and it's what will be put in-place when BusKill is "disarmed".

Execute the following on your 'sys-usb' Qube:

cat << EOF | sudo tee /rw/config/buskill.lock.rules
################################################################################
# File:    sys-usb:/etc/udev/rules.d/buskill.rules -> /rw/config/buskill.lock.rules
# Purpose: Just lock the screen. For more info, see: https://buskill.in/qubes-os/
# Authors: Michael Altfield 
# Created: 2023-05-10
# License: GNU GPLv3
################################################################################
ACTION=="remove", SUBSYSTEM=="usb", ENV{ID_MODEL}=="Micromax_A74", RUN+="/usr/bin/qrexec-client-vm dom0 buskill.lock"
EOF

The careful reader will see that we're not actually disarming BusKill in the same sense as our BusKill GUI app. Indeed, what we're actually going to do is swap these two files for 30 seconds.

This way, if BusKill is armed and you remove the cable, your computer shuts-down.

But if you want to disarm, the procedure becomes:

  1. Hit the "Disarm BusKill" keyboard shortcut (see below)
  2. Wait for the toast popup message indicating that BusKill is now disarmed
  3. Remove the cable within 30 seconds
  4. Your screen locks (instead of shutting down)

Personally, I can't think of a QubesOS user that would want to leave their machine unlocked when they go to the bathroom, so I figured this approach would work better than an actual disarm.

Bonus: when you return from your break, just plug-in the BusKill cable in, and it'll already be armed (reducing the risk of user error due to forgetting to arm BusKill).

Now, let's add the actual 'buskill-disarm.sh' script to disarm BusKill:

Execute the following on your 'sys-usb' Qube:

cat << EOF | sudo tee /usr/local/bin/buskill-disarm.sh
#!/bin/bash
 
################################################################################
# File:    sys-usb:/usr/local/bin/buskill-disarm.sh
# Purpose: Temp disarm BusKill. For more info, see: https://buskill.in/qubes-os/
# Authors: Tom 
# Co-Auth: Michael Altfield 
# Created: 2023-05-10
# License: GNU GPLv3
################################################################################
 
# replace the 'shutdown' trigger with the 'lock' trigger
sudo rm /etc/udev/rules.d/buskill.rules
sudo ln -s /rw/config/buskill.lock.rules /etc/udev/rules.d/buskill.rules
sudo udevadm control --reload
 
# let the user know that BusKill is now temporarily disarmed
notify-send -t 21000 "BusKill" "Disarmed for 30 seconds" -i changes-allow
 
# wait 30 seconds
sleep 30
 
# replace the 'lock' trigger with the 'shutdown' trigger
sudo rm /etc/udev/rules.d/buskill.rules
sudo ln -s /rw/config/buskill.rules /etc/udev/rules.d/buskill.rules
sudo udevadm control --reload
notify-send -t 5000 "BusKill" "BusKill is Armed" -i changes-prevent
EOF
sudo chmod +x /usr/local/bin/buskill-disarm.sh

dom0

If you followed our previous guide to setting-up BusKill in QubesOS, then you shouldn't need to add any files to dom0. What you do need to do is setup some keyboard shortcuts.

In the QubesOS GUI, click on the big Q "Start Menu" in the top-left of your XFCE panel to open the Applications menu. Navigate to 'System Tools' and click Keyboard

Screenshot of QubesOS with an arrow pointing to the "Q" Application Menu in the very top-left of the screen Screenshot of QubesOS Application Menu with "System Tools -> Keyboard" highlighted
Click the “Q” to open the QubesOS Application Menu Click System Tools -> Keyboard

Click the 'Application Shortcuts' Tab and then click the '+ Add' button on the bottom-left of the window.

Screenshot of QubesOS Keyboard Settings Window that shows the "Application Shortcuts" tab highlighted'alt Screenshot of QubesOS Keyboard Settings Window that shows the "+ Add" button highlightedalt
Click the “Application Shortcuts” tab to add a Keyboard Shortcut in Qubes Click the “Add” Button to add a new Keyboard Shortcut in Qubes

In the 'Command' input field, type the following

qvm-run sys-usb buskill-disarm.sh

The above command will execute a command in 'dom0' that will execute a command in 'sys-usb' that will execute the 'buskill-disarm.sh' script that we created above.

Screenshot of QubesOS Keyboard Settings Window that shows the \"OK\" button highlighted
After typing the command to be executed when the keyboard shortcut is pressed, click the "OK" button

Now click "OK" and, when prompted, type Ctrl+Shift+D (or whatever keyboard shortcut you want to bind to "Disarming BusKill").

Screenshot of QubesOS Keyboard Settings Window that shows the prompt "Press now the keyboard keys you want to use to trigger the command..."alt Screenshot of QubesOS Keyboard Settings Window that shows the selected Shortcut "Shift+Ctrl+D"
Type "Ctrl+Shift+D" or whatever keyboard shortcut you want to trigger BusKill to be disarmed for 30 seconds                                            

You should now have a keyboard shortcut binding for disarming BusKill!

Screenshot of QubesOSKeyboard Settings Window that shows the newly created keyboard shortcutfor \"Shift+Ctrl+D\" at the top of thelist

Test It!

At this point, you can test your new (temporary) BusKill Disarm functionality by:

  1. Plugging-in your BusKill cable
  2. Typing Ctrl+Shift+D
  3. Waiting for the toast popup message to appear indicating that BusKill is disarmed for 30 seconds
  4. Unplugging your BusKill cable

Your machine should lock, not shutdown.

Screenshot of QubesOS with a toast message in the top-right that says \"BusKill Disarmed for 30 Seconds\"
After hitting the keyboard shortcut to disarm BusKill, you have 30 seconds to remove the cable

After 30 seconds, return to your computer and test the normal "arm" functionality:

  1. Plug-in your BusKill cable
  2. Unlock your screen
  3. Unplug your BusKill cable

Your computer should shutdown, not lock.

Screenshot of QubesOS with a toast message in the top-right that says \"BusKill is Armed\"
30 seconds after hitting the keyboard shortcut, BusKill will arm itself

Troubleshooting

Is unplugging your USB device doing nothing? Having other issues?

See the Troubleshooting section in our original guide to using BusKill on QubesOS.

Limitations/Improvements

Security is porous. All software has bugs. Nothing is 100% secure. For more limitations to using BusKill on QubesOS, see the Limitations section in our original guide to using BusKill on QubesOS.

Buy a BusKill Cable

We look forward to continuing to improve the BusKill software and making BusKill more accessible this year. If you want to help, please consider purchasing a BusKill cable for yourself or a loved one. It helps us fund further development, and you get your own BusKill cable to keep you or your loved ones safe.

You can also buy a BusKill cable with bitcoin, monero, and other altcoins from our BusKill Store's .onion site.

Stay safe,
The BusKill Team
https://www.buskill.in/
http://www.buskillvampfih2iucxhit3qp36i2zzql3u6pmkeafvlxs3tlmot5yad.onion
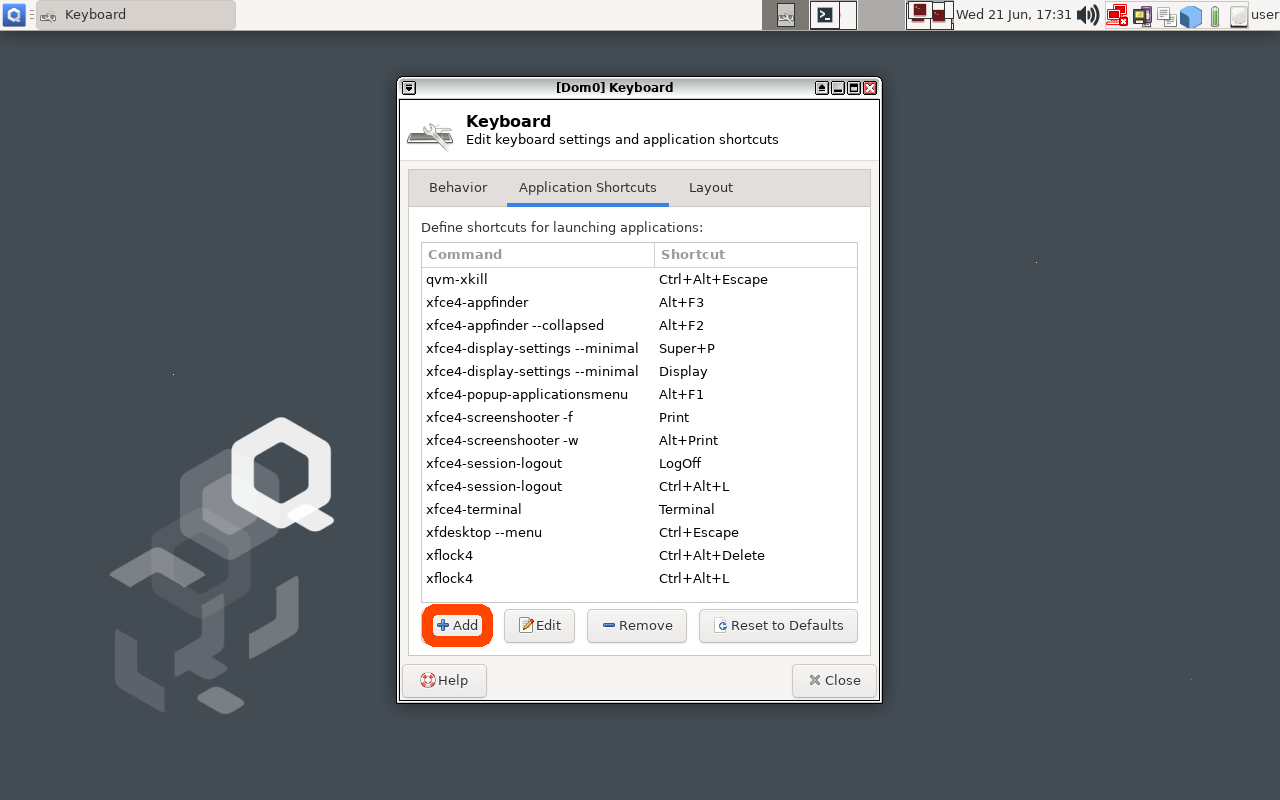
 

This article describes how to setup keyboard shortcuts in QubesOS so that you can temporarily disarm (pause) the BusKill laptop kill cord.

This allows the user to, for example, go to the bathroom without causing their computer to shutdown or self-destruct.

Arm & Disarm BusKill in QubesOS

This is a guide that builds on part one: A Laptop Kill Cord for QubesOS (1/2). Before reading this, you should already be familiar with how to setup udev rules for BusKill on QubesOS.

  1. A Laptop Kill Cord for QubesOS (1/2)
  2. Disarm BusKill in QubesOS (2/2)

ⓘ Note: This post is adapted from its original article on Tom Hocker's blog.

What is BusKill?

What if someone literally steals your laptop while you're working with classified information inside a Whonix DispVM? They'd also be able to recover data from previous DispVMs--as Disposable VM's rootfs virtual files are not securely shredded after your DispVM is destroyed.

Are you a security researcher, journalist, or intelligence operative that works in QubesOS--exploiting Qubes' brilliant security-through-compartimentalization to keep your data safe? Do you make use of Whonix Disposable VMs for your work? Great! This post is for you.

I'm sure your QubesOS laptop has Full Disk Encryption and you're using a strong passphrase. But what if someone literally steals your laptop while you're working with classified information inside a Whonix DispVM? Not only will they get access to all of your AppVM's private data and the currently-running Whonix DispVM's data, but there's a high chance they'd be able to recover data from previous DispVMs--as Disposable VM's rootfs virtual files (volatile.img) are not securely shredded after your DispVM is destroyed by Qubes!

Let's say you're a journalist, activist, whistleblower, or a human rights worker in an oppressive regime. Or an intelligence operative behind enemy lines doing research or preparing a top-secret document behind a locked door. What do you do to protect your data, sources, or assets when the secret police suddenly batter down your door? How quickly can you actually act to shutdown your laptop and shred your RAM and/or FDE encryption keys?

BusKill Demo
Watch the BusKill Explainer Video for more info youtube.com/v/qPwyoD_cQR4

BusKill utilizes a magnetic trip-wire that tethers your body to your laptop. If you suddenly jump to your feet or fall off your chair (in response to the battering ram crashing through your door) or your laptop is ripped off your table by a group of armed thugs, the data bus' magnetic connection will be severed. This event causes a configurable trigger to execute.

The BusKill trigger can be anything from:

  1. locking your screen or
  2. shutting down the computer or
  3. initiating a self-destruct sequence

While our last post described how to setup such a system in QubesOS with BusKill, this post will describe how to add keyboard shortcuts to arm & disarm the dead man switch (eg so you can go to the bathroom).

Disclaimer

This guide contains experimental files, commands, and software. The information contained in this article may or may not lead to corruption or total permanent deletion of some or all of your data. We've done our best to carefully guide the user so they know the risks of each BusKill trigger, but we cannot be responsible for any data loss that has occurred as a result of following this guide.

The contents of this guide is provided openly and is licensed under the CC-BY-SA license. The software included in this guide is licensed under the GNU GPLv3 license. All content here is consistent with the limitations of liabilities outlined in its respective licenses.

We highly recommend that any experiments with the scripts included in this article are used exclusively on a disposable machine containing no valuable data.

If data loss is a concern for you, then leave now and do not proceed with following this guide. You have been warned.

Release Note

Also be aware that, due to the risks outlined above, BusKill will not be released with this "self-destruct" trigger.

If you purchase a BusKill cable, it will only ship with non-destructive triggers that lock the screen or shutdown the computer. Advanced users can follow guides to add additional destructive triggers, such as the one described in this post, but they should do so at their own risk--taking carefully into consideration all of the warnings outlined above and throughout this article.

Again, if you buy a BusKill cable, the worst that can happen is your computer will abruptly shutdown.

Assumptions

This guide necessarily makes several assumptions outlined below.

sys-usb

In this guide, we assume that your QubesOS install has a USB-Qube named 'sys-usb' for handling USB events on behalf of dom0.

If you decided to combine your USB and networking Qubes at install time, then replace all references in this guide for 'sys-usb' to 'sys-net'.

If you decided to run your 'sys-usb' VM as a DispoableVM at install time, then replace all references in this guide for 'sys-usb' its Disposable TemplateVM (eg 'fedora-36-dvm').

..And if you chose not to isolate your USB devices, then may god help you.

Udev Device Matching

BusKill in Linux uses udev to detect when the USB's cable is severed. The exact udev rule that you use in the files below will depend on the drive you choose to use in your BusKill cable.

In this guide, we identify our BusKill-specific drive with the 'ENV{ID_MODEL}=="Micromax_A74"' udev property. You should replace this property with one that matches your BusKill-specific drive.

To determine how to query your USB drive for device-specific identifiers, see Introducing BusKill: A Kill Cord for your Laptop. Note that the `udevadm monitor --environment --udev` command should be run in the 'sys-usb' Qube.

ⓘ Note: If you'd prefer to buy a BusKill cable than make your own, you can buy one fully assembled here.

QubesOS Version

This guide was written for QubesOS v4.1.

[user@dom0 ~]$ cat /etc/redhat-release Qubes release 4.1.2 (R4.1)
[user@dom0 ~]$

BusKill Files

This section will describe what files should be created and where.

Due to the design of QubesOS, it takes a bit of mental gymnastics to understand what we're doing and why. It's important to keep in mind that, in QubesOS

  1. The keyboard and UI are configured in 'dom0'
  2. USB devices (like the BusKill device) are routed to the 'sys-usb' VM
  3. dom0 has the privilege to execute scripts inside other VMs (eg 'sys-usb')
  4. By design, VMs should *not* be able to send arbitrary commands to be executed in dom0
  5. ...but via the qubes-rpc, we can permit some VMs (eg 'sys-usb') to execute a script in dom0 (though for security reasons, ideally such that no data/input is sent from the less-trusted VM to dom0 -- other than the name of the script)

Due to the constraints listed above:

  1. We'll be configuring the disarm button as keyboard shortcut in dom0
  2. We'll be saving and executing the 'buskill-disarm.sh' script in 'sys-usb' (because these scripts manipulate our udev rules)
  3. The keyboard shortcut in dom0 will actually be executing the above script in 'sys-usb'

sys-usb

If you followed our previous guide to setting-up BusKill in QubesOS, then you should already have a file in 'sys-usb' at '/rw/config/buskill.rules'. You may even have modified it to trigger a LUKS Self-Destruct on removal of your BusKill device.

Because you're now experimenting with a new setup, let's go ahead and wipe out that old file with a new one that just executes a soft-shutdown. You might need some days to get used to the new disarm procedure, and you probably don't want to suddenly loose all your data due to an accidental false-positive!

Execute the following on your 'sys-usb' Qube:

mv /rw/config/buskill.rules /rw/config/buskill.rules.bak.`date "+%Y%m%d_%H%M%S"`
cat << EOF | sudo tee /rw/config/buskill.rules
################################################################################
# File:    sys-usb:/etc/udev/rules.d/buskill.rules -> /rw/config/buskill.rules
# Purpose: Add buskill rules. For more info, see: https://buskill.in/qubes-os/
# Authors: Michael Altfield 
# Created: 2020-01-02
# License: GNU GPLv3
################################################################################
ACTION=="remove", SUBSYSTEM=="usb", ENV{ID_MODEL}=="Micromax_A74", RUN+="/usr/bin/qrexec-client-vm dom0 buskill.softShutdown"
EOF
sudo ln -s /rw/config/buskill.rules /etc/udev/rules.d/
sudo udevadm control --reload

Now, let's add a new udev '.rules' file. This one will always just lock your screen, and it's what will be put in-place when BusKill is "disarmed".

Execute the following on your 'sys-usb' Qube:

cat << EOF | sudo tee /rw/config/buskill.lock.rules
################################################################################
# File:    sys-usb:/etc/udev/rules.d/buskill.rules -> /rw/config/buskill.lock.rules
# Purpose: Just lock the screen. For more info, see: https://buskill.in/qubes-os/
# Authors: Michael Altfield 
# Created: 2023-05-10
# License: GNU GPLv3
################################################################################
ACTION=="remove", SUBSYSTEM=="usb", ENV{ID_MODEL}=="Micromax_A74", RUN+="/usr/bin/qrexec-client-vm dom0 buskill.lock"
EOF

The careful reader will see that we're not actually disarming BusKill in the same sense as our BusKill GUI app. Indeed, what we're actually going to do is swap these two files for 30 seconds.

This way, if BusKill is armed and you remove the cable, your computer shuts-down.

But if you want to disarm, the procedure becomes:

  1. Hit the "Disarm BusKill" keyboard shortcut (see below)
  2. Wait for the toast popup message indicating that BusKill is now disarmed
  3. Remove the cable within 30 seconds
  4. Your screen locks (instead of shutting down)

Personally, I can't think of a QubesOS user that would want to leave their machine unlocked when they go to the bathroom, so I figured this approach would work better than an actual disarm.

Bonus: when you return from your break, just plug-in the BusKill cable in, and it'll already be armed (reducing the risk of user error due to forgetting to arm BusKill).

Now, let's add the actual 'buskill-disarm.sh' script to disarm BusKill:

Execute the following on your 'sys-usb' Qube:

cat << EOF | sudo tee /usr/local/bin/buskill-disarm.sh
#!/bin/bash
 
################################################################################
# File:    sys-usb:/usr/local/bin/buskill-disarm.sh
# Purpose: Temp disarm BusKill. For more info, see: https://buskill.in/qubes-os/
# Authors: Tom 
# Co-Auth: Michael Altfield 
# Created: 2023-05-10
# License: GNU GPLv3
################################################################################
 
# replace the 'shutdown' trigger with the 'lock' trigger
sudo rm /etc/udev/rules.d/buskill.rules
sudo ln -s /rw/config/buskill.lock.rules /etc/udev/rules.d/buskill.rules
sudo udevadm control --reload
 
# let the user know that BusKill is now temporarily disarmed
notify-send -t 21000 "BusKill" "Disarmed for 30 seconds" -i changes-allow
 
# wait 30 seconds
sleep 30
 
# replace the 'lock' trigger with the 'shutdown' trigger
sudo rm /etc/udev/rules.d/buskill.rules
sudo ln -s /rw/config/buskill.rules /etc/udev/rules.d/buskill.rules
sudo udevadm control --reload
notify-send -t 5000 "BusKill" "BusKill is Armed" -i changes-prevent
EOF
sudo chmod +x /usr/local/bin/buskill-disarm.sh

dom0

If you followed our previous guide to setting-up BusKill in QubesOS, then you shouldn't need to add any files to dom0. What you do need to do is setup some keyboard shortcuts.

In the QubesOS GUI, click on the big Q "Start Menu" in the top-left of your XFCE panel to open the Applications menu. Navigate to 'System Tools' and click Keyboard

Screenshot of QubesOS with an arrow pointing to the "Q" Application Menu in the very top-left of the screen Screenshot of QubesOS Application Menu with "System Tools -> Keyboard" highlighted
Click the “Q” to open the QubesOS Application Menu Click System Tools -> Keyboard

Click the 'Application Shortcuts' Tab and then click the '+ Add' button on the bottom-left of the window.

Screenshot of QubesOS Keyboard Settings Window that shows the "Application Shortcuts" tab highlighted'alt Screenshot of QubesOS Keyboard Settings Window that shows the "+ Add" button highlightedalt
Click the “Application Shortcuts” tab to add a Keyboard Shortcut in Qubes Click the “Add” Button to add a new Keyboard Shortcut in Qubes

In the 'Command' input field, type the following

qvm-run sys-usb buskill-disarm.sh

The above command will execute a command in 'dom0' that will execute a command in 'sys-usb' that will execute the 'buskill-disarm.sh' script that we created above.

Screenshot of QubesOS Keyboard Settings Window that shows the \"OK\" button highlighted
After typing the command to be executed when the keyboard shortcut is pressed, click the "OK" button

Now click "OK" and, when prompted, type Ctrl+Shift+D (or whatever keyboard shortcut you want to bind to "Disarming BusKill").

Screenshot of QubesOS Keyboard Settings Window that shows the prompt "Press now the keyboard keys you want to use to trigger the command..."alt Screenshot of QubesOS Keyboard Settings Window that shows the selected Shortcut "Shift+Ctrl+D"
Type "Ctrl+Shift+D" or whatever keyboard shortcut you want to trigger BusKill to be disarmed for 30 seconds                                            

You should now have a keyboard shortcut binding for disarming BusKill!

Screenshot of QubesOSKeyboard Settings Window that shows the newly created keyboard shortcutfor \"Shift+Ctrl+D\" at the top of thelist

Test It!

At this point, you can test your new (temporary) BusKill Disarm functionality by:

  1. Plugging-in your BusKill cable
  2. Typing Ctrl+Shift+D
  3. Waiting for the toast popup message to appear indicating that BusKill is disarmed for 30 seconds
  4. Unplugging your BusKill cable

Your machine should lock, not shutdown.

Screenshot of QubesOS with a toast message in the top-right that says \"BusKill Disarmed for 30 Seconds\"
After hitting the keyboard shortcut to disarm BusKill, you have 30 seconds to remove the cable

After 30 seconds, return to your computer and test the normal "arm" functionality:

  1. Plug-in your BusKill cable
  2. Unlock your screen
  3. Unplug your BusKill cable

Your computer should shutdown, not lock.

Screenshot of QubesOS with a toast message in the top-right that says \"BusKill is Armed\"
30 seconds after hitting the keyboard shortcut, BusKill will arm itself

Troubleshooting

Is unplugging your USB device doing nothing? Having other issues?

See the Troubleshooting section in our original guide to using BusKill on QubesOS.

Limitations/Improvements

Security is porous. All software has bugs. Nothing is 100% secure. For more limitations to using BusKill on QubesOS, see the Limitations section in our original guide to using BusKill on QubesOS.

Buy a BusKill Cable

We look forward to continuing to improve the BusKill software and making BusKill more accessible this year. If you want to help, please consider purchasing a BusKill cable for yourself or a loved one. It helps us fund further development, and you get your own BusKill cable to keep you or your loved ones safe.

You can also buy a BusKill cable with bitcoin, monero, and other altcoins from our BusKill Store's .onion site.

Stay safe,
The BusKill Team
https://www.buskill.in/
http://www.buskillvampfih2iucxhit3qp36i2zzql3u6pmkeafvlxs3tlmot5yad.onion
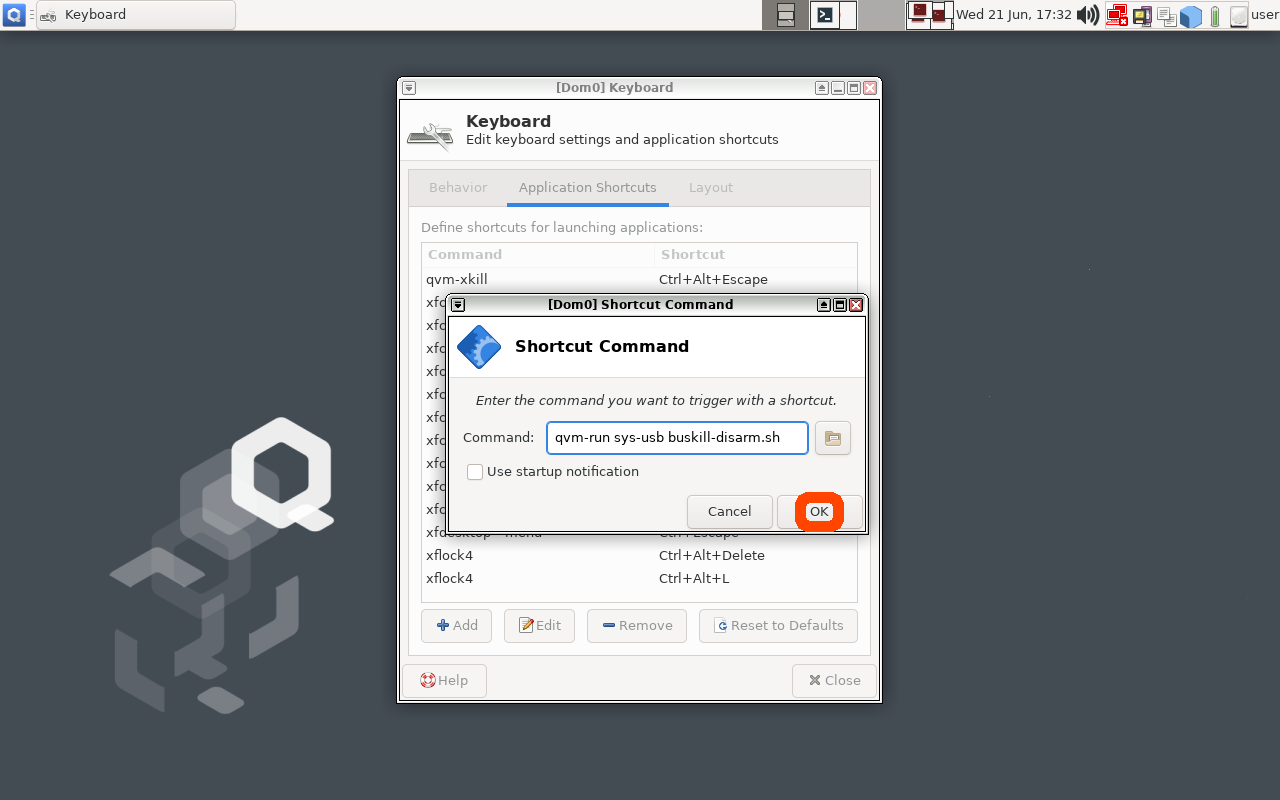
 

This article describes how to setup keyboard shortcuts in QubesOS so that you can temporarily disarm (pause) the BusKill laptop kill cord.

This allows the user to, for example, go to the bathroom without causing their computer to shutdown or self-destruct.

Arm & Disarm BusKill in QubesOS

This is a guide that builds on part one: A Laptop Kill Cord for QubesOS (1/2). Before reading this, you should already be familiar with how to setup udev rules for BusKill on QubesOS.

  1. A Laptop Kill Cord for QubesOS (1/2)
  2. Disarm BusKill in QubesOS (2/2)

ⓘ Note: This post is adapted from its original article on Tom Hocker's blog.

What is BusKill?

What if someone literally steals your laptop while you're working with classified information inside a Whonix DispVM? They'd also be able to recover data from previous DispVMs--as Disposable VM's rootfs virtual files are not securely shredded after your DispVM is destroyed.

Are you a security researcher, journalist, or intelligence operative that works in QubesOS--exploiting Qubes' brilliant security-through-compartimentalization to keep your data safe? Do you make use of Whonix Disposable VMs for your work? Great! This post is for you.

I'm sure your QubesOS laptop has Full Disk Encryption and you're using a strong passphrase. But what if someone literally steals your laptop while you're working with classified information inside a Whonix DispVM? Not only will they get access to all of your AppVM's private data and the currently-running Whonix DispVM's data, but there's a high chance they'd be able to recover data from previous DispVMs--as Disposable VM's rootfs virtual files (volatile.img) are not securely shredded after your DispVM is destroyed by Qubes!

Let's say you're a journalist, activist, whistleblower, or a human rights worker in an oppressive regime. Or an intelligence operative behind enemy lines doing research or preparing a top-secret document behind a locked door. What do you do to protect your data, sources, or assets when the secret police suddenly batter down your door? How quickly can you actually act to shutdown your laptop and shred your RAM and/or FDE encryption keys?

BusKill Demo
Watch the BusKill Explainer Video for more info youtube.com/v/qPwyoD_cQR4

BusKill utilizes a magnetic trip-wire that tethers your body to your laptop. If you suddenly jump to your feet or fall off your chair (in response to the battering ram crashing through your door) or your laptop is ripped off your table by a group of armed thugs, the data bus' magnetic connection will be severed. This event causes a configurable trigger to execute.

The BusKill trigger can be anything from:

  1. locking your screen or
  2. shutting down the computer or
  3. initiating a self-destruct sequence

While our last post described how to setup such a system in QubesOS with BusKill, this post will describe how to add keyboard shortcuts to arm & disarm the dead man switch (eg so you can go to the bathroom).

Disclaimer

This guide contains experimental files, commands, and software. The information contained in this article may or may not lead to corruption or total permanent deletion of some or all of your data. We've done our best to carefully guide the user so they know the risks of each BusKill trigger, but we cannot be responsible for any data loss that has occurred as a result of following this guide.

The contents of this guide is provided openly and is licensed under the CC-BY-SA license. The software included in this guide is licensed under the GNU GPLv3 license. All content here is consistent with the limitations of liabilities outlined in its respective licenses.

We highly recommend that any experiments with the scripts included in this article are used exclusively on a disposable machine containing no valuable data.

If data loss is a concern for you, then leave now and do not proceed with following this guide. You have been warned.

Release Note

Also be aware that, due to the risks outlined above, BusKill will not be released with this "self-destruct" trigger.

If you purchase a BusKill cable, it will only ship with non-destructive triggers that lock the screen or shutdown the computer. Advanced users can follow guides to add additional destructive triggers, such as the one described in this post, but they should do so at their own risk--taking carefully into consideration all of the warnings outlined above and throughout this article.

Again, if you buy a BusKill cable, the worst that can happen is your computer will abruptly shutdown.

Assumptions

This guide necessarily makes several assumptions outlined below.

sys-usb

In this guide, we assume that your QubesOS install has a USB-Qube named 'sys-usb' for handling USB events on behalf of dom0.

If you decided to combine your USB and networking Qubes at install time, then replace all references in this guide for 'sys-usb' to 'sys-net'.

If you decided to run your 'sys-usb' VM as a DispoableVM at install time, then replace all references in this guide for 'sys-usb' its Disposable TemplateVM (eg 'fedora-36-dvm').

..And if you chose not to isolate your USB devices, then may god help you.

Udev Device Matching

BusKill in Linux uses udev to detect when the USB's cable is severed. The exact udev rule that you use in the files below will depend on the drive you choose to use in your BusKill cable.

In this guide, we identify our BusKill-specific drive with the 'ENV{ID_MODEL}=="Micromax_A74"' udev property. You should replace this property with one that matches your BusKill-specific drive.

To determine how to query your USB drive for device-specific identifiers, see Introducing BusKill: A Kill Cord for your Laptop. Note that the `udevadm monitor --environment --udev` command should be run in the 'sys-usb' Qube.

ⓘ Note: If you'd prefer to buy a BusKill cable than make your own, you can buy one fully assembled here.

QubesOS Version

This guide was written for QubesOS v4.1.

[user@dom0 ~]$ cat /etc/redhat-release Qubes release 4.1.2 (R4.1)
[user@dom0 ~]$

BusKill Files

This section will describe what files should be created and where.

Due to the design of QubesOS, it takes a bit of mental gymnastics to understand what we're doing and why. It's important to keep in mind that, in QubesOS

  1. The keyboard and UI are configured in 'dom0'
  2. USB devices (like the BusKill device) are routed to the 'sys-usb' VM
  3. dom0 has the privilege to execute scripts inside other VMs (eg 'sys-usb')
  4. By design, VMs should *not* be able to send arbitrary commands to be executed in dom0
  5. ...but via the qubes-rpc, we can permit some VMs (eg 'sys-usb') to execute a script in dom0 (though for security reasons, ideally such that no data/input is sent from the less-trusted VM to dom0 -- other than the name of the script)

Due to the constraints listed above:

  1. We'll be configuring the disarm button as keyboard shortcut in dom0
  2. We'll be saving and executing the 'buskill-disarm.sh' script in 'sys-usb' (because these scripts manipulate our udev rules)
  3. The keyboard shortcut in dom0 will actually be executing the above script in 'sys-usb'

sys-usb

If you followed our previous guide to setting-up BusKill in QubesOS, then you should already have a file in 'sys-usb' at '/rw/config/buskill.rules'. You may even have modified it to trigger a LUKS Self-Destruct on removal of your BusKill device.

Because you're now experimenting with a new setup, let's go ahead and wipe out that old file with a new one that just executes a soft-shutdown. You might need some days to get used to the new disarm procedure, and you probably don't want to suddenly loose all your data due to an accidental false-positive!

Execute the following on your 'sys-usb' Qube:

mv /rw/config/buskill.rules /rw/config/buskill.rules.bak.`date "+%Y%m%d_%H%M%S"`
cat << EOF | sudo tee /rw/config/buskill.rules
################################################################################
# File:    sys-usb:/etc/udev/rules.d/buskill.rules -> /rw/config/buskill.rules
# Purpose: Add buskill rules. For more info, see: https://buskill.in/qubes-os/
# Authors: Michael Altfield 
# Created: 2020-01-02
# License: GNU GPLv3
################################################################################
ACTION=="remove", SUBSYSTEM=="usb", ENV{ID_MODEL}=="Micromax_A74", RUN+="/usr/bin/qrexec-client-vm dom0 buskill.softShutdown"
EOF
sudo ln -s /rw/config/buskill.rules /etc/udev/rules.d/
sudo udevadm control --reload

Now, let's add a new udev '.rules' file. This one will always just lock your screen, and it's what will be put in-place when BusKill is "disarmed".

Execute the following on your 'sys-usb' Qube:

cat << EOF | sudo tee /rw/config/buskill.lock.rules
################################################################################
# File:    sys-usb:/etc/udev/rules.d/buskill.rules -> /rw/config/buskill.lock.rules
# Purpose: Just lock the screen. For more info, see: https://buskill.in/qubes-os/
# Authors: Michael Altfield 
# Created: 2023-05-10
# License: GNU GPLv3
################################################################################
ACTION=="remove", SUBSYSTEM=="usb", ENV{ID_MODEL}=="Micromax_A74", RUN+="/usr/bin/qrexec-client-vm dom0 buskill.lock"
EOF

The careful reader will see that we're not actually disarming BusKill in the same sense as our BusKill GUI app. Indeed, what we're actually going to do is swap these two files for 30 seconds.

This way, if BusKill is armed and you remove the cable, your computer shuts-down.

But if you want to disarm, the procedure becomes:

  1. Hit the "Disarm BusKill" keyboard shortcut (see below)
  2. Wait for the toast popup message indicating that BusKill is now disarmed
  3. Remove the cable within 30 seconds
  4. Your screen locks (instead of shutting down)

Personally, I can't think of a QubesOS user that would want to leave their machine unlocked when they go to the bathroom, so I figured this approach would work better than an actual disarm.

Bonus: when you return from your break, just plug-in the BusKill cable in, and it'll already be armed (reducing the risk of user error due to forgetting to arm BusKill).

Now, let's add the actual 'buskill-disarm.sh' script to disarm BusKill:

Execute the following on your 'sys-usb' Qube:

cat << EOF | sudo tee /usr/local/bin/buskill-disarm.sh
#!/bin/bash
 
################################################################################
# File:    sys-usb:/usr/local/bin/buskill-disarm.sh
# Purpose: Temp disarm BusKill. For more info, see: https://buskill.in/qubes-os/
# Authors: Tom 
# Co-Auth: Michael Altfield 
# Created: 2023-05-10
# License: GNU GPLv3
################################################################################
 
# replace the 'shutdown' trigger with the 'lock' trigger
sudo rm /etc/udev/rules.d/buskill.rules
sudo ln -s /rw/config/buskill.lock.rules /etc/udev/rules.d/buskill.rules
sudo udevadm control --reload
 
# let the user know that BusKill is now temporarily disarmed
notify-send -t 21000 "BusKill" "Disarmed for 30 seconds" -i changes-allow
 
# wait 30 seconds
sleep 30
 
# replace the 'lock' trigger with the 'shutdown' trigger
sudo rm /etc/udev/rules.d/buskill.rules
sudo ln -s /rw/config/buskill.rules /etc/udev/rules.d/buskill.rules
sudo udevadm control --reload
notify-send -t 5000 "BusKill" "BusKill is Armed" -i changes-prevent
EOF
sudo chmod +x /usr/local/bin/buskill-disarm.sh

dom0

If you followed our previous guide to setting-up BusKill in QubesOS, then you shouldn't need to add any files to dom0. What you do need to do is setup some keyboard shortcuts.

In the QubesOS GUI, click on the big Q "Start Menu" in the top-left of your XFCE panel to open the Applications menu. Navigate to 'System Tools' and click Keyboard

Screenshot of QubesOS with an arrow pointing to the "Q" Application Menu in the very top-left of the screen Screenshot of QubesOS Application Menu with "System Tools -> Keyboard" highlighted
Click the “Q” to open the QubesOS Application Menu Click System Tools -> Keyboard

Click the 'Application Shortcuts' Tab and then click the '+ Add' button on the bottom-left of the window.

Screenshot of QubesOS Keyboard Settings Window that shows the "Application Shortcuts" tab highlighted'alt Screenshot of QubesOS Keyboard Settings Window that shows the "+ Add" button highlightedalt
Click the “Application Shortcuts” tab to add a Keyboard Shortcut in Qubes Click the “Add” Button to add a new Keyboard Shortcut in Qubes

In the 'Command' input field, type the following

qvm-run sys-usb buskill-disarm.sh

The above command will execute a command in 'dom0' that will execute a command in 'sys-usb' that will execute the 'buskill-disarm.sh' script that we created above.

Screenshot of QubesOS Keyboard Settings Window that shows the \"OK\" button highlighted
After typing the command to be executed when the keyboard shortcut is pressed, click the "OK" button

Now click "OK" and, when prompted, type Ctrl+Shift+D (or whatever keyboard shortcut you want to bind to "Disarming BusKill").

Screenshot of QubesOS Keyboard Settings Window that shows the prompt "Press now the keyboard keys you want to use to trigger the command..."alt Screenshot of QubesOS Keyboard Settings Window that shows the selected Shortcut "Shift+Ctrl+D"
Type "Ctrl+Shift+D" or whatever keyboard shortcut you want to trigger BusKill to be disarmed for 30 seconds                                            

You should now have a keyboard shortcut binding for disarming BusKill!

Screenshot of QubesOSKeyboard Settings Window that shows the newly created keyboard shortcutfor \"Shift+Ctrl+D\" at the top of thelist

Test It!

At this point, you can test your new (temporary) BusKill Disarm functionality by:

  1. Plugging-in your BusKill cable
  2. Typing Ctrl+Shift+D
  3. Waiting for the toast popup message to appear indicating that BusKill is disarmed for 30 seconds
  4. Unplugging your BusKill cable

Your machine should lock, not shutdown.

Screenshot of QubesOS with a toast message in the top-right that says \"BusKill Disarmed for 30 Seconds\"
After hitting the keyboard shortcut to disarm BusKill, you have 30 seconds to remove the cable

After 30 seconds, return to your computer and test the normal "arm" functionality:

  1. Plug-in your BusKill cable
  2. Unlock your screen
  3. Unplug your BusKill cable

Your computer should shutdown, not lock.

Screenshot of QubesOS with a toast message in the top-right that says \"BusKill is Armed\"
30 seconds after hitting the keyboard shortcut, BusKill will arm itself

Troubleshooting

Is unplugging your USB device doing nothing? Having other issues?

See the Troubleshooting section in our original guide to using BusKill on QubesOS.

Limitations/Improvements

Security is porous. All software has bugs. Nothing is 100% secure. For more limitations to using BusKill on QubesOS, see the Limitations section in our original guide to using BusKill on QubesOS.

Buy a BusKill Cable

We look forward to continuing to improve the BusKill software and making BusKill more accessible this year. If you want to help, please consider purchasing a BusKill cable for yourself or a loved one. It helps us fund further development, and you get your own BusKill cable to keep you or your loved ones safe.

You can also buy a BusKill cable with bitcoin, monero, and other altcoins from our BusKill Store's .onion site.

Stay safe,
The BusKill Team
https://www.buskill.in/
http://www.buskillvampfih2iucxhit3qp36i2zzql3u6pmkeafvlxs3tlmot5yad.onion
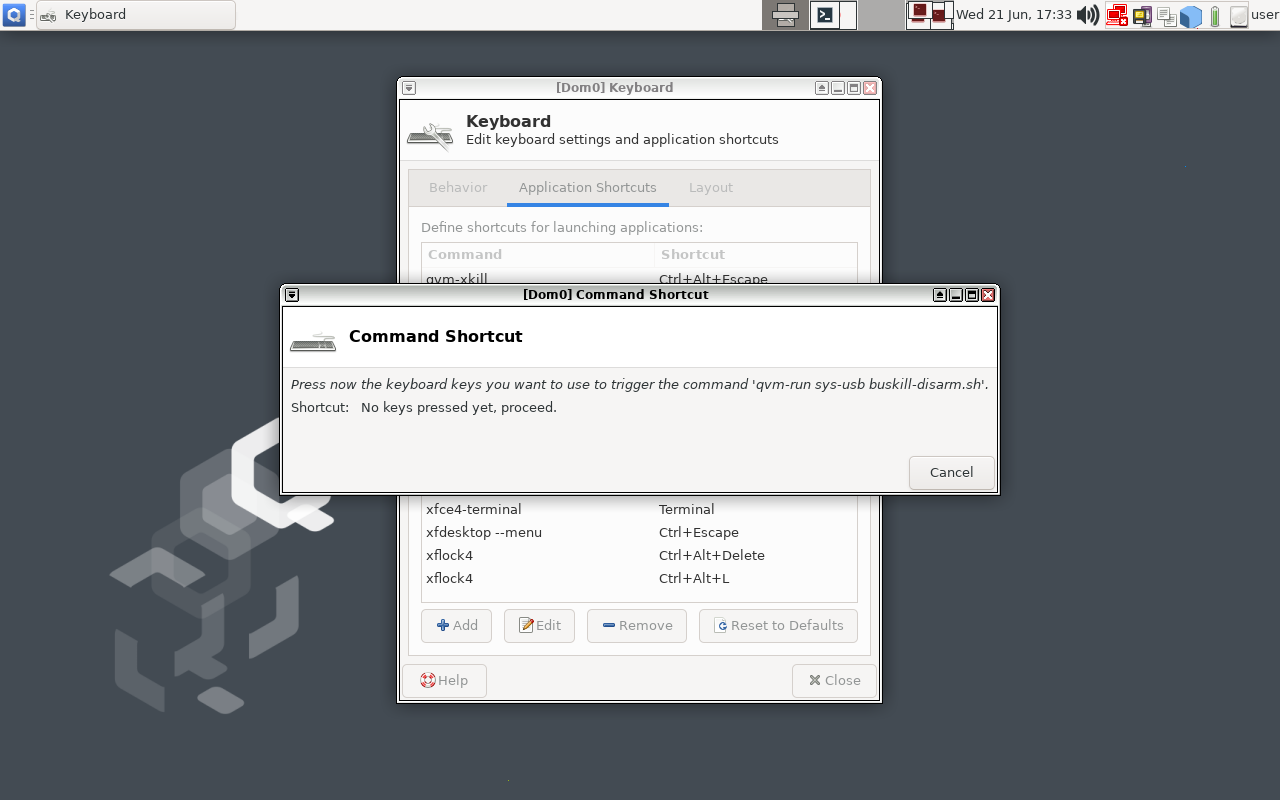
 

This article describes how to setup keyboard shortcuts in QubesOS so that you can temporarily disarm (pause) the BusKill laptop kill cord.

This allows the user to, for example, go to the bathroom without causing their computer to shutdown or self-destruct.

Arm & Disarm BusKill in QubesOS

This is a guide that builds on part one: A Laptop Kill Cord for QubesOS (1/2). Before reading this, you should already be familiar with how to setup udev rules for BusKill on QubesOS.

  1. A Laptop Kill Cord for QubesOS (1/2)
  2. Disarm BusKill in QubesOS (2/2)

ⓘ Note: This post is adapted from its original article on Tom Hocker's blog.

What is BusKill?

What if someone literally steals your laptop while you're working with classified information inside a Whonix DispVM? They'd also be able to recover data from previous DispVMs--as Disposable VM's rootfs virtual files are not securely shredded after your DispVM is destroyed.

Are you a security researcher, journalist, or intelligence operative that works in QubesOS--exploiting Qubes' brilliant security-through-compartimentalization to keep your data safe? Do you make use of Whonix Disposable VMs for your work? Great! This post is for you.

I'm sure your QubesOS laptop has Full Disk Encryption and you're using a strong passphrase. But what if someone literally steals your laptop while you're working with classified information inside a Whonix DispVM? Not only will they get access to all of your AppVM's private data and the currently-running Whonix DispVM's data, but there's a high chance they'd be able to recover data from previous DispVMs--as Disposable VM's rootfs virtual files (volatile.img) are not securely shredded after your DispVM is destroyed by Qubes!

Let's say you're a journalist, activist, whistleblower, or a human rights worker in an oppressive regime. Or an intelligence operative behind enemy lines doing research or preparing a top-secret document behind a locked door. What do you do to protect your data, sources, or assets when the secret police suddenly batter down your door? How quickly can you actually act to shutdown your laptop and shred your RAM and/or FDE encryption keys?

BusKill Demo
Watch the BusKill Explainer Video for more info youtube.com/v/qPwyoD_cQR4

BusKill utilizes a magnetic trip-wire that tethers your body to your laptop. If you suddenly jump to your feet or fall off your chair (in response to the battering ram crashing through your door) or your laptop is ripped off your table by a group of armed thugs, the data bus' magnetic connection will be severed. This event causes a configurable trigger to execute.

The BusKill trigger can be anything from:

  1. locking your screen or
  2. shutting down the computer or
  3. initiating a self-destruct sequence

While our last post described how to setup such a system in QubesOS with BusKill, this post will describe how to add keyboard shortcuts to arm & disarm the dead man switch (eg so you can go to the bathroom).

Disclaimer

This guide contains experimental files, commands, and software. The information contained in this article may or may not lead to corruption or total permanent deletion of some or all of your data. We've done our best to carefully guide the user so they know the risks of each BusKill trigger, but we cannot be responsible for any data loss that has occurred as a result of following this guide.

The contents of this guide is provided openly and is licensed under the CC-BY-SA license. The software included in this guide is licensed under the GNU GPLv3 license. All content here is consistent with the limitations of liabilities outlined in its respective licenses.

We highly recommend that any experiments with the scripts included in this article are used exclusively on a disposable machine containing no valuable data.

If data loss is a concern for you, then leave now and do not proceed with following this guide. You have been warned.

Release Note

Also be aware that, due to the risks outlined above, BusKill will not be released with this "self-destruct" trigger.

If you purchase a BusKill cable, it will only ship with non-destructive triggers that lock the screen or shutdown the computer. Advanced users can follow guides to add additional destructive triggers, such as the one described in this post, but they should do so at their own risk--taking carefully into consideration all of the warnings outlined above and throughout this article.

Again, if you buy a BusKill cable, the worst that can happen is your computer will abruptly shutdown.

Assumptions

This guide necessarily makes several assumptions outlined below.

sys-usb

In this guide, we assume that your QubesOS install has a USB-Qube named 'sys-usb' for handling USB events on behalf of dom0.

If you decided to combine your USB and networking Qubes at install time, then replace all references in this guide for 'sys-usb' to 'sys-net'.

If you decided to run your 'sys-usb' VM as a DispoableVM at install time, then replace all references in this guide for 'sys-usb' its Disposable TemplateVM (eg 'fedora-36-dvm').

..And if you chose not to isolate your USB devices, then may god help you.

Udev Device Matching

BusKill in Linux uses udev to detect when the USB's cable is severed. The exact udev rule that you use in the files below will depend on the drive you choose to use in your BusKill cable.

In this guide, we identify our BusKill-specific drive with the 'ENV{ID_MODEL}=="Micromax_A74"' udev property. You should replace this property with one that matches your BusKill-specific drive.

To determine how to query your USB drive for device-specific identifiers, see Introducing BusKill: A Kill Cord for your Laptop. Note that the `udevadm monitor --environment --udev` command should be run in the 'sys-usb' Qube.

ⓘ Note: If you'd prefer to buy a BusKill cable than make your own, you can buy one fully assembled here.

QubesOS Version

This guide was written for QubesOS v4.1.

[user@dom0 ~]$ cat /etc/redhat-release Qubes release 4.1.2 (R4.1)
[user@dom0 ~]$

BusKill Files

This section will describe what files should be created and where.

Due to the design of QubesOS, it takes a bit of mental gymnastics to understand what we're doing and why. It's important to keep in mind that, in QubesOS

  1. The keyboard and UI are configured in 'dom0'
  2. USB devices (like the BusKill device) are routed to the 'sys-usb' VM
  3. dom0 has the privilege to execute scripts inside other VMs (eg 'sys-usb')
  4. By design, VMs should *not* be able to send arbitrary commands to be executed in dom0
  5. ...but via the qubes-rpc, we can permit some VMs (eg 'sys-usb') to execute a script in dom0 (though for security reasons, ideally such that no data/input is sent from the less-trusted VM to dom0 -- other than the name of the script)

Due to the constraints listed above:

  1. We'll be configuring the disarm button as keyboard shortcut in dom0
  2. We'll be saving and executing the 'buskill-disarm.sh' script in 'sys-usb' (because these scripts manipulate our udev rules)
  3. The keyboard shortcut in dom0 will actually be executing the above script in 'sys-usb'

sys-usb

If you followed our previous guide to setting-up BusKill in QubesOS, then you should already have a file in 'sys-usb' at '/rw/config/buskill.rules'. You may even have modified it to trigger a LUKS Self-Destruct on removal of your BusKill device.

Because you're now experimenting with a new setup, let's go ahead and wipe out that old file with a new one that just executes a soft-shutdown. You might need some days to get used to the new disarm procedure, and you probably don't want to suddenly loose all your data due to an accidental false-positive!

Execute the following on your 'sys-usb' Qube:

mv /rw/config/buskill.rules /rw/config/buskill.rules.bak.`date "+%Y%m%d_%H%M%S"`
cat << EOF | sudo tee /rw/config/buskill.rules
################################################################################
# File:    sys-usb:/etc/udev/rules.d/buskill.rules -> /rw/config/buskill.rules
# Purpose: Add buskill rules. For more info, see: https://buskill.in/qubes-os/
# Authors: Michael Altfield 
# Created: 2020-01-02
# License: GNU GPLv3
################################################################################
ACTION=="remove", SUBSYSTEM=="usb", ENV{ID_MODEL}=="Micromax_A74", RUN+="/usr/bin/qrexec-client-vm dom0 buskill.softShutdown"
EOF
sudo ln -s /rw/config/buskill.rules /etc/udev/rules.d/
sudo udevadm control --reload

Now, let's add a new udev '.rules' file. This one will always just lock your screen, and it's what will be put in-place when BusKill is "disarmed".

Execute the following on your 'sys-usb' Qube:

cat << EOF | sudo tee /rw/config/buskill.lock.rules
################################################################################
# File:    sys-usb:/etc/udev/rules.d/buskill.rules -> /rw/config/buskill.lock.rules
# Purpose: Just lock the screen. For more info, see: https://buskill.in/qubes-os/
# Authors: Michael Altfield 
# Created: 2023-05-10
# License: GNU GPLv3
################################################################################
ACTION=="remove", SUBSYSTEM=="usb", ENV{ID_MODEL}=="Micromax_A74", RUN+="/usr/bin/qrexec-client-vm dom0 buskill.lock"
EOF

The careful reader will see that we're not actually disarming BusKill in the same sense as our BusKill GUI app. Indeed, what we're actually going to do is swap these two files for 30 seconds.

This way, if BusKill is armed and you remove the cable, your computer shuts-down.

But if you want to disarm, the procedure becomes:

  1. Hit the "Disarm BusKill" keyboard shortcut (see below)
  2. Wait for the toast popup message indicating that BusKill is now disarmed
  3. Remove the cable within 30 seconds
  4. Your screen locks (instead of shutting down)

Personally, I can't think of a QubesOS user that would want to leave their machine unlocked when they go to the bathroom, so I figured this approach would work better than an actual disarm.

Bonus: when you return from your break, just plug-in the BusKill cable in, and it'll already be armed (reducing the risk of user error due to forgetting to arm BusKill).

Now, let's add the actual 'buskill-disarm.sh' script to disarm BusKill:

Execute the following on your 'sys-usb' Qube:

cat << EOF | sudo tee /usr/local/bin/buskill-disarm.sh
#!/bin/bash
 
################################################################################
# File:    sys-usb:/usr/local/bin/buskill-disarm.sh
# Purpose: Temp disarm BusKill. For more info, see: https://buskill.in/qubes-os/
# Authors: Tom 
# Co-Auth: Michael Altfield 
# Created: 2023-05-10
# License: GNU GPLv3
################################################################################
 
# replace the 'shutdown' trigger with the 'lock' trigger
sudo rm /etc/udev/rules.d/buskill.rules
sudo ln -s /rw/config/buskill.lock.rules /etc/udev/rules.d/buskill.rules
sudo udevadm control --reload
 
# let the user know that BusKill is now temporarily disarmed
notify-send -t 21000 "BusKill" "Disarmed for 30 seconds" -i changes-allow
 
# wait 30 seconds
sleep 30
 
# replace the 'lock' trigger with the 'shutdown' trigger
sudo rm /etc/udev/rules.d/buskill.rules
sudo ln -s /rw/config/buskill.rules /etc/udev/rules.d/buskill.rules
sudo udevadm control --reload
notify-send -t 5000 "BusKill" "BusKill is Armed" -i changes-prevent
EOF
sudo chmod +x /usr/local/bin/buskill-disarm.sh

dom0

If you followed our previous guide to setting-up BusKill in QubesOS, then you shouldn't need to add any files to dom0. What you do need to do is setup some keyboard shortcuts.

In the QubesOS GUI, click on the big Q "Start Menu" in the top-left of your XFCE panel to open the Applications menu. Navigate to 'System Tools' and click Keyboard

Screenshot of QubesOS with an arrow pointing to the "Q" Application Menu in the very top-left of the screen Screenshot of QubesOS Application Menu with "System Tools -> Keyboard" highlighted
Click the “Q” to open the QubesOS Application Menu Click System Tools -> Keyboard

Click the 'Application Shortcuts' Tab and then click the '+ Add' button on the bottom-left of the window.

Screenshot of QubesOS Keyboard Settings Window that shows the "Application Shortcuts" tab highlighted'alt Screenshot of QubesOS Keyboard Settings Window that shows the "+ Add" button highlightedalt
Click the “Application Shortcuts” tab to add a Keyboard Shortcut in Qubes Click the “Add” Button to add a new Keyboard Shortcut in Qubes

In the 'Command' input field, type the following

qvm-run sys-usb buskill-disarm.sh

The above command will execute a command in 'dom0' that will execute a command in 'sys-usb' that will execute the 'buskill-disarm.sh' script that we created above.

Screenshot of QubesOS Keyboard Settings Window that shows the \"OK\" button highlighted
After typing the command to be executed when the keyboard shortcut is pressed, click the "OK" button

Now click "OK" and, when prompted, type Ctrl+Shift+D (or whatever keyboard shortcut you want to bind to "Disarming BusKill").

Screenshot of QubesOS Keyboard Settings Window that shows the prompt "Press now the keyboard keys you want to use to trigger the command..."alt Screenshot of QubesOS Keyboard Settings Window that shows the selected Shortcut "Shift+Ctrl+D"
Type "Ctrl+Shift+D" or whatever keyboard shortcut you want to trigger BusKill to be disarmed for 30 seconds                                            

You should now have a keyboard shortcut binding for disarming BusKill!

Screenshot of QubesOSKeyboard Settings Window that shows the newly created keyboard shortcutfor \"Shift+Ctrl+D\" at the top of thelist

Test It!

At this point, you can test your new (temporary) BusKill Disarm functionality by:

  1. Plugging-in your BusKill cable
  2. Typing Ctrl+Shift+D
  3. Waiting for the toast popup message to appear indicating that BusKill is disarmed for 30 seconds
  4. Unplugging your BusKill cable

Your machine should lock, not shutdown.

Screenshot of QubesOS with a toast message in the top-right that says \"BusKill Disarmed for 30 Seconds\"
After hitting the keyboard shortcut to disarm BusKill, you have 30 seconds to remove the cable

After 30 seconds, return to your computer and test the normal "arm" functionality:

  1. Plug-in your BusKill cable
  2. Unlock your screen
  3. Unplug your BusKill cable

Your computer should shutdown, not lock.

Screenshot of QubesOS with a toast message in the top-right that says \"BusKill is Armed\"
30 seconds after hitting the keyboard shortcut, BusKill will arm itself

Troubleshooting

Is unplugging your USB device doing nothing? Having other issues?

See the Troubleshooting section in our original guide to using BusKill on QubesOS.

Limitations/Improvements

Security is porous. All software has bugs. Nothing is 100% secure. For more limitations to using BusKill on QubesOS, see the Limitations section in our original guide to using BusKill on QubesOS.

Buy a BusKill Cable

We look forward to continuing to improve the BusKill software and making BusKill more accessible this year. If you want to help, please consider purchasing a BusKill cable for yourself or a loved one. It helps us fund further development, and you get your own BusKill cable to keep you or your loved ones safe.

You can also buy a BusKill cable with bitcoin, monero, and other altcoins from our BusKill Store's .onion site.

Stay safe,
The BusKill Team
https://www.buskill.in/
http://www.buskillvampfih2iucxhit3qp36i2zzql3u6pmkeafvlxs3tlmot5yad.onion
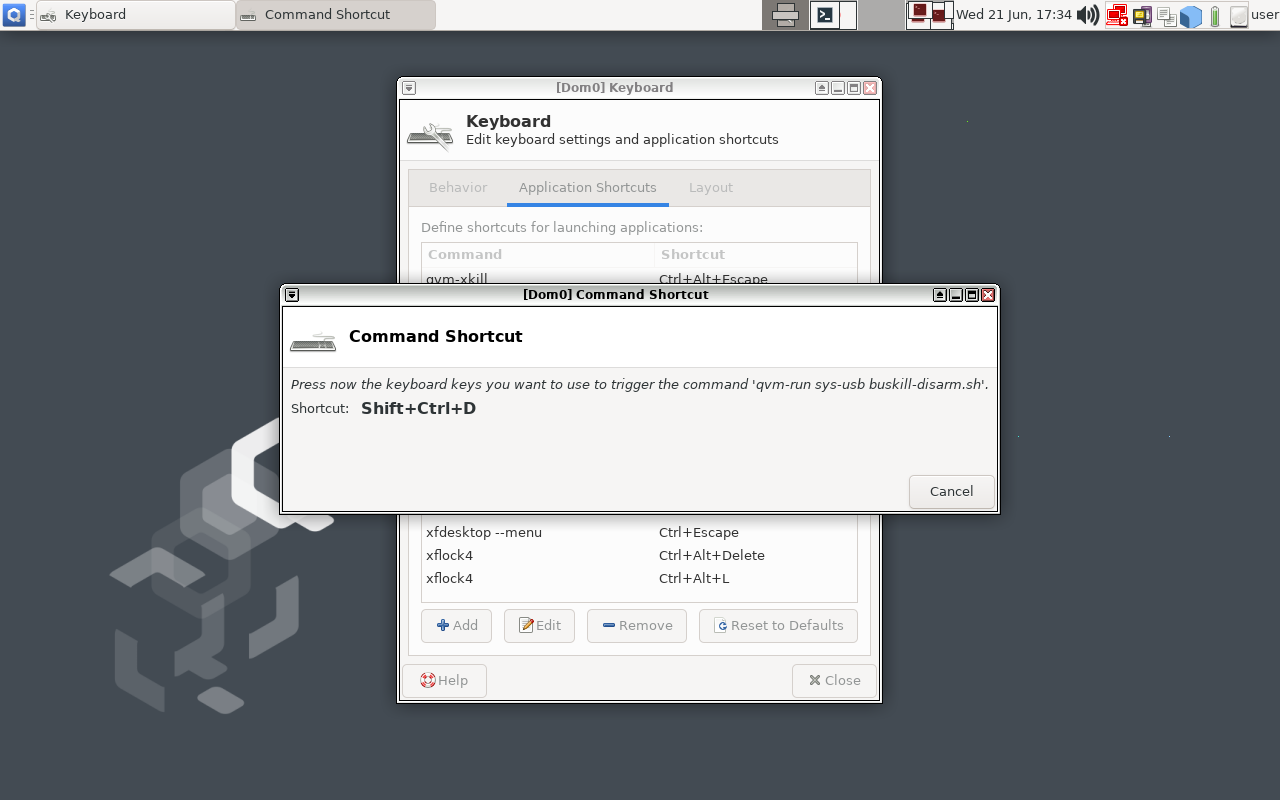
 

This article describes how to setup keyboard shortcuts in QubesOS so that you can temporarily disarm (pause) the BusKill laptop kill cord.

This allows the user to, for example, go to the bathroom without causing their computer to shutdown or self-destruct.

Arm & Disarm BusKill in QubesOS

This is a guide that builds on part one: A Laptop Kill Cord for QubesOS (1/2). Before reading this, you should already be familiar with how to setup udev rules for BusKill on QubesOS.

  1. A Laptop Kill Cord for QubesOS (1/2)
  2. Disarm BusKill in QubesOS (2/2)

ⓘ Note: This post is adapted from its original article on Tom Hocker's blog.

What is BusKill?

What if someone literally steals your laptop while you're working with classified information inside a Whonix DispVM? They'd also be able to recover data from previous DispVMs--as Disposable VM's rootfs virtual files are not securely shredded after your DispVM is destroyed.

Are you a security researcher, journalist, or intelligence operative that works in QubesOS--exploiting Qubes' brilliant security-through-compartimentalization to keep your data safe? Do you make use of Whonix Disposable VMs for your work? Great! This post is for you.

I'm sure your QubesOS laptop has Full Disk Encryption and you're using a strong passphrase. But what if someone literally steals your laptop while you're working with classified information inside a Whonix DispVM? Not only will they get access to all of your AppVM's private data and the currently-running Whonix DispVM's data, but there's a high chance they'd be able to recover data from previous DispVMs--as Disposable VM's rootfs virtual files (volatile.img) are not securely shredded after your DispVM is destroyed by Qubes!

Let's say you're a journalist, activist, whistleblower, or a human rights worker in an oppressive regime. Or an intelligence operative behind enemy lines doing research or preparing a top-secret document behind a locked door. What do you do to protect your data, sources, or assets when the secret police suddenly batter down your door? How quickly can you actually act to shutdown your laptop and shred your RAM and/or FDE encryption keys?

BusKill Demo
Watch the BusKill Explainer Video for more info youtube.com/v/qPwyoD_cQR4

BusKill utilizes a magnetic trip-wire that tethers your body to your laptop. If you suddenly jump to your feet or fall off your chair (in response to the battering ram crashing through your door) or your laptop is ripped off your table by a group of armed thugs, the data bus' magnetic connection will be severed. This event causes a configurable trigger to execute.

The BusKill trigger can be anything from:

  1. locking your screen or
  2. shutting down the computer or
  3. initiating a self-destruct sequence

While our last post described how to setup such a system in QubesOS with BusKill, this post will describe how to add keyboard shortcuts to arm & disarm the dead man switch (eg so you can go to the bathroom).

Disclaimer

This guide contains experimental files, commands, and software. The information contained in this article may or may not lead to corruption or total permanent deletion of some or all of your data. We've done our best to carefully guide the user so they know the risks of each BusKill trigger, but we cannot be responsible for any data loss that has occurred as a result of following this guide.

The contents of this guide is provided openly and is licensed under the CC-BY-SA license. The software included in this guide is licensed under the GNU GPLv3 license. All content here is consistent with the limitations of liabilities outlined in its respective licenses.

We highly recommend that any experiments with the scripts included in this article are used exclusively on a disposable machine containing no valuable data.

If data loss is a concern for you, then leave now and do not proceed with following this guide. You have been warned.

Release Note

Also be aware that, due to the risks outlined above, BusKill will not be released with this "self-destruct" trigger.

If you purchase a BusKill cable, it will only ship with non-destructive triggers that lock the screen or shutdown the computer. Advanced users can follow guides to add additional destructive triggers, such as the one described in this post, but they should do so at their own risk--taking carefully into consideration all of the warnings outlined above and throughout this article.

Again, if you buy a BusKill cable, the worst that can happen is your computer will abruptly shutdown.

Assumptions

This guide necessarily makes several assumptions outlined below.

sys-usb

In this guide, we assume that your QubesOS install has a USB-Qube named 'sys-usb' for handling USB events on behalf of dom0.

If you decided to combine your USB and networking Qubes at install time, then replace all references in this guide for 'sys-usb' to 'sys-net'.

If you decided to run your 'sys-usb' VM as a DispoableVM at install time, then replace all references in this guide for 'sys-usb' its Disposable TemplateVM (eg 'fedora-36-dvm').

..And if you chose not to isolate your USB devices, then may god help you.

Udev Device Matching

BusKill in Linux uses udev to detect when the USB's cable is severed. The exact udev rule that you use in the files below will depend on the drive you choose to use in your BusKill cable.

In this guide, we identify our BusKill-specific drive with the 'ENV{ID_MODEL}=="Micromax_A74"' udev property. You should replace this property with one that matches your BusKill-specific drive.

To determine how to query your USB drive for device-specific identifiers, see Introducing BusKill: A Kill Cord for your Laptop. Note that the `udevadm monitor --environment --udev` command should be run in the 'sys-usb' Qube.

ⓘ Note: If you'd prefer to buy a BusKill cable than make your own, you can buy one fully assembled here.

QubesOS Version

This guide was written for QubesOS v4.1.

[user@dom0 ~]$ cat /etc/redhat-release Qubes release 4.1.2 (R4.1)
[user@dom0 ~]$

BusKill Files

This section will describe what files should be created and where.

Due to the design of QubesOS, it takes a bit of mental gymnastics to understand what we're doing and why. It's important to keep in mind that, in QubesOS

  1. The keyboard and UI are configured in 'dom0'
  2. USB devices (like the BusKill device) are routed to the 'sys-usb' VM
  3. dom0 has the privilege to execute scripts inside other VMs (eg 'sys-usb')
  4. By design, VMs should *not* be able to send arbitrary commands to be executed in dom0
  5. ...but via the qubes-rpc, we can permit some VMs (eg 'sys-usb') to execute a script in dom0 (though for security reasons, ideally such that no data/input is sent from the less-trusted VM to dom0 -- other than the name of the script)

Due to the constraints listed above:

  1. We'll be configuring the disarm button as keyboard shortcut in dom0
  2. We'll be saving and executing the 'buskill-disarm.sh' script in 'sys-usb' (because these scripts manipulate our udev rules)
  3. The keyboard shortcut in dom0 will actually be executing the above script in 'sys-usb'

sys-usb

If you followed our previous guide to setting-up BusKill in QubesOS, then you should already have a file in 'sys-usb' at '/rw/config/buskill.rules'. You may even have modified it to trigger a LUKS Self-Destruct on removal of your BusKill device.

Because you're now experimenting with a new setup, let's go ahead and wipe out that old file with a new one that just executes a soft-shutdown. You might need some days to get used to the new disarm procedure, and you probably don't want to suddenly loose all your data due to an accidental false-positive!

Execute the following on your 'sys-usb' Qube:

mv /rw/config/buskill.rules /rw/config/buskill.rules.bak.`date "+%Y%m%d_%H%M%S"`
cat << EOF | sudo tee /rw/config/buskill.rules
################################################################################
# File:    sys-usb:/etc/udev/rules.d/buskill.rules -> /rw/config/buskill.rules
# Purpose: Add buskill rules. For more info, see: https://buskill.in/qubes-os/
# Authors: Michael Altfield 
# Created: 2020-01-02
# License: GNU GPLv3
################################################################################
ACTION=="remove", SUBSYSTEM=="usb", ENV{ID_MODEL}=="Micromax_A74", RUN+="/usr/bin/qrexec-client-vm dom0 buskill.softShutdown"
EOF
sudo ln -s /rw/config/buskill.rules /etc/udev/rules.d/
sudo udevadm control --reload

Now, let's add a new udev '.rules' file. This one will always just lock your screen, and it's what will be put in-place when BusKill is "disarmed".

Execute the following on your 'sys-usb' Qube:

cat << EOF | sudo tee /rw/config/buskill.lock.rules
################################################################################
# File:    sys-usb:/etc/udev/rules.d/buskill.rules -> /rw/config/buskill.lock.rules
# Purpose: Just lock the screen. For more info, see: https://buskill.in/qubes-os/
# Authors: Michael Altfield 
# Created: 2023-05-10
# License: GNU GPLv3
################################################################################
ACTION=="remove", SUBSYSTEM=="usb", ENV{ID_MODEL}=="Micromax_A74", RUN+="/usr/bin/qrexec-client-vm dom0 buskill.lock"
EOF

The careful reader will see that we're not actually disarming BusKill in the same sense as our BusKill GUI app. Indeed, what we're actually going to do is swap these two files for 30 seconds.

This way, if BusKill is armed and you remove the cable, your computer shuts-down.

But if you want to disarm, the procedure becomes:

  1. Hit the "Disarm BusKill" keyboard shortcut (see below)
  2. Wait for the toast popup message indicating that BusKill is now disarmed
  3. Remove the cable within 30 seconds
  4. Your screen locks (instead of shutting down)

Personally, I can't think of a QubesOS user that would want to leave their machine unlocked when they go to the bathroom, so I figured this approach would work better than an actual disarm.

Bonus: when you return from your break, just plug-in the BusKill cable in, and it'll already be armed (reducing the risk of user error due to forgetting to arm BusKill).

Now, let's add the actual 'buskill-disarm.sh' script to disarm BusKill:

Execute the following on your 'sys-usb' Qube:

cat << EOF | sudo tee /usr/local/bin/buskill-disarm.sh
#!/bin/bash
 
################################################################################
# File:    sys-usb:/usr/local/bin/buskill-disarm.sh
# Purpose: Temp disarm BusKill. For more info, see: https://buskill.in/qubes-os/
# Authors: Tom 
# Co-Auth: Michael Altfield 
# Created: 2023-05-10
# License: GNU GPLv3
################################################################################
 
# replace the 'shutdown' trigger with the 'lock' trigger
sudo rm /etc/udev/rules.d/buskill.rules
sudo ln -s /rw/config/buskill.lock.rules /etc/udev/rules.d/buskill.rules
sudo udevadm control --reload
 
# let the user know that BusKill is now temporarily disarmed
notify-send -t 21000 "BusKill" "Disarmed for 30 seconds" -i changes-allow
 
# wait 30 seconds
sleep 30
 
# replace the 'lock' trigger with the 'shutdown' trigger
sudo rm /etc/udev/rules.d/buskill.rules
sudo ln -s /rw/config/buskill.rules /etc/udev/rules.d/buskill.rules
sudo udevadm control --reload
notify-send -t 5000 "BusKill" "BusKill is Armed" -i changes-prevent
EOF
sudo chmod +x /usr/local/bin/buskill-disarm.sh

dom0

If you followed our previous guide to setting-up BusKill in QubesOS, then you shouldn't need to add any files to dom0. What you do need to do is setup some keyboard shortcuts.

In the QubesOS GUI, click on the big Q "Start Menu" in the top-left of your XFCE panel to open the Applications menu. Navigate to 'System Tools' and click Keyboard

Screenshot of QubesOS with an arrow pointing to the "Q" Application Menu in the very top-left of the screen Screenshot of QubesOS Application Menu with "System Tools -> Keyboard" highlighted
Click the “Q” to open the QubesOS Application Menu Click System Tools -> Keyboard

Click the 'Application Shortcuts' Tab and then click the '+ Add' button on the bottom-left of the window.

Screenshot of QubesOS Keyboard Settings Window that shows the "Application Shortcuts" tab highlighted'alt Screenshot of QubesOS Keyboard Settings Window that shows the "+ Add" button highlightedalt
Click the “Application Shortcuts” tab to add a Keyboard Shortcut in Qubes Click the “Add” Button to add a new Keyboard Shortcut in Qubes

In the 'Command' input field, type the following

qvm-run sys-usb buskill-disarm.sh

The above command will execute a command in 'dom0' that will execute a command in 'sys-usb' that will execute the 'buskill-disarm.sh' script that we created above.

Screenshot of QubesOS Keyboard Settings Window that shows the \"OK\" button highlighted
After typing the command to be executed when the keyboard shortcut is pressed, click the "OK" button

Now click "OK" and, when prompted, type Ctrl+Shift+D (or whatever keyboard shortcut you want to bind to "Disarming BusKill").

Screenshot of QubesOS Keyboard Settings Window that shows the prompt "Press now the keyboard keys you want to use to trigger the command..."alt Screenshot of QubesOS Keyboard Settings Window that shows the selected Shortcut "Shift+Ctrl+D"
Type "Ctrl+Shift+D" or whatever keyboard shortcut you want to trigger BusKill to be disarmed for 30 seconds                                            

You should now have a keyboard shortcut binding for disarming BusKill!

Screenshot of QubesOSKeyboard Settings Window that shows the newly created keyboard shortcutfor \"Shift+Ctrl+D\" at the top of thelist

Test It!

At this point, you can test your new (temporary) BusKill Disarm functionality by:

  1. Plugging-in your BusKill cable
  2. Typing Ctrl+Shift+D
  3. Waiting for the toast popup message to appear indicating that BusKill is disarmed for 30 seconds
  4. Unplugging your BusKill cable

Your machine should lock, not shutdown.

Screenshot of QubesOS with a toast message in the top-right that says \"BusKill Disarmed for 30 Seconds\"
After hitting the keyboard shortcut to disarm BusKill, you have 30 seconds to remove the cable

After 30 seconds, return to your computer and test the normal "arm" functionality:

  1. Plug-in your BusKill cable
  2. Unlock your screen
  3. Unplug your BusKill cable

Your computer should shutdown, not lock.

Screenshot of QubesOS with a toast message in the top-right that says \"BusKill is Armed\"
30 seconds after hitting the keyboard shortcut, BusKill will arm itself

Troubleshooting

Is unplugging your USB device doing nothing? Having other issues?

See the Troubleshooting section in our original guide to using BusKill on QubesOS.

Limitations/Improvements

Security is porous. All software has bugs. Nothing is 100% secure. For more limitations to using BusKill on QubesOS, see the Limitations section in our original guide to using BusKill on QubesOS.

Buy a BusKill Cable

We look forward to continuing to improve the BusKill software and making BusKill more accessible this year. If you want to help, please consider purchasing a BusKill cable for yourself or a loved one. It helps us fund further development, and you get your own BusKill cable to keep you or your loved ones safe.

You can also buy a BusKill cable with bitcoin, monero, and other altcoins from our BusKill Store's .onion site.

Stay safe,
The BusKill Team
https://www.buskill.in/
http://www.buskillvampfih2iucxhit3qp36i2zzql3u6pmkeafvlxs3tlmot5yad.onion
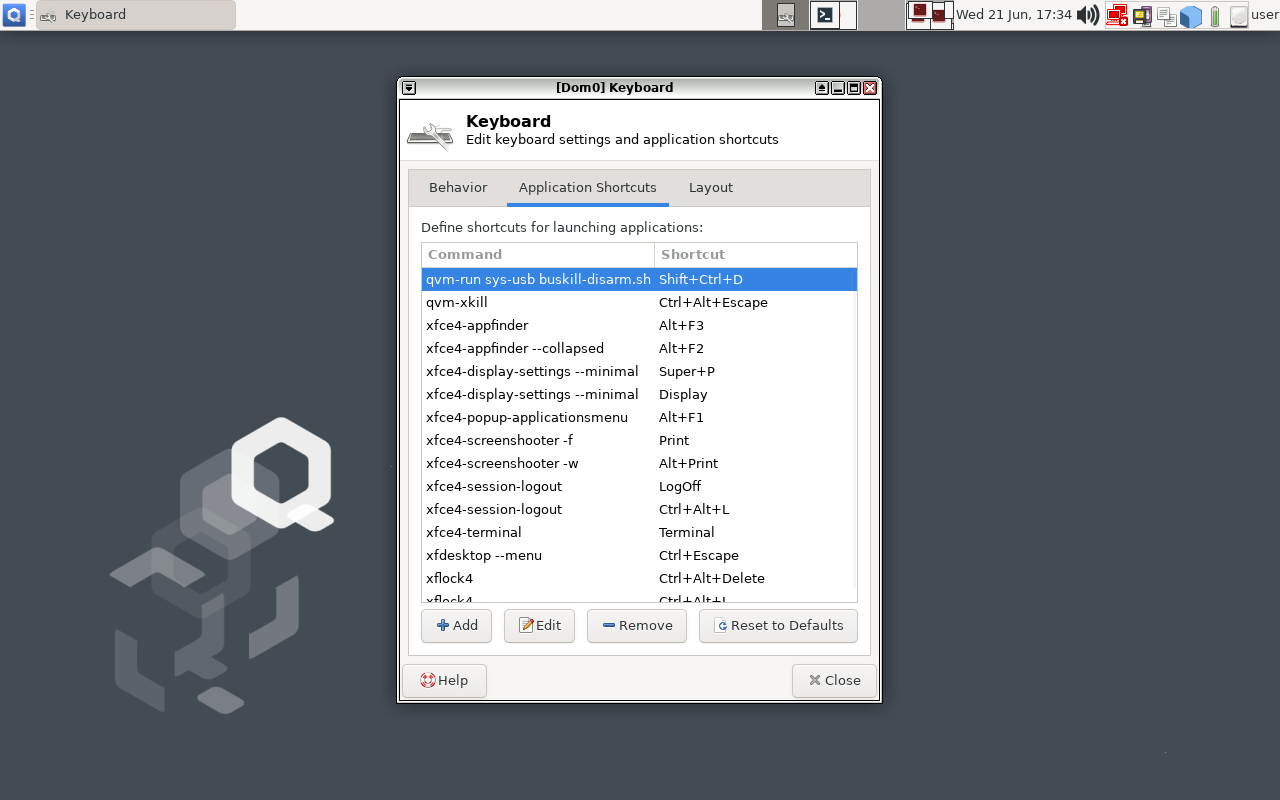
[–] [email protected] 2 points 1 year ago

This article is literally a guide to building your own.

[–] [email protected] 0 points 1 year ago* (last edited 1 year ago)

It has a magnetic (de)coupler, which allows it to break away at any angle if your laptop is physically snatched away from you.

Some of our users actually use the BusKill cable with a Yubikey:

If that's not clear, I highly recommend watching this 2-minute explainer video

[–] [email protected] 4 points 1 year ago* (last edited 1 year ago)

I build open-source USB Dead Man Switches and the accompanying (also free) software

What is BusKill? (Explainer Video)
Watch the BusKill Explainer Video for more info youtube.com/v/qPwyoD_cQR4

You attach the kill cable to your body and if the connection between you to your computer is severed, then your device will lock, shutdown, or shred its encryption keys. It's designed to protect high-risk users’ data. Data could include private keys (eg theft of cryptocurrency assets), contacts of correspondence (eg sources of a journalist – such as whistleblowers), etc.

[–] [email protected] 5 points 1 year ago* (last edited 1 year ago)

I've paid myself nothing so-far. The price just barely breaks-even for the business. There's one-time costs like a few grand for a CNC'd injection mold and assembly jig, but also certification fees, product boxes, cardstock paper for documentation inserts, printing fees, artist commissions, packaging materials, warehousing, shipping, other logistics fees, etc.

All of this is explained in-detail in "The Finances" section here.

I prefer open-source hardware to be designed using common off-the-shelf items that are easily found everywhere in the world. Unfortunately, the one vendor of a USB-A magnetic breakaway couplers decided to EOL their product shortly after I published a guide on how to build your own BusKill cable. After we published, they all got sold-out, and we had to go to manufacturers for a custom component.

Prices would drop dramatically if we could do production runs (and actually sell) >10,000 units at a time. Currently we only sell a few cables per month. If you want to help, please tell all your security-conscious friends about BusKill :)

[–] [email protected] 2 points 1 year ago

It should only be posted once to this community. It's also been cross-posted to other relevant communities.

[–] [email protected] 4 points 1 year ago* (last edited 1 year ago) (2 children)

Unfortunately, that's what it costs to make open-source hardware at small-scale.

There's a cheaper $59 cable available or you could build your own.

[–] [email protected] 8 points 1 year ago* (last edited 1 year ago)

Theft of high-risk users' data. Data could include private keys (eg theft of cryptocurrency assets), contacts of correspondence (eg sources of a journalist -- such as whistleblowers), etc.

For more information, see the Who Uses BusKill? section of the documentation.

[–] [email protected] 2 points 1 year ago

Yeah, once they document how to use it, I hope they also publish an PSA telling all users to disable their existing keys and migrate to using Restricted API Keys

[–] [email protected] 2 points 1 year ago (2 children)

I consider "support" for this as having it documented. It's not a boolean "on" / "off". To "support Restricted API Keys" would mean that they document the minimum set of permissions required (which is a long list of properties, each set to "none" or "read" or "write").

Indeed, I'm very happy to see they've changed it from 'low-priority' to 'high-priority'. Hopefully they'll update the documentation with the permissions needed for Restricted API Keys soon.

[–] [email protected] 3 points 1 year ago* (last edited 1 year ago) (1 children)

The problem is that creating a "Restricted API Key" means you have to tick "read" or "write" for dozens of different API "resource types".

So if WooCommerce doesn't document which resource types are needed, then "Restricted API Keys" are basically not supported because even security-conscious users cannot know how to produce a key that is fully functional yet satisfies the PoLP.

view more: ‹ prev next ›